Weld Add Path Options window
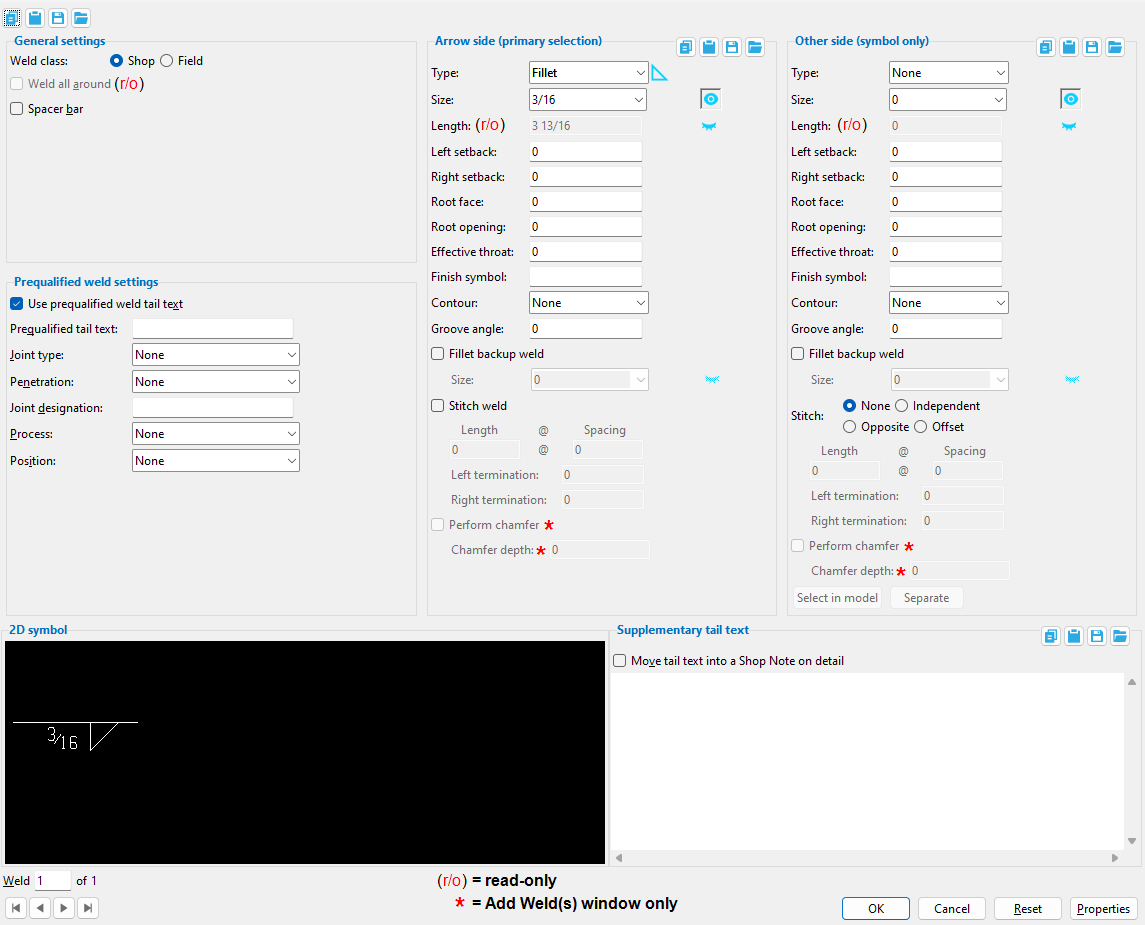
Add/Edit Weld(s) window
This window assists with the creation of welds and sets certain weld attributes on the Add Weld(s) window.
Add/Edit Weld(s): This window opens when using the Weld Add, Weld Add Layout, and Weld Edit commands.
This window allows you review or change the type, size, and other attributes of welds.
- General Overview
- Tips and Tricks
- Related Tools
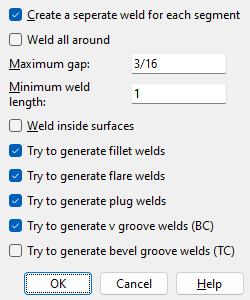
Weld Add Path Options window
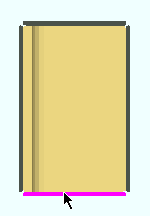
Create a separate weld for each segment: ![]() or
or ![]() . This appears on the Weld Add Path Options window only. It does not appear on the Add/Edit Weld(s) window.
. This appears on the Weld Add Path Options window only. It does not appear on the Add/Edit Weld(s) window.
 |
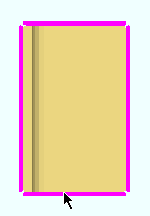 |
If this box is checked (
), then each weld segment that is added during the Weld Add operation will considered to be a distinct weld. In some cases, auto detailing is better able to recognize such welds, and they, therefore, may produce better details.
If the box is not checked (
), the weld segments that are added during the same Weld Add operation are considered to be the same weld. This means that if you select one of the weld segments, all of the weld segments will be selected, and any changes made to the one weld segment on the Edit Weld(s) window will be applied to all of the weld segments.
 |
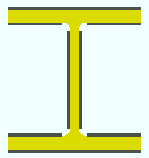 |
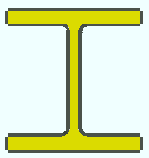
If this box is checked (
), a continuous weld is generated around every edge of the material, including material radii.
If the box is not checked (
), weld is not generated on curved surfaces or on the thickness edges or toes of material.
Report Writer: MemberMaterial.Weld.WeldAllAround
Advanced Selection: WeldAllAround
Parametric module: WeldAllAround
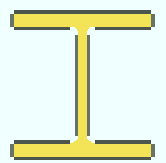
Maximum gap: The distance that to-be-welded materials must be closer together than. This appears on the Weld Add Path Options window only. It does not appear on the Edit Weld(s) window.
Maximum gap is greater than the actual gap.
 |
The actual gap is greater than the Maximum gap.
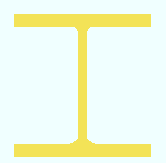 |
After you press OK to close this window: If the maximum gap entered here is greater than the actual gap between the two pieces of material to be welded together, a weld is generated. If the actual gap is greater than the maximum, a weld is not generated.
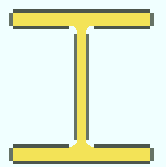
Minimum weld length: The distance that you want to be the minimum length of weld allowed to be generated. This appears on the Weld Add Path Options window only. It does not appear on the Edit Weld(s) window.
Minimum weld length is less than the flange thickness.
 |
Minimum weld length is greater than the flange thickness.
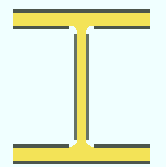 |
Effect on the 3D model: If the minimum length entered here is longer than a to-be-welded edge or surface, that edge will not be welded (as shown in the example above).
Weld inside surfaces: ![]() or
or ![]() . This appears on the Weld Add Path Options window only. It does not appear on the Edit Weld(s) window.
. This appears on the Weld Add Path Options window only. It does not appear on the Edit Weld(s) window.
 |
 |
If this box is checked (
), Weld Add welds both the inside and outside surfaces of a HSS round or HSS rectangular section.
If the box is not checked (
), only the outside of the HSS round or HSS rectangular is welded.
Try to generate fillet welds: ![]() or
or ![]() . This appears on the Weld Add Path Options window only. It does not appear on the Edit Weld (s) window.
. This appears on the Weld Add Path Options window only. It does not appear on the Edit Weld (s) window.
If this box is checked (
), Weld Add generates fillet welds to create welded joints if possible. After you press OK on the Weld Add Path Options window, you can remove any unwanted welds that are generated.
If the box is not checked (
), Weld Add does not generate fillet welds.
Warning: Multiple Try to generate... options may be checked simultaneously, which may produce clashing welds. It is recommended that you uncheck (
) the Try to generate... options for unneeded weld types—this is usually easier than locating and deleting unwanted welds.
Try to generate flare welds: ![]() or
or ![]() . This appears on the Weld Add Path Options window only. It does not appear on the Add/Edit Weld(s) window. Multiple Try to generate... options may be checked, which may produce clashing welds. After you press OK on the Weld Add Path Options window, you can remove any unwanted welds that are generated.
. This appears on the Weld Add Path Options window only. It does not appear on the Add/Edit Weld(s) window. Multiple Try to generate... options may be checked, which may produce clashing welds. After you press OK on the Weld Add Path Options window, you can remove any unwanted welds that are generated.
If this box is checked (
), Weld Add generates flare welds to create welded joints if possible.
If the box is not checked (
), Weld Add does not generate flare welds.
Try to generate plug welds: ![]() or
or ![]() . This appears on the Weld Add Path Options window only. It does not appear on the Edit Weld(s) window. Multiple Try to generate... options may be checked, which may produce clashing welds. After you press OK on the Weld Add Path Options window, you can remove any unwanted welds that are generated.
. This appears on the Weld Add Path Options window only. It does not appear on the Edit Weld(s) window. Multiple Try to generate... options may be checked, which may produce clashing welds. After you press OK on the Weld Add Path Options window, you can remove any unwanted welds that are generated.
If this box is checked (
), Weld Add generates plug welds to create welded joints if possible.
If the box is not checked (
), Weld Add does not generate plug welds.
Try to generate v groove welds (BC): ![]() or
or ![]() . This appears on the Weld Add Path Options window only. It does not appear on the Edit Weld(s) window. Multiple Try to generate... options may be checked, which may produce clashing welds. After you press OK on the Weld Add Path Options window, you can remove any unwanted welds that are generated.
. This appears on the Weld Add Path Options window only. It does not appear on the Edit Weld(s) window. Multiple Try to generate... options may be checked, which may produce clashing welds. After you press OK on the Weld Add Path Options window, you can remove any unwanted welds that are generated.
If this box is checked (
), Weld Add generates V-groove welds to create welded T- or corner joints if possible.
If the box is not checked (
), Weld Add does not generate V- groove welds.
Try to generate bevel groove welds (TC): ![]() or
or ![]() . This appears on the Weld Add Path Options window, for Weld Add operations only. It does not appear on the Add/Edit Weld(s) window. Multiple Try to generate... options may be checked, which may produce clashing welds. After you press OK on the Weld Add Path Options window, you can remove any unwanted welds that are generated.
. This appears on the Weld Add Path Options window, for Weld Add operations only. It does not appear on the Add/Edit Weld(s) window. Multiple Try to generate... options may be checked, which may produce clashing welds. After you press OK on the Weld Add Path Options window, you can remove any unwanted welds that are generated.
If this box is checked (
), Weld Add generates bevel groove welds to create welded T- or corner joints if possible.
If the box is not checked (
), Weld Add does not generate bevel groove welds.
Add/Edit Weld(s) window
General settings
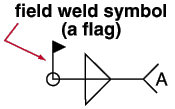
Field means that the materials being welded together are submaterials of different members. System connections for which 3D field welds are generated automatically include HSS braces field welded to gusset plates, welded column splices, welded moment connections and shear plates set to be Attached to the Supported. Field welds are not drawn on member details. A flag like that shown in the weld symbol above indicates that the weld is a field weld.
Shop means that the materials being welded are submaterials of the same member. The materials are shop welded. A weld symbol will be generated on the member detail when you Detail the member.
Status Display: Weld status > Shop weld
Status Display: Weld status > Field weld
Detail Erection Views: Show 3D field welds and Show 3D shop welds
Report Writer: MemberMaterial.Weld.FieldWeld
Advanced Selection: FieldWeld
Parametric module: FieldWeld
Weld all around: ![]() or
or ![]() (read only)
(read only)

|
The circle on the end of this 2D Symbol designates weld-all-around. |
If this box is checked (
), then Weld-all-around was checked (
) when this weld was added—if this weld is a user-added weld. If this weld is a system generated weld, then Weld pattern is set to All around on an auto base/cap plate, or the column with the base/cap plate is an HSS round, or Weld all around for a user base/cap plate is set to Yes or Automatic.
If the box is not checked (
), the weld is not a weld-all-around weld.
Spacer bar: ![]() or
or ![]() . This applies when V groove or Bevel groove is selected as the weld Type.
. This applies when V groove or Bevel groove is selected as the weld Type.

|
An arrow side V-groove weld with a spacer bar. |
If this box is checked (
), the supplementary symbol for a spacer bar ("M" inside a rectangle) will be drawn as a part of the weld symbol.
If the box is not checked (
), the weld symbol will be drawn without a spacer bar symbol.
Status Display: Weld status > Spacer bar
Prequalified weld settings
| These settings let you enter Prequalified tail text by selecting a Joint type and/or Penetration and/or Weld type and/or Joint designation and/or Process and/or Position |
Use prequalified weld tail text: ![]() or
or ![]() .
.
If this box is checked (
), the options for Joint type Joint designation Process and Position are enabled. You can use these options to enter Prequalified tail text.
If the box is not checked (
), you cannot enter Prequalified tail text. You can, however, select a Penetration.
Prequalified tail text: You can type in the text yourself, or select a Joint type and/or Penetration and/or Weld type and/or Joint designation and/or Process and/or Position.See Table 8-2, AISC Thirteenth Edition, p. 8-34.
| Order of prequalified tail text: joint type - penetration weld type joint dsg - process - position |
Note on making entries: You can only enter the tail text symbols that are shown on Table 8-2, AISC Thirteenth Edition, p. 8-34. These must be entered in the correct order. For example, suppose that you enter BTC-U-F-F as the Prequalified tail text. Then Butt, T- or Corner joint is selected as the Joint type, Unlimited thickness, full penetration is selected as the Penetration, Flux cored arc welding (FCAW) is selected as the Process, the second F selects Flat as the Position, and the string BTC-U-F-F is automatically entered on the weld symbol. The Weld type selection automatically enters the joint type symbol to the appropriate position here, in this field, and on the weld symbol.
Status Display: Weld status > Prequalified tail text
Joint type: None or Butt joint or Corner joint or T-joint or Butt or Corner joint or T or Corner joint or Butt, T- or Corner joint. The selection made here automatically enters the joint type symbol to the appropriate position in the Prequalified tail text (above) and on the weld symbol. See Table 8-2, AISC Thirteenth Edition, p. 8-34.
| Joint Type | Symbol |
| Butt joint | B |
| Corner joint | C |
| T-joint | T |
| Butt or Corner joint | BC |
| T or Corner joint | TC |
| Butt, T- or Corner joint | BTC |
Status Display: Weld status > Weld joint
Report Writer: MemberMaterial.Weld.JointTypeDescription
Penetration: None or Limited thickness, full penetration or Unlimited thickness, full penetration or Partial-penetration. The selection made here automatically enters the penetration symbol to the appropriate position in the Prequalified tail text (above) and on the weld symbol. See Table 8-2, AISC Thirteenth Edition, p. 8-34.
| Penetration | Symbol |
| Limited thickness, full penetration | L |
| Unlimited thickness, full penetration | U |
| Partial-penetration | P |
Status Display: Weld status > Weld penetration
Report Writer: MemberMaterial.Weld.PenetrationDescription
Joint designation: The lower case letter (1 character) that you enter here automatically enters the tail text to the appropriate position in the Prequalified tail text (above) and on the weld symbol. Table 8-2 on page 8-34 of the AISC Thirteenth Edition states, "The lower case letters (e.g., a , b , c , d , etc.) are used to differentiate between joints that would otherwise have the same joint designation."
Status Display: Weld status > Joint designation
Report Writer: MemberMaterial.Weld.JointDesignation
Process: None or Submerged arc welding (SAW) or Gas metal arc welding (GMAW) or Flux cored arc welding (FCAW) or GMAW/FCAW (GF). The selection made here automatically enters the welding process symbol to the appropriate position in the Prequalified tail text (above) and on the weld symbol. See Table 8-2, AISC Thirteenth Edition, p. 8-34.
| Process | Symbol |
| Submerged arc welding (SAW) | S |
| Gas metal arc welding (GMAW) | G |
| Flux cored arc welding (FCAW) | F |
| GMAW/FCAW (GF) | GF |
Status Display: Weld status > Weld process
Report Writer: MemberMaterial.Weld.PenetrationDescription
Position: None or Flat or Horizontal or Vertical or Overhead. The selection made here automatically enters the welding position symbol to the appropriate position in the Prequalified tail text (above) and on the weld symbol. See Table 8-2, AISC Thirteenth Edition, p. 8-34.
| Position | Symbol |
| Flat | F |
| Horizontal | H |
| Vertical | V |
| Overhead | OH |
Status Display: Weld position
Report Writer: MemberMaterial.Weld.PositionDescription
Arrow side (primary selection)
| (primary selection) indicates that the arrow-side weld is displayed in the model in the Primary selection color. |
Type: Fillet or Square groove or Bevel groove or V groove or J groove or U groove or Flare bevel groove or Flare V groove or Plug or Backing weld or Backing bar. This applies to Prequalified tail text (the 3rd position) and to all other welds (including all system connection welds).
| symbol | name | weld used for... |
|
|
fillet | General welding of material. |
|
|
square groove | Butt joints. Prequalified... = 1. |
|
|
bevel groove | General full penetration welding of material. Prequalified... = 4 (5 for double). For Weld Add operations, this enables Perform chamfer. |
|
|
V groove | Butt joints of thicker material. Prequalified... = 2 (3 for double). For Weld Add operations, this enables Perform chamfer. |
|
|
J groove | Special full penetration welding of material. Prequalified... = 8 ( 9 for double). |
|
|
U groove | Butt joints of thicker material. Prequalified... = 6 (7 for double). |
|
|
flare bevel groove | For a radiused surface to flat surface (e.g., tube to plate). Prequalified... = 10. |
|
|
flare V groove | For a radiused surface to radiused surface. |
| |
plug | For SDS2 software to generate a plug weld, the material requires plug weld holes. |
|
|
backing weld | For the back side of bevel or V, J or U groove welds. |

|
backing bar | For the back side of bevel or V, J or U groove welds. |
Status Display: Weld type
Shape file: MemberMaterial.Weld.WeldTypeDescription
Advanced Selection: Type
Parametric module: ArrowWeldType or OtherWeldTypeIndex
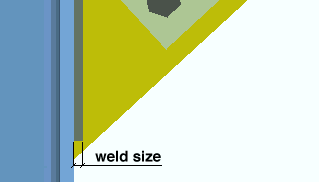
Size: A distance that indicates depth of preparation, size or strength of the weld. This dimension is modeled in 3D as shown below. The eye button ![]() or
or ![]() or
or ![]() )
)
|
Weld size is modeled in 3D as shown here. The eye button controls how the weld size is depicted on weld symbols in 2D drawings. |
The eye button may be set to
or ( show )
or ( don't show )
. ( mixed )

( show ) results in weld symbols for the weld(s) you are editing being drawn to show the weld Size when the affected members with those welds subsequently undergo Detail Members. If you are editing a single weld, the Size of that single weld is depicted on the 2D symbol (this window).
( don't show ) hides the weld size on the subsequently detailed weld symbol(s).
( mixed ) indicates that you are editing multiple welds whose shown-hidden state is mixed. Clicking to change the state of the button to
or
will apply that choice to all of the multiple welds that are being edited.
Status Display: Weld status > Weld size
Report Writer: MemberMaterial.Weld.Size
Advanced Selection: ArrowSize
Parametric module: ArrowSize or OtherSize
Length: Read-only except for the eye button ( ![]() or
or ![]() or
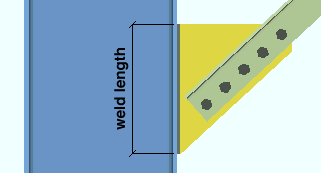
or ![]() ) for weld symbols. To adjust the length of a weld, change the Left setback and/or Right setback, then press OK. The new Weld length will be reported when you open this window again.
) for weld symbols. To adjust the length of a weld, change the Left setback and/or Right setback, then press OK. The new Weld length will be reported when you open this window again.
|
Weld length is modeled in 3D as shown here. The eye button controls how the weld length is depicted on weld symbols in 2D drawings. |
The eye button may be set to
or ( show )
or ( don't show )
. It affects how weld symbols are drawn on member details. ( mixed )

( show ) results in weld symbols for the weld(s) you are editing being drawn to show the weld Length when the affected members with those welds subsequently undergo Detail Members. If you are editing a single weld, the Size of that single weld is depicted on the 2D symbol (this window).
( don't show ) hides the weld length on the subsequently detailed weld symbol(s).
( mixed ) indicates that you are editing multiple welds whose shown-hidden state is mixed. Clicking to change the state of the button to
or
will apply that choice to all of the multiple welds that are being edited.
Defaults: Home > Project Settings > Job > Design > Weld Design Settings >
Show weld length on weld symbols sets whether a weld's length is set to shown
( or not shown)
( at the time that the weld is created. The visual result becomes evident when the weld is auto detailed using Detail Members.)
Status Display: Weld status > Weld length
Report Writer: MemberMaterial.Weld.Length
Advanced Selection: Length
Parametric module: ArrowLength or OtherLengthAlso see: For automatic detailing of erection views, a Show field weld lengths can be found on the Detail Erection View window.
Left setback: The distance that the left end of the weld is set back from the edge of the material. 0 (zero) makes the left end of the weld go to the edge of the material.
Status Display: Weld status > Left setback
Report Writer: MemberMaterial.Weld.LeftSetback
Right setback: The distance (in the primary dimension Units or other units) that the right end of the weld is set back from the edge of the material. 0 (zero) makes the right end of the weld go to the edge of the material.
Status Display: Weld staut > Right setback
Report Writer: MemberMaterial.Weld.RightSetback
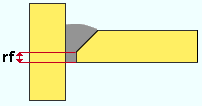
Root face: A distance that defines the root face for groove welds. The root face is the portion of a prepared edge that is not beveled or grooved.
|
Status Display: Weld status > Root face
Report Writer: MemberMaterial.Weld.RootFace
Advanced Selection: RootFace
Parametric module: ArrowRootFace or OtherRootFace
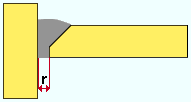
Root opening: A distance that defines the root opening for groove welds.
|
Status Display: Weld status > Root opening
Report Writer: MemberMaterial.Weld.RootOpening
Advanced Selection: RootOpening
Parametric module: ArrowRootOpening or OtherRootOpening
Effective throat: A distance. In a fillet weld, this is the distance from the root to the face of the weld. The distance is measured in the plane where the weld is most likely to fail. An Effective throat distance may be applied to weld symbols for bevel and groove welds, not just fillet welds.

|
This symbol indicates that the arrow-side weld has an effective throat of 1/4 inch. |
Status Display: Weld status > Effective throat
Finish symbol: A letter (1 character) to appear on the weld symbol to designate the finish (reference f/F in the illustration below).
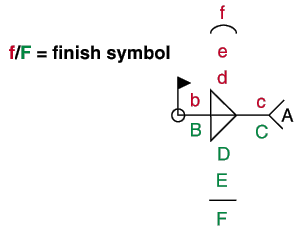
Status Display: Weld status > Finish symbol
Report Writer: MemberMaterial.Weld.WeldSymbolFinishSymbol
Contour: None or Flush or Convex or Concave or Smooth toes.
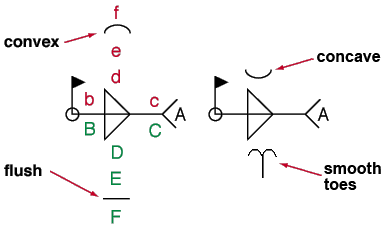
None results in no contour symbol being included as part of the 2D symbol.
Flush adds a flat line as the contour symbol to the weld symbol.
Concave adds a concave line.
Convex adds a convex line.
Smooth toes adds a contour symbol that looks like two back-to-back J's. It serves as an instruction to the welder to perform weld toe grinding.
Status Display: Weld status > Weld contour
Report Writer: MemberMaterial.Weld.WeldContourDescription
Advanced Selection: WeldContourDescription
Parametric module: ArrowWeldContourDescription or OtherContour
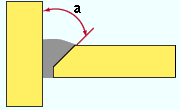
Groove angle: The positive or negative number of degrees (-75 to 75) that defines the angle for bevel groove or V groove welds.
|
Status Display: Weld status > Groove angle
Report Writer: MemberMaterial.Weld.GrooveAngle
Advanced Selection: GrooveAngle
Parametric module: ArrowGrooveAngle or OtherGrooveAngle
If this box is checked (
), a fillet backup weld is applied to a square groove, bevel groove, or J groove weld.
If the box is not checked (
), a fillet backup weld is not applied.
Status Display: Weld status > Fillet backup
Report Writer: MemberMaterial.Weld.FilletBackupWeld
Size: The size of the Fillet backup weld. The size can be selected from the drop-down menu of preloaded fillet weld sizes or manually typed into the field. The size can be shown on the Fillet backup weld symbol. The eye button ![]() or
or ![]() or
or ![]() )
)
The eye button may be set to
or (show)
or (don't show)
. (mixed)

(show) results in weld symbols for the weld(s) you are editing being drawn to show the fillet backup weld Size on the fillet backup weld symbol when the affected members with those welds subsequently undergo Detail Members. If you are editing a single weld, the fillet backup weld Size of that single weld is depicted on the 2D symbol (this window).
(don't show) hides the fillet backup weld size on the subsequently detailed weld symbol(s).
(mixed) indicates that you are editing multiple welds whose shown-hidden state is mixed. Clicking to change the state of the button to
or
will apply that choice to all of the multiple welds that are being edited.
Stitch weld: ![]() or
or ![]() . All weld types can now be stitched.
. All weld types can now be stitched.
If this box is checked (
), you may enter a Length and Spacing and Left termination and Right termination to specify stitch welding for the arrow side. The other side will use the choice made to Stitch.
If the box is not checked (
), arrow side stitch welding will not be applied. You can still, however, have other side stitch welding by choosing Independent as the Stitch for the other side.
Status Display: Weld Status > Stitch
Length: A distance (in the primary dimension Units or other units) that defines the length of each weld segment in a stitch weld.
|
Status Display: Weld status > Stitch length
Report Writer: MemberMaterial.Weld.StaggerLength
Advanced Selection: StaggerLength
Parametric module: ArrowStitchLength or OtherStitchLength
Spacing: The distance (in the primary dimension Units or other units) from the beginning of one weld segment to the beginning of the next weld segment.
|
Status Display: Weld status > Stitch spacing
Report Writer: MemberMaterial.Weld.StaggerSpacing
Advanced Selection: StaggerSpacing
Parametric module: ArrowStitchSpacing or OtherStitchSpacing
Left termination: The weld length (in the primary dimension Units or other units) of the weld segment at the left end of a stitch weld.
|
Status Display: Weld status > Left termination
Report Writer: MemberMaterial.Weld.LeftTermination
Right termination: The weld length (in the primary dimension Units or other units) of the weld segment at the right end of a stitch weld.
|
Status Display: Weld status > Right termination
Report Writer: MemberMaterial.Weld.RightTermination
Perform chamfer: ![]() or
or ![]() . This applies when the Weld type is Bevel groove or V groove. For any other Weld type, this option is disabled. Also, this option and Chamfer depth appear on the Add Weld(s) window only. They are not options on the Edit Weld(s) window.
. This applies when the Weld type is Bevel groove or V groove. For any other Weld type, this option is disabled. Also, this option and Chamfer depth appear on the Add Weld(s) window only. They are not options on the Edit Weld(s) window.
If this box is checked (
), Weld Add performs both a chamfer operation and the weld operation. The operation is performed on the material to be welded, the first material selected, which is the green material shown in step 1 of Weld Add Layout or Weld Add. The chamfer operation is performed per the Groove angle and Chamfer depth.
If the box is not checked (
), only a weld operation will be performed.
Setup: The Perform chamfer for user welds by default option in Weld Design Settings sets whether this option is automatically checked or not checked when a Bevel groove or V groove weld is selected.
To remove a chamfer: Open the chamfered material's edit window, then press the OK button at the bottom of the window. A yes-no dialog opens. On it is the question, "Do you want to regenerate this material to clear user modified material operations?" Press the Yes button. Click here for more detailed instructions.
Report Writer: XXXXX . BeveledEdgeCount
Report Writer: XXXXX . BeveledEdgeLength
Report Writer: XXXXX . BeveledEdgeLengthDimension
Chamfer depth: A distance (in the primary dimension Units or other units) that is parallel with the thickness of the material to be welded, which is the green material shown in step 1 of Weld Add Layout or Weld Add. This value only applies if you are doing a Perform chamfer operation. Be aware that the choices you make to Groove angle also affects such an operation.

|
d = Chamfer depth |
Other side (secondary selection or symbol only)
| (secondary selection) indicates that the other-side weld is displayed in the model in the Secondary selection color. |
| (symbol only) indicates that changes to other-side weld options will affect the weld symbol only, not the model. |
Type: Same as Type for the arrow side, except that this applies to the other side.
Size: Same as Size for the arrow side, except that this applies to the other side.
Length: Same as Length for the arrow side except that this applies to the other side.
Left setback: Same as Left setback for the arrow side, except that this applies to the other side.
Right setback: Same as Right setback for the arrow side, except that this applies to the other side.
Root face: Same as Root face for the arrow side, except that this applies to the other side.
Root opening: Same as Root opening for the arrow side, except that this applies to the other side.
Effective throat: Same as Effective throat for the arrow side, except that this applies to the other side.
Finish symbol: Same as Finish symbol for the arrow side, except that this applies to the other side.
Contour: Same as Contour for the arrow side, except that this applies to the other side.
Groove angle: Same as Groove angle for the arrow side, except that this applies to the other side.
Fillet backup weld: Same as Fillet backup weld for the arrow side, except that this applies to the other side.
Size: Same as Size for the arrow side, except that this applies to the other side.
Stitch: ![]() None or
None or ![]() Independent or
Independent or ![]() Opposite or
Opposite or ![]() Offset .
Offset .
None |
Opposite

|
Offset |
None results in a continuous weld (not a stitch weld).
Independent lets you specify the Length and Spacing and Left termination and Right termination that you want for the other side stitch weld.
Opposite generates a stitch weld on the other side that mirrors the stitch weld on the arrow side.
Offset generates a stitch weld on the other side that is staggered with respect to the stitch weld on the arrow side.
Length: Same as Length for the arrow side, except that this applies to the other side.
Spacing: Same as Spacing for the arrow side, except that this applies to the other side.
Left termination: Same as Left termination for the arrow side, except that this applies to the other side.
Right termination: Same as Right termination for the arrow side, except that this applies to the other side.
Perform chamfer: Same as Perform chamfer for the arrow side, except that this applies to the other side.
Chamfer depth: Same as Chamfer depth for the arrow side, except that this applies to the other side.
Select In Model and Separate
![]()
![]()
Select In Model closes this window and lets you select in the model a weld to combine with the weld that is currently depicted on the 2D symbol. The result will be a double weld. That is, both welds are shown on the 2D symbol, one on the arrow side, the other on the other side. This functionality is demonstrated in the above video and also in the video for 2D symbol. The total count of welds reported in the Weld num of total welds widget is decreased by 1 since the combined welds will no longer be assigned two numbers, but will be combined under a single number.
Separate applies when the 2D symbol designates one weld on the arrow side and another weld on the other side. Separate deconstructs the weld symbol into two different weld symbols, which each designate its weld on the arrow side. The welds are each assigned different weld numbers in the model. The total count of welds reported in the Weld num of total welds widget is increased by 1 since, as a result of being separated, each of the welds are assigned an unique weld number.
2D symbol

|
On the Add/Edit Weld(s) window, the weld symbol that is shown is the one that is selected using the Weld num of total welds widget. |
| No weld symbol is shown on the Edit Weld(s) window if you are editing multiple weld numbers. |

|
The Length of a weld is depicted on the 2D symbol when the eye button next to Length is set to show ( |

|
Combined welds are depicted with one weld symbol. .In the model, the arrow-side weld is the Primary selection color, the other-side weld is the Secondary selection color. |
One weld can be combined with another weld by pressing the Select in Model button. The 2D symbol will then depict an arrow-side weld and an other-side weld. As you make changes to Arrow side settings, the bottom part of the weld symbol will be updated. Changes made to Other side settings update to top part of the weld symbol.
If Weld class is set to Shop, the weld symbol will be drawn on the member detail during auto detailing. If the Weld class is Field, the weld symbol will not be shown on the member detail.
Supplementary tail text
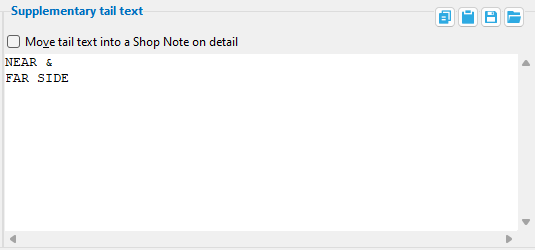
If this field is left blank and Use prequalified weld tail text is not checked, a tail will not be drawn on the weld symbol. If a text string is entered, a tail with that character string as its text is drawn on the 2D symbol as well as on the weld symbol that is generated during Detail Members. If Use prequalified weld tail text is checked, the text you enter here, in this window, will be placed below the prequalifed tail text.
To enter multi-line tail text such as that shown in the example below, press Enter key where you want a line break.
| Tail text entered here : |
|
| Tail text on weld symbol: |

|
Move tail text into a Shop Note on detail: ![]() or
or ![]() . This applies when a text string has been added to the Supplementary tail text field.
. This applies when a text string has been added to the Supplementary tail text field.
If this box is checked (
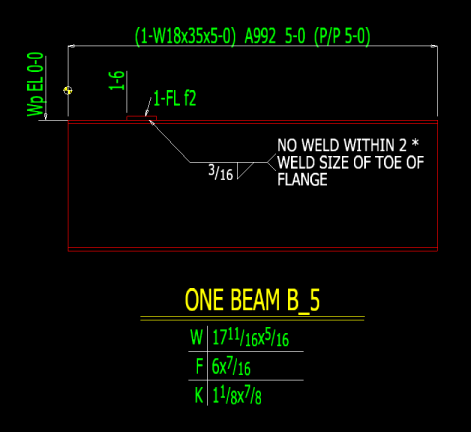
), instead of adding the supplementary tail text to the weld symbol's tail in Drawing Editor, a label with that character string is added beneath the member detail's callout. The weld symbol's tail is not shown unless there is more than one matching material using the same weld. The weld symbol's tail is shown with a note reading *NOTE-TYP when more than one matching material on the member detail uses the same modeled weld.
Single material: 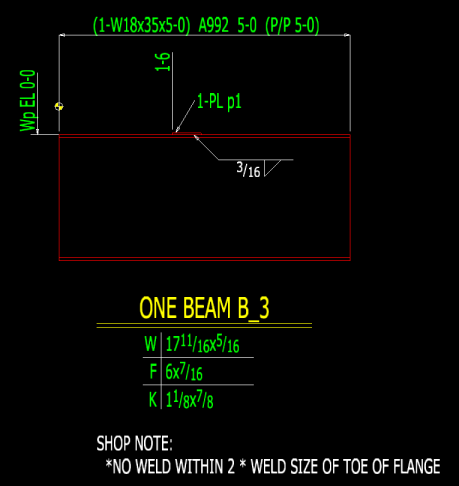
Multiple matching materials with matching welds: 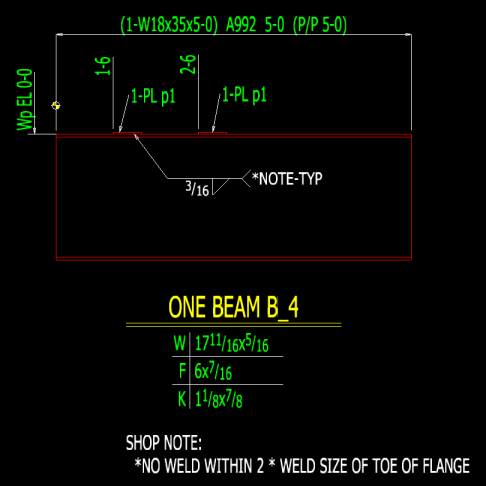
If the box is not checked (
), a tail with that character string as its text is drawn on the 2D symbol as well as on the weld symbol that is generated during Detail Members.
Report Writer: MemberMaterial.Weld.WeldSymbolTailText
Advanced Selection: WeldSymbolTailText
Parametric module: WeldSymbolTailText
Weld __ of __
Note: These options are only shown on the Add Weld(s) window, and only if Create a separate weld for each segment was checked (  ) on the Weld Add Path Options window.
The weld number of the one weld symbol you are currently editing and the total count of all welds that you are adding. You can use the VCR buttons to select a different weld to edit on this window. When you select a weld number, that weld is highlighted in the model. and the settings for that weld, including the 2D symbol, are shown on this window.
|
|
| VCR buttons for selecting a weld symbol to edit. |
If you press the Select in Model button and select a weld to combine with the weld number that is currently selected, those two welds will be combined and depicted by a single 2D Symbol and referenced by a single weld number. New numbers may be assigned to some of the welds you are adding. Also, the total count of welds that you are adding will be reduced by one.
As stated previously, Weld _ of _ appears on the Add Weld(s) window only. It does not appear on the Edit Weld(s) window. On the Edit Weld(s) window, if multiple loads are being edited, it is possible to have mixed entries to a field. On the Add Weld(s) window, mixed entries are not possible.
Buttons
![]() Copy, Paste, Save, Load buttons:
Copy, Paste, Save, Load buttons:
OK (or the Enter key) closes this window and applies the settings on it.
Cancel (or the Esc key) closes the window without saving changes made to the options.
Reset undoes all changes made to the options on the window since you first opened it.
Properties opens the Edit Properties window, on which you can make entries to custom properties. If, at the time it was created, your current Job was set to use a legacy flavor, the window that opens is named Custom Properties, not Edit Properties.
The Edit Properties window can also be used to read
Log entries or review or type
Notes.
Tip: Model > Weld > Properties is an alternative to this button. It opens the Edit Properties window directly, without your first having to edit welds.
- Weld Add (opens the Weld Add Path Options window then the Add Weld(s) window)
- Weld Add Layout (another way to add welds)
- Weld Input (counterpart to this window in the Drawing Editor)
- Edit Welds (opens the Edit Weld(s) window)
- Model completed (makes the Edit Weld(s) window read only)
- Weld Design Settings (setup of system connection welds)
- Weld symbols (weld symbols on details)
- To edit multiple welds
