The Edit Report setup window ( Fabricator Settings & Tables )
| Note: Opening the Edit Report window by any method -- including by editing a table in Drawing Editor -- changes the reports that are listed on the Project Settings > Fabricator > Report Manager window. |
 |
A rebar report edited in this window may then be run from either Report Manager , or used to generate a table . |
To open this window :
▸ Use a keyboard shortcut , or click the Report Manager icon. Click the Revert icon. The icon can be taken from the command group Settings -- Concrete Settings and placed on the ribbon.
▸ Home > Project Settings > Fabricator > Rebar > Report Manager . The Report Manager window opens. Select a report that you want to edit and press the " Edit " button.
▸ In Drawing Editor , edit a rebar report that is placed in a drawing -- that is, any report whose " Name " is also listed on the Report Manager window. From the Table Edit window, click the " Edit " button near the " Custom Report " drop-down list.
Password protection: If a password has been set using the Change Setup Password utility, you can open the Report Manager window only if you first enter that exact password.
Also see :
- Report Manager (window from which Edit Report can be opened)
- Table Edit (window from which Edit Report can be opened)
Options :
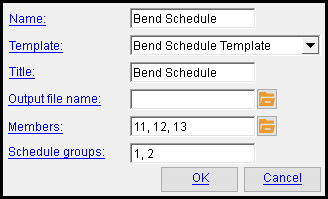
Name: A string . This is the name of the report that appears in the Report Manager window. It also becomes the name of this custom report in the Table Edit window. The default value for this field is same as the " Default title " option for the " Template " selected here, on this window. You may enter a string to replace the default value.
Template: A list of templates . Choices in this window are limited to those report templates that are appropriate to the report type from which the report was created.
Title: A string . This is the title of the report that appears at the top of the report when " Show title " is enabled for the " Template " selected here, on this window. The default value for this field is same as the " Default title " option for the selected template. You may enter a string to replace the default value.
Output file name: A file name . You can type in the file path that you want, or you can press the " Browse " ( ![]() ) button and, in the dialog that opens, navigate to a directory and enter a file name.
) button and, in the dialog that opens, navigate to a directory and enter a file name.
Tip: Giving a file name a .csv extension expedites the importing of the file to a word processor or spreadsheet program.
Members: Blank , or a comma-delimited list containing at least one member number can be entered here.
When this field is ' blank ' , all members not excluded by the values entered for the " Schedule groups " options will be reported.
To enter one or more 'member numbers ', press the " Browse " (
) button and select the members from the list that opens, or you can manually type a comma delimited list of members.
Schedule groups: Blank , or a comma-delimited list containing at least one schedule group can be entered here.
If " Schedule groups " is ' blank ' , the report will list members from all available schedule groups.
To enter one or more 'schedule groups ', press the
To close this window :
"OK" closes this window and completes the edit operation.
"Cancel" (or the Esc key or the ![]() button) closes this window without saving changes you have made.
button) closes this window without saving changes you have made.

