The Edit Report Template window
 |
| Templates edited in this window are used to create reports in the Report Manager window. The rebar report may then be run from either Report Manager or Home , or used to generate a table . |
To open this window :
In Modeling (classic) or the Drawing Editor , choose Settings > Concrete Settings > Concrete Fabricator Settings > Report Template Manager , or use a keyboard shortcut , or click the Report Template Manager toolbar icon. (If the icon is not currently on your toolbar, you can add it using Toolbar Configuration .)
Home > Project Settings > Fabricator > Rebar > Report Template Manager .
Password protection: If a password has been set using the Change Setup Password utility, you can open this window only if you first enter that exact password.
Once the Report Template Manager is opened, select a report template that you want to edit and press the " Edit " button. Or press the " Add " button to add a new report template.
Also see :
- Report Template Manager (the window from which the Edit Report Template window can be opened)
- Report Manager (uses report templates to add custom reports)
concrete | setup | concrete fabricator setup | top
------ General settings ------
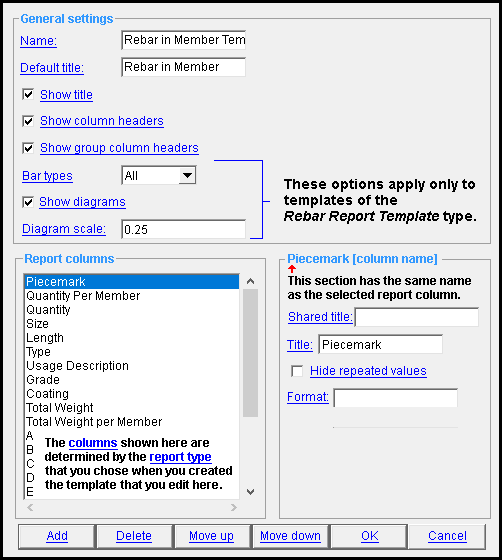
Name: The report type or a user-entered string . This is the template name that is listed in the Report Template Manager . It also becomes a " Template " selection ( ![]() ) in the Edit Report window.
) in the Edit Report window.
The default name for this field is the name of the ' report type ' you selected in the Select report type window when you added the template in the Report Template Manager .
A duplicate report template name can be entered here; however, the name will be appended with a number (e.g. "(2)") when it is listed as a " Template " selection (
) in the Edit Report window.
Default title: A title or a user-entered string . This is the title that populates both the " Name " and the " Title " fields of the Edit Report window.
The " Default title " will become the name of any report added using this template, unless a user-entered value is entered into its Name field in the Edit Report window.
The " Default title " will also become the name of any table created using a report added using this template, unless a user-entered value is entered into the report's Title field in the Edit Report window.
If this box is checked (
), the " Title " of the report is the report header.
If the box is not checked (
), the " Title " of the report is not the report header.


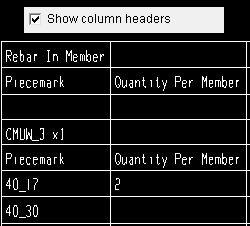
A report created with the Rebar in Member Template can produce tables similar to those shown here. Or, a report can be output with the same formatting.
If this box is checked (
), column headers are placed at the top of the report, or under the title if " Show title " is also checked.
If the box is not checked (
), column headers are not placed at or near the top of the table.
Group column headers may be shown under the group names regardless of whether " Show column headers " is checked, as in the illustrations below:
|
||||
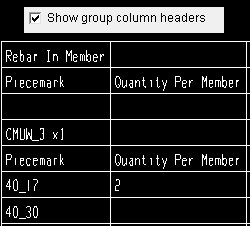
| A report created with the Rebar in Member Template can produce tables similar to those shown here. Or, a report can be output with the same formatting. |
Show group column headers: ![]() or
or ![]() .
.
If this box is checked (
), group column headers are placed in a row beneath the group name.
If the box is not checked (
), column headers are not placed in a row beneath the group name.
Column headers may be shown at the top of the table regardless of whether " Show group column headers " is checked, as in the illustrations below:
|
||||
| A report created with the Rebar in Member Template can produce tables similar to those shown here. Or, a report can be output with the same formatting. |
Bar types: all or Straight or Bent . This option only applies to templates of the type Rebar Report Template . The bars listed in a table created using a report added using this template will be limited to ' Straight or ' Bent ' unless this option is set to ' All ' . Bars listed may also be shown in diagrams, provided that " Show diagrams " is checked ( ![]() ).
).
Show diagrams: ![]() or
or ![]() . This option only applies to templates of the type Rebar Report Template .
. This option only applies to templates of the type Rebar Report Template .
|
If this box is checked (
), a diagram showing the shapes for rebar listed in the table is placed under a table when it is created using a report added using this template.
If the box is not checked (
), a diagram showing the shapes for rebar listed in the table is not placed under a table when it is created using a report added using this template.
Diagrams are created automatically for the current job whenever a table showing diagrams is placed. They are named with the prefix "rebarSched_" and are saved as job standard details .
Each diagram contains a label displaying the name of the rebar shape. The label corresponds with the report column named "Type", provided that you add this column to the report template.
Diagram scale: The scale . This option only applies to templates of the type Rebar Report Template . This sets the " Scale " at which the diagram will be placed, provided that " Show diagrams " is checked ( ![]() ).
).
concrete | setup | concrete fabricator setup | top
------ Report columns ------
Report columns may be included or excluded from your report template or edited when selected in the " Report columns " section list. Only one column may be selected from the list at a time.
|
lets you add a new column. When you press " Add ", a selection dialog opens. On it is a list of report columns. The available columns are determined by the report template type that was used to create the template that you edit.
lets you delete the column that you have selected.
moves the selected column up in the list, and to the left of any column that it precedes when a report made with this template is generated.
moves the selected column down in the list, and to the right of any column that it follows when a report is generated.
concrete | setup | concrete fabricator setup | top
------ [Report column] name------
Shared title: A string . Entries made here will appear above both the column header (if shown) or the group column header (if shown) of the report column that you edit.
Title: A string . This is the name of the column displayed in both the column header (if shown) or the group column header (if shown) of the report column that you edit. If no entry is made to this field, the name of the report column is used.
If this box is checked (
), a diagram showing the shapes for rebar listed in the table is placed under a table when it is created using a report added using this template.
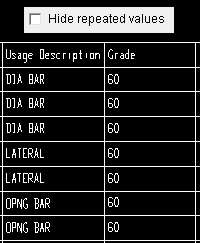
If the box is not checked (
), all row entries will be printed, even if they are repeated.
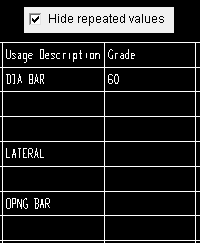
In the example to the left, " Hide repeated values " is applied to both the Usage Description and the Grade fields:
|
||||
| A report created with the Rebar in Member Template will produce tables similar to those shown here. |
Format: A formatting flag consisting of non-negative integers (0, 1, etc.), spaces , or special characters (+, -, #, .). Formatting flags allow you to control the alignment of row entries within the column that you edit by adding spaces or decimal places.
Limitations: Formatting flags that pad row entries with spaces produce inconsistent results unless a monospaced font is used for the table. Also, spaces are ignored when CSV files are imported into spreadsheet software.
When a custom report is output, row entries are converted to one of three format types. The format type for row entries in the report column is determined by the report column selected:
report column format type bar mark, bar piece, and quantity integer weight floating point number name (e.g. piecemarks) length, description, etc. string String is the most common column format type.
The format type, in turn, determines which formatting flags are valid. Most formatting flags are valid for all format types, but the floating point number type has unique formatting flags.
If an invalid entry is made in this field, you will receive a warning similar to 'invalid format for "%s" value' when you " Run " a report made with this template, or when a table using that report is generated.
Formatting flags for all format types:

Table format examples are from Drawing Editor erection views.
" • " represents a space (" ")A = ' zero '. No adjustment is made by adding spaces.
B = ' positive integer '.
Example 1: a value of "19" right-adjusts row entries to a minimum width of 19 digits. The row entry will be padded with zeros to meet this minimum. Integers less than the number of characters in the widest entry are allowed.
Example 2: a value of "2" results in row entries with a minimum width of two characters. Note that the three-digit row entry ("859") remains three characters wide.
C = ' - ' + ' positive integer '. A "-" left-adjusts row entries by padding them with the number of spaces specified by the following integer.
Integer formatting flags will widen the column to accommodate the required number of characters, if the integer is greater than number of characters making up the widest row entry in the column. Otherwise, the column will be as wide as the widest row entry or header.
D = ' space ' (" "). A single blank space is prepended to the row entry. Additional spaces entered to this field will be ignored. (This flag is valid for the string and integer format types, but is ignored by the floating point number format type.)
Formatting flags for the floating point number format type:
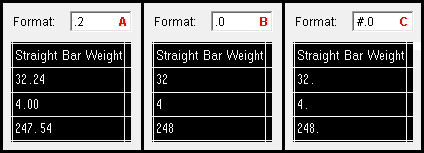
Table format examples are from Drawing Editor erection views.
A = ' . ' + ' positive integer '. A value of "2" results in a decimal number with two digits after the decimal point. Note that the two zeros after the 4 are displayed.
B = ' . ' + ' zero '. A value of "0" results in zero digits after the decimal point. Note that the decimal point is not displayed.
C = ' # ' + ' . ' + ' positive integer '. A value of "0" results in zero digits after the decimal point. However, the "#" results in a decimal point after each row entry, even though zero digits follow it. If the value is greater than 0 (e.g., #.2), the result is the same as for A .
A single "#" implies "#.0". However, the integer flag may be ignored if that report column's default format requires one or more digits after the decimal point.
The values are rounded when the number of digits after the decimal point are reduced. In the examples above, 247.54 is rounded to 248 when the formatting flags in fields B or C are applied.
Formatting flags for the floating point number format type can be combined with flags for the string and integer types . For example, the flag "19.3" will right-adjust the row entry for a minimum width of 19 characters and will display three digits after the decimal point.
concrete | setup | concrete fabricator setup | top
To close this window :

"OK" closes this window and completes the edit operation.
"Cancel" (or the Esc key or the
button) closes this window without saving changes you have made.
