Table Edit window ( Drawing Editor )
- Tip: If you plan to fill out the contents of a table using a " CSV Report " or " Report Writer Report " (
 ), the cells needed to accommodate the data will be created automatically. You don't have to create rows and columns manually.
To open this window :
Drag and double-click :
- To edit a table, double-click one of its lines or labels.
- Drag a cell's rightmost vertical line to adjust the width of the column in which that cell resides.
- Drag a label or the space inside a cell or the table's leftmost line to reposition the table.
Also see :
- Explode (transforms a table into its component lines and labels)
- Tables (topic)
- Defaults for new tables ( Fabricator > Detailing > Drawing Presentation > the " Tables " tab > )
- Table Add
- Table Erase
- Unlock/Lock Sheet Tables ( Edit > Change Option > )
page 1 | contents | objects > tables > | objects -- tables | double-click a table | top
Example :

|
|
" |
page 1 | contents | objects > tables > | objects -- tables | double-click a table | top
If this box is checked (
), the " CSV Report " and " Report Writer Report " fields are disabled. This prevents you from overwriting the contents of this report with updated information contained in a CSV file or Report Writer report. The table that is shown will be preserved as it is shown without regard to changes in the CVS file or Report Writer report it was generated from. Even if you delete or move the original report that the table was generated from, the table will be unaffected so long is it remains locked. Locking the table prevents the table from being updated when changes are made to the CVS file or Report Writer report.
If the box is not checked (
), the table will be allowed to be modified by your importing data from a " CSV Report " and " Report Writer Report ." Entering a CVS file or Report Writer report overwrites all entities made to the table with a new set of entries imported from the file or report. If you make changes to the original CVS file or Report Writer report, those changes will update on the table after you File > Save or press the " Refresh " button or, for example, when Plotting or doing a Home > Export > 2D > Export PDF Drawing . In other words, unlocking the table allows the table to stay synchronized with changes made to its generating CVS file or Report Writer report.
Note: If you import data from a Report Writer report or CSV file then make changes to the table, the table is locked automatically so that the changes you make are preserved.
page 1 | contents | objects > tables > | objects -- tables | double-click a table | top
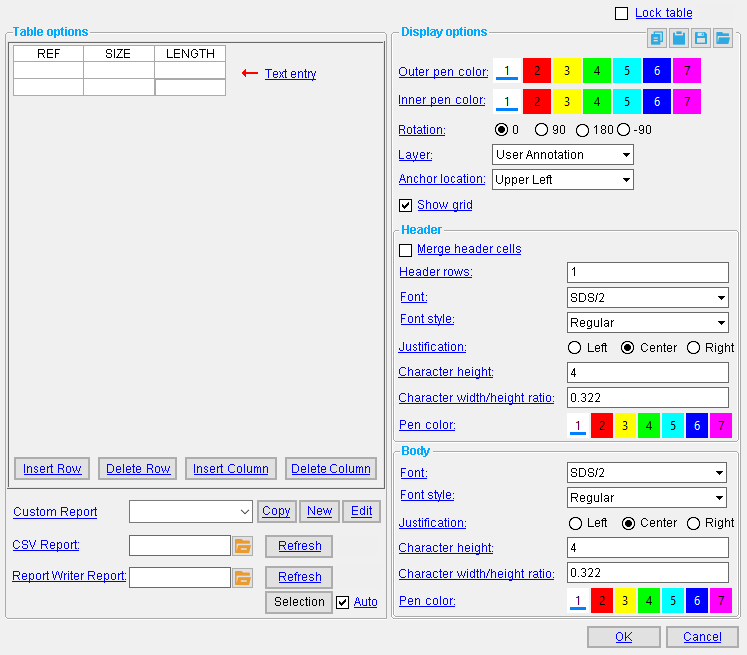
------ Table options ------
To enter text to a table :

Tip : You don't have to type in all text for each cell on the table since, after you close this window, you can double-click a label on the table to edit that label's text. Click in a cell and type the text that you want.
- Tab moves the cursor (insertion bar) forward one cell.
- Shift + Tab moves the cursor back one cell.
- ↑ moves the cursor up.
- ↓ moves the cursor down.
- For more information, see text entry widgets .
To add cells, use " Insert Row " and/or " Insert Column ."
To remove cells, use " Delete Row " and/or " Delete Column ."
After you press " OK ," the width of the cells in the table dynamically resizes to accommodate the text that fits in them.
![]() adds a new, empty row immediately below the row your cursor (insertion bar) is currently in.
adds a new, empty row immediately below the row your cursor (insertion bar) is currently in.
The cursor will move into that new row..
![]() removes the row that the cursor is in.
removes the row that the cursor is in.
The row below the row that is deleted will take the place of the deleted row, and the cursor will then be in that row..
If the table has only one row, this button does nothing.
![]() adds a new column to the immediate right of the column your cursor is currently in.
adds a new column to the immediate right of the column your cursor is currently in.
The cursor will move into that new column.
![]() removes the column that the cursor is in.
removes the column that the cursor is in.
The column to the right of the deleted column will take the place of the deleted column, and the cursor will then be in that column.
If the column has only one column, this button does nothing.
page 1 | contents | objects > tables > | objects -- tables | double-click a table | top
------ Display options ------
Outside pen color: 1 or 2 or 3 or 4 or 5 or 6 or 7 .
|
|
| The selected button sets the pen number and on-screen display color of the table's perimeter. Line Weights sets the thickness of lines drawn with the pen number. |
|
The outside pen color sets the color and line thickness of the table's perimeter. In this example, the color is yellow (pen number 3). |
Default: Home > Project Settings > Fabricator > Detailing > Drawing Presentation > the " Tables " tab > " Outside pen color ."
Inside pen color: 1 or 2 or 3 or 4 or 5 or 6 or 7 .
|
|
| The selected button sets the pen number and on-screen display color of the table's interior grid of lines. Line Weights sets the thickness of lines drawn with the pen number. |

|
The inside pen color sets the color and line thickness of the table's inner grid. In this example, the color is white (pen number 1). |
Default: Home > Project Settings > Fabricator > Detailing > Drawing Presentation > the " Tables " tab > ." Inside pen color ."
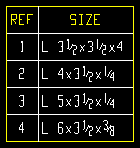
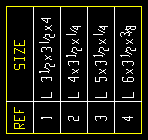
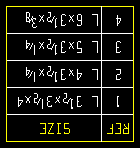
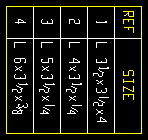
Rotation: 0º or 90º or 180º or -90º . Rotation is counterclockwise around the " Anchor location ."
| 0º | 90º | 180º | -90º |

|
|
|
|
Default: Home > Project Settings > Fabricator > Detailing > Drawing Presentation > the " Tables " tab > " Rotation ."
Layer: The drawing layer that the table you are adding is placed onto when you press " OK " to close this window. If that layer happens to be hidden (not marked " Show "), the label disappears after the first Redraw .
![]()
Anchor location: Upper left or Upper right or Lower left or Lower right . This sets the point that " Rotation " is around. This also sets the insertion point that will be used after this window opens for an Objects > Tables > Add operation.
|
|
|

|

|
|
|
|

|

|
'
Upper left ' is the upper, left corner of the table when the " Rotation " is set to 0 º.
'
Upper right ' is the upper, right corner of the table when the " Rotation " is set to 0 º.
'
Lower left ' is the lower, left corner of the table when the " Rotation " is set to 0 º.
'
Lower right ' is the lower, right corner of the table when the " Rotation " is set to 0 º.
Default: Home > Project Settings > Fabricator > Detailing > Drawing Presentation > the " Tables " tab > " Anchor location ."
|
|
|
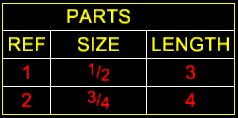
|
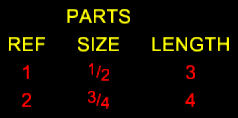
|
If this box is checked (
), the table's lines will be shown.
If the box is not checked (
), only the bill's header text and body text will be shown.
Default: Home > Project Settings > Fabricator > Detailing > Drawing Presentation > the " Tables " tab > " Show grid ."
page 1 | contents | objects > tables > | objects -- tables | double-click a table | top
------ Header ------
Merge header cells
Merge header cells

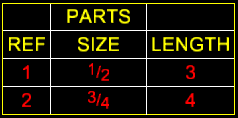
If this box is checked (
), all cells that make up the table's first row will be merged into a single cell that will be the full width of the table.
If the box is not checked (
), the first row of the table will be divided into the same number of cells as all of the other rows in the table.
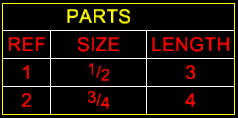
Header rows: The quantity ( 0 or 1 or 2 or ...) of rows to which you want to apply the header font specifications. The header rows are the top rows.
| Header rows = 1 | Header rows = 2 |
|

|
' 0 ' results in the text in all rows in the table using the body font settings.
' 1 ' results in the text contained in the top row of the table using the header font settings.
' 2 ' results in text contained in the top two rows of the table using the header font settings.
Tip: If you want all text in the table to use the header font settings, set " Header rows " to a number that is equal to or greater than the total number of rows in the table.
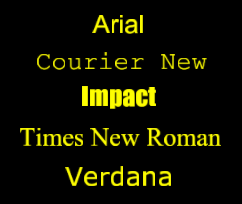
Font: Any font that is listed can be selected for the header text.
|
For a TrueType font , such as any of those shown here, a " Character width/height ratio " of ' 0.6 ' renders the font at its native width. |
Header text is the text that populates the top row(s) of the table when the number of " Header rows " is ' 1 ' or greater.
Tips: Be sure to also choose the header-text " Font style " that you want. The header-text " Character height " sets the font size. If you select the ' SDS2 ' font, be aware that the header-text " Pen color " affects the thickness of the font when it is plotted.
Default: Home > Project Settings > Fabricator > Detailing > Drawing Presentation > the " Tables " tab > " Font ."
Font style: The style (' Bold ' or ' Bold Italic ' or ' Italic ' or ' Regular ') of the selected header-text " Font ."
Header text is the text that populates the top row(s) of the table when the number of " Header rows " is ' 1 ' or greater.
Default: Home > Project Settings > Fabricator > Detailing > Drawing Presentation > the " Tables " tab > " Font style ."
Justification: Left or Center or Right . This applies to the text in the header cells.
|
'
Left ' left-justifies the text in each of the header cells.
'
Center ' centers the text in each of the header cells.
'
Right ' right-justifies the text in each of the header cells.
Header cells are the cells in the top row(s) of the table when the number of " Header rows " is ' 1 ' or greater.
Fabricator Setup: Home > Project Settings > Fabricator > Detailing > Drawing Presentation > the " Tables " tab > " Justification ."
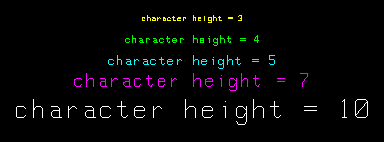
Character height: The height (in millimeters) of letters/numbers that make up the header text. This value is independent of the " Drawing scale " of this drawing. Assuming that the sheet that this drawing will eventually be placed on has a scale of 1:1 and you do not re-scale the text and the printer does not adjust the scale, this will be the actual printed height of the characters.
|
Header text is the text that populates the top row(s) of the table when the number of " Header rows " is ' 1 ' or greater.
Font dependencies: This applies to whatever font is selected as the header-text " Font ," regardless of whether that font is a TrueType font or the ' SDS2 ' font.
Default: Home > Project Settings > Fabricator > Detailing > Drawing Presentation > the " Tables " tab > " Character height ."
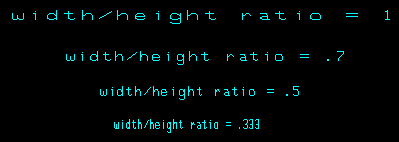
Character width/height ratio: The width/height of the characters that make up the header text.
|
Header text is the text that populates the top row(s) of the table when the number of " Header rows " is ' 1 ' or greater.
Font dependencies: This applies to whatever font is selected as the header-text " Font ," regardless of whether that font is a TrueType font or the ' SDS2 ' font. For a TrueType font, a ratio of ' 0.6 ' renders that font at its native width. A ratio larger than ' 0.6 ' stretches the font. A ratio less than ' 0.6 ' compacts the font. For the ' SDS2 ' font, ' 0.4 ' is the default choice.
Default: Home > Project Settings > Fabricator > Detailing > Drawing Presentation > the " Tables " tab > " Character width/height ratio ."
Pen color: 1 or 2 or 3 or 4 or 5 or 6 or 7 .
|
|
|
The button that is pressed sets the on-screen display color of the header text font and, if you are using the ' SDS2 ' font , it sets the printed thickness (though not the displayed thickness) of that font. |
Header text is the text that populates the top row(s) of the table when the number of " Header rows " is ' 1 ' or greater.
For a TrueType header-text font, the " Pen color " affects the display color of the header text while you are in the Drawing Editor , but does not affect the plotted appearance of the" Font " so long as all pens in Line Weights are set to print in black. By default, all pens in Line Weights are set to print in black.
For the ' SDS2 ' Font, the pen color sets the stroke weight (thickness) of the label characters. Line Weights assigns a particular thickness to each " Pen color ."
Default: Home > Project Settings > Fabricator > Detailing > Drawing Presentation > the " Tables " tab > " Pen color ."
page 1 | contents | objects > tables > | objects -- tables | double-click a table | top
------ Body ------
Font: Any font that is listed can be selected for the body text.
|
For a TrueType font , such as any of those shown here, a body-text " Character width/height ratio " of ' 0.6 ' to renders the font at its native width. |
Body text is the text that is in the rows of the table that are below the header row(s). For example, if the number of " Header rows " is ' 1 ', then the body text is the text in all rows of the table that are below the top row.
Be sure to also choose the body-text " Font style " that you want. The body-text " Character height " sets the font size. If you select the ' SDS2 ' font, be aware that the body-text " Pen color " affects the thickness of the font when it is plotted.
Fabricator Setup: Home > Project Settings > Fabricator > Detailing > Drawing Presentation > the " Tables " tab > " Font ."
Font style: The style (' Bold ' or ' Bold Italic ' or ' Italic ' or ' Regular ') of the selected body-text " Font ."
Body text is the text that is in the rows of the table that are below the header row(s). For example, if the number of " Header rows " is ' 2 ', then the body text is the text in all rows of the table that are below the top two rows.
Available font styles are listed alphabetically in the font style list box , and the first style that is listed for a particular font is the style that is selected by default. You may, instead of using the default, prefer to choose ' Regular ', which is generally the most popular style for a particular font. ' Regular ' is the only choice that is available for the ' SDS2 ' font. To adjust the stroke thickness of the ' SDS2 ' font, you can change the body-text " Pen color ."
Default: Home > Project Settings > Fabricator > Detailing > Drawing Presentation > the " Tables " tab > " Font style ."
Justification: Left or Center or Right .
|
'
Left ' left-justifies the text in each of the body cells.
'
Center ' centers the text in each of the body cells.
'
Right ' right-justifies the text in each of the body cells.
Body cells are the cells in the table that are in rows below the header row(s). For example, if the number of " Header rows " is ' 2 ', then the body cells are the cells in all rows of the table that are below the top two rows.
Default: Home > Project Settings > Fabricator > Detailing > Drawing Presentation > the " Tables " tab > " Justification ."
Character height: The height (in millimeters) of letters/numbers that make up the body text. This value is independent of the " Drawing scale " of this drawing. Assuming that the sheet that this drawing will eventually be placed on has a scale of 1:1 and you do not re-scale the text and the printer does not adjust the scale, this will be the actual printed height of characters.
|
Body text is the text that is in the rows of the table that are below the header row(s). For example, if the number of " Header rows " is ' 0 ', then the body text is the text in all rows of the table.
Font dependencies: This applies to whatever font is selected as the body-text " Font ," regardless of whether that font is a TrueType font or the ' SDS2 ' font.
Default: Home > Project Settings > Fabricator > Detailing > Drawing Presentation > the " Tables " tab > " Character height ."
Character width/height ratio: The width/height of the characters that make up the body text.
|
Body text is the text that is in the rows of the table that are below the header row(s). For example, if the number of " Header rows " is ' 1 ', then the body text is the text in all rows of the table that are below the top row.
Font dependencies: For a TrueType font, a ratio of ' 0.6 ' renders that font at its native width. A ratio larger than ' 0.6 ' stretches the font. A ratio less than ' 0.6 ' compacts the font. For the ' SDS2 ' font, ' 0.4 ' is the default choice.
Default: Home > Project Settings > Fabricator > Detailing > Drawing Presentation > the " Tables " tab > " Character width/height ratio ."
Pen color: 1 or 2 or 3 or 4 or 5 or 6 or 7 .
|
|
|
The button that is pressed sets the on-screen display color of the body-text font and, if you are using the ' SDS2 ' font , it sets the printed thickness (though not the displayed thickness) of that font. |
Body text is the text that is in the rows of the table that are below the header row(s). For example, if the number of " Header rows " is ' 1 ', then the body text is the text in all rows of the table that are below the top row.
For a TrueType body-text font, the " Pen color " affects the display color of the body text while you are in the Drawing Editor , but does not affect the plotted appearance of the " Font " so long as all pens in Line Weights are set to print in black. By default, all pens in Line Weights are set to print in black.
For the ' SDS2 ' Font, the pen color sets the stroke weight (thickness) of the label characters. Line Weights assigns a particular thickness to each " Pen color ."
Default: Home > Project Settings > Fabricator > Detailing > Drawing Presentation > the " Tables " tab > " Pen color ."
page 1 | contents | objects > tables > | objects -- tables | double-click a table | top
Custom Report: SDS2 distributes several rebar custom reports that you can use if you have a concrete license. You can also create your own custom reports from templates using Report Manager . The reports can be used to populate tables. To output data from a custom report, be sure that the " Members " and the " Schedule groups " (if applicable) selected by the report match members that are in the drawing in which the table is placed.
1 . Choose a report from the " Custom Report " drop-down list.
2 .
the report, if desired. The Edit Report window will open. Click " OK " when you are satisfied with the options the Edit Report window. Opening the Edit Report window by any method -- including by editing a table in Drawing Editor -- changes the reports that are listed on the Project Settings > Fabricator > Report Manager window.
3 .
existing reports for alteration, if you want similar reports for different sets of members or schedule groups.
4 .
will create new reports like those that are distributed by SDS2. Clicking " New " is equivalent to clicking the " Add " button in the Report Manager window.
The Report Manager window provides these and further report management options.
CSV Report: CSV stands for comma-separated value. A CSV file is a plain text file with a .csv extension. Each of the lines in the CSV file must have the same number of commas. The table that is created when you enter a CSV file and press the " Refresh " button will have as many cells as there are comma-separated values in the CSV file. Each comma-separated value in the CSV file will populate a different cell in the table.

|
1 . Create a CSV file. Save it as a plain text file with a .csv extension. The file whose contents are shown here is called name.csv. |
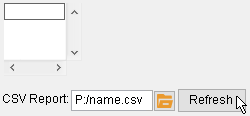
|
2 . Enter the CSV file, and press the " Refresh " button. Note: In this example, " No " was pressed in response to the prompt, " Copy file to job? " |
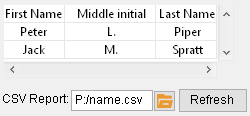
|
3 . The table is automatically filled out with the comma-separated values that were typed to the CSV file. Each comma-separated value is entered to a different cell. |
![]()
opens the data directory used by your current version of SDS2. You can browse to any location on your network in order to select a CSV file.
When you use the
button to select a CSV file that has never before been used in your current Job, a yes-no dialog opens, giving you the option to copy the file to your Job or not. Saving a copy (pressing " Yes ") allows the original file to be modified or moved without affecting the table. The copy of the original file will be saved in the
Tables folder in your current Job . . Pressing " No " results in the table being generated from the file you selected instead of a copy of that file.

Copy file to job?. 

applies when "
Lock table " is not checked. It updates the table based on the file path entered to " CSV Report ."
If the path entered to " CSV Report " is simply a "filename," then the .csv file is stored in the
Tables folder, and pressing " Refresh " regenerates the table from that file.
For path in the form " drive:/folder/subfolder/file name ," " Refresh " updates the table from that file.
Report Writer Report: To output data from a Report Writer table, you need to make sure that, in Report Writer for that report, " Select " is set appropriately, that the " Export selection type " is ' Delimited ' and that " Export report columns " specifies the starting point for each column in the table.
|
|
|
|
|

opens the
reports/Tables folder in the data directory used by your current version of SDS2. SDS2 distributes several reports to that folder. The reports can be used to populate tables.
When you use the
button to select a Report Writer report that has never before been used in your Job, a copy of that report is placed in the
Tables folder in your current Job if that report is capable of generating a table. The printed file path will reference the file name only. If you make a change to the table, then unlock the table ("
Lock table ") and press " Refresh ," the table will be updated from the copy of the report that is in the
Tables folder in your current Job.
When you use the
button to select a Report Writer report that has previously been used in your Job, a yes-no dialog like that shown below will open. Pressing " Yes " overwrites the file that is stored in Tables folder in your current Job. Pressing " No " keeps the file stored in the Tables folder in your current Job as it is. The file path that is printed when you press "No" will be in the form " drive:/folder/subfolder/file name ". The file path that is printed when when you press "Yes" will simply be the file name.

The file already exists in the job. Overwrite the file?. 

Sharing Jobs : If you transfer a copy of your Job to a site outside of your local network, users who view that Job will be able to see the data in all tables that were generated from reports that are stored in your current Job.
applies when "
Lock table " is not checked. It updates the table based on the file path entered to " Report Writer Report ." Another way to update the table is to close this window then choose Save ( Ctrl + s ).
An example of how " Refresh " works":
1 . Enter an appropriate file path to " Report Writer Report ." The table on this window will fill out automatically.
2 . With the cursor in the top row of the table, press the " Insert Row " button. A new row will be added, and "
Lock table " will be checked.
3 . Uncheck the box for "
Lock table " then press the " Refresh " button. The table regenerates. It will look exactly like it did at the end of step 1. The new row you added in step 2 will disappear.
Note: If the " Report Writer Report " file path is in the form " drive:/folder/subfolder/file name ", the table will be updated from the Report Writer report pointed to by that path, and you will get a yes-no dialog giving you the option to overwrite the file of the same name that is stored in your current Job. If the " Report Writer Report " file path is in the form "file name", then the table will be updated from the Report Writer report that is stored in your current Job.
applies when "
Auto" is not checked. Press the " Selection " button to select items that you want data about in the table. The types of items that you can select are determined by the choice made for the report to " Select " in Report Writer . For example, if " Select " in Report Writer is set to ' Gather sheets ', then pressing " Select " here will let you choose gather sheets.
VIDEO 
When " Auto " is off ( not checked ) for a Report Writer report, you can press the " Selection " button to choose the items that you want the report to provide data on. "
Auto" (when checked) keys on the choice made to " Select " in Report Writer to include in the report those items of the " Select " type which are in your current document. For example, if you are on a gather sheet with multiple submaterials placed onto it and " Select " in Report Writer is set to ' Gather sheets ' for the report, then the report will generate the table based on the submaterials that are on your current gather sheet.
page 1 | contents | objects > tables > | objects -- tables | double-click a table | top
"OK" (or the Enter key) closes this window and completes the Table Add operation or, it you double-clicked a table, the edit operation.
Note 1: The width of cells in a table are sized dynamically to accommodate the text that fits in them. In other words, if you increased the text in a cell of a table, the column that contains that text will grow wider if that is the cell in that column with the most text.
Note 2: After making changes to this window and pressing " OK ," you can still undo your changes by using Revert or Undo . If you Save to make your changes permanent, you can no longer Revert , but you can still Undo .
Note 3: Another way to edit a table is to Explode it so that it breaks down to its component lines and labels, which can be adjusted any way you like.
"Cancel" (or the Esc key or the ![]() button) closes this window without saving changes you have made.
button) closes this window without saving changes you have made.
In the case of an Table Add operation, the table will not be added.
In the case of a table edit operation, where you double-clicked a line on a table, that table will remain unchanged.
page 1 | contents | objects > tables > | objects -- tables | double-click a table | top
