Add Part From Library ( Modeling )
Tool summary :
- Opens the Part Library window so that you can select a part to add to the member that you select.
To select a library part for adding it to the model:
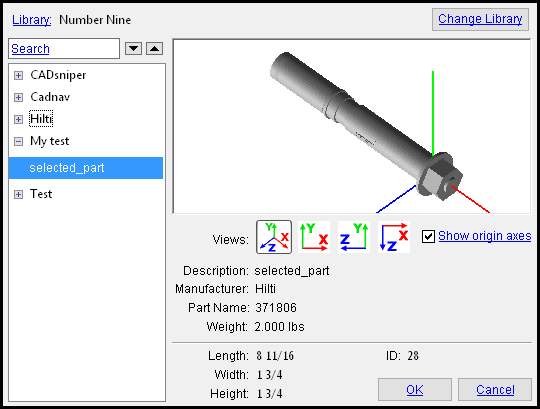
1 . In the part selection tree , click on the name of the part. In this example, the part's name (its " Description ") is selected_part .2 . Press the " OK " button.
- This help page also discusses how to add a library part as a stand-alone legacy miscellaneous member. When you add the part as a legacy miscellaneous member, the part is shipped loose, can be auto detailed as a member detail, and you do not select a member to add the part to. Click here for more detailed instructions.
- A library part's " Part type " can be ' Fastener ' or ' Materia l '.
- See, on this page, to open this window for the first time in a Modeling session .
Also see :
- Part Library Manager (window for managing the parts in part libraries) (
 )
)
- F3 (opens the Material Type Selection window)
- Library Part (option on the Material Type Selection window) ( )
- F2 (opens the Member Type Selection window)
- Library Part (option on the Member Type Selection window) ( )
- Part Library Fastener Edit (similar window, but for part library fasteners)
- Standard part (topic -- library parts are copied as when added to the model)
- User Created Standard Part Material (edit window for standard parts)
To open Part Library for the first time in a Modeling session :
If you have already added a library part in a Modeling session, you can skip step 2 . The Part Library window will open directly, without your having to first select a library. If at that point you want to change to a different library, you can press the " Change Library " button.
1 . In Modeling , you can add a library part TO a member or AS a legacy miscellaneous member:
To add a library part TO a member (pre-selection method):
- Select the one (1) member that you want to add the material to > press F3 > filter for "
Other " > double-click " Library Part " > continue to step 2.
- Select one (1) member > click the Add Library Part icon or use a keyboard shortcut or etc. > continue to step 2. The tool can be found in the Ribbon Editor under the command group ' Model -- Material '.
To add a library part AS a legacy miscellaneous member: Confirm that the box is checked for User and Site Options > Site > "
Another way to add a library part: On the Part Library Fastener Edit window, press the "file cabinet" browse button (
) next to " Part name ." When Part Library is opened using this method, you can only select parts whose " Part type " is ' Fastener '.
2 . A selection dialog opens. You have two alternatives:
|
Part libraries that are listed are those libraries that are in the
|
Alternative 1 : Double-click the one (1) library you want (or select it and press " OK "). Go to step 3.
Alternative 2 : Press " Cancel ." Do not continue.
3 . The Part Library window opens. The library you selected in step 2 is now the current " Library ." At this point you have two choices, which are different depending on the method of opening this window you used in step 1.
![]()
![]()
Alternative 1 (methods 1 thru 4) You can select a part (" Part type " = ' Fastene r' or ' Materia l'), then press " OK " and continue the operation that you started in step 1. The tool you invoked in step 1 will prompt you to locate two points to lay out the part.
Alternative 2 (methods 1 thru 4) You can press the " Cancel " button to end the operation you began in step 1.
Alternative 1 (method 5) : You can select a fastener (" Part type " = ' Fastene r'), then press " OK ." The entries made on the Part Library Fastener Edit window update to match the settings assigned to the fastener you selected.
Alternative 2 (method 5) You can press the " Cancel " button to close this window. The Part Library Fastener Edit window remains open and is now your currently active window.
Library: The name of the part library that is currently loaded.
When you first open this window, this is either the name that you selected or, if you didn't select a library, it is ' None selected '.
To change to a different library, press the " Change Library " button.
"Change Library" opens a selection dialog with a list of all part libraries that have been created.
1 . Press " Change Library ."
2 . A selection dialog opens. Do one (1) of the following:
HILTI ANCHORS

Part libraries that are listed are those libraries that are in the standardparts folder in the data directory for your current version of this program. You can add part libraries using the Part Library Manager .
Alternative 1 : Double-click the one (1) library you want (or select it and press " OK "). Go to step 3.
Alternative 2 : If you decide that you no longer want to change to a different part library, press " Cancel ." Go to step 3.
3 . The Part Library window becomes active again. If you selected a library in step 2, that library is now the current " Library ." If you pressed " Cancel " in step 2, then your current " Library " is the same one that was current before you did step 1.
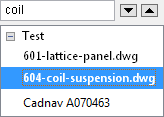
Search: Lets you enter a character string that will select a part or folder whose name (in the tree ) includes the entered string. " Search " looks through the current " Library " as it is represented in the selection tree, beginning from the currently selected part. Pressing ( ![]() ) or (
) or ( ![]() ) invokes the search.
) invokes the search.
|
When a searched-for part is found, the part is selected in the selection tree and displayed in the part viewer . |
1 . Enter the characters (numbers and/or letters and/or special characters) that you want to search for in the part selection tree .
2 . Press the down button (
) if you want to search down from the item that is currently selected in the part selection tree. Press the up button (
) if you want to search up from the item that is currently selected in the tree.
3 . Depending on whether you pressed the down button (
The part selection tree: The tree consists of folders and parts that are stored in the current " Library ."
|
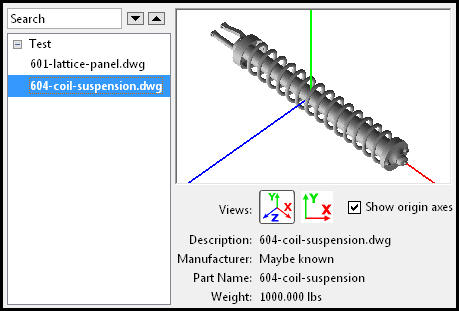
Selecting a part in the tree causes a view of that part to be shown. Part information such as the " Description " and " Manufacturer " is also shown. In this example, the part named 604-coil-suspension.dwg is selected. |
Folders containing parts are marked with a [ + ] or [ - ] symbol. Parts and empty folders do not have such a symbol next to their name. Pressing the [ + ] symbol next to a folder shows the parts and folders within that folder. Pressing the [ - ] symbol collapses the folder so that the parts and folders within it are no longer shown.
One way to select a part is to do a " Search ."
Views: Four buttons let you change views in the part viewer.
|
|
|
one of these buttons may be selected at a time |
The selected " Views " button sets the perspective that is shown of whichever part is selected in the part selection tree .
Each " Views " button shows a different axes-orientation perspective of the part. To achieve additional views, left-click and drag within the viewer to rotate the part and its axes.
The selected button remains pressed when you select different parts in the tree , thus giving you the same perspective of each subsequent part that you select.
Show origin axes: ![]() or
or ![]() . The axes origin can be changed in the Part Library Manager , but not on this window. The origin is important because it sets the insertion point for the part.
. The axes origin can be changed in the Part Library Manager , but not on this window. The origin is important because it sets the insertion point for the part.
|
The X axis runs parallel with the " Length " dimension of the part.
The Y axis runs parallel with the " Height " dimension of the part. The Z axis runs parallel with the " Width " dimension of the part. |
|
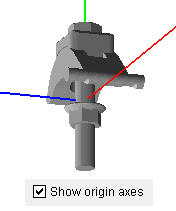
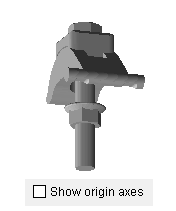
If this box is checked (
If the box is not checked (
), axes will not be shown in the part viewer.
Length: The calculated length of the part as measured parallel with the X axis ( red axis ).
Length is is expressed in the primary dimension " Units " and is automatically calculated based on a part's X axis orientation.
The " Length " may or may not correspond to the 3D model's definition of length for a similar material.
The actual volume of the part is based on information contained in the imported part file. This volume cannot be changed using the Library Part Manager and is the actual volume of the part when it is added to the model.
Width: The calculated height of the part as measured parallel with the Z axis ( blue axis ).
Width is expressed in the primary dimension " Units " and is automatically calculated based on a part's Z axis orientation.
The " Width " may or may not correspond to the 3D model's definition of width for a similar material.
The actual volume of the part is based on information contained in the imported part file. This volume cannot be changed using the Library Part Manager and is the actual volume of the part when it is added to the model.
Height: The calculated width of the part as measured parallel with the Y axis ( green axis ).
Height is expressed in the primary dimension " Units " and is automatically calculated based on a part's Y axis orientation.
The " Height " may or may not correspond to the 3D model's definition of width for a similar material.
The actual volume of the part is based on information contained in the imported part file. This volume cannot be changed using the Library Part Manager and is the actual volume of the part when it is added to the model.
ID: The index number (integer) assigned to the part library part for internal reference.
The " ID " needs to be referenced in scripts for adding an index part parametrically.

