The User Created Standard Part Material window
Settings on this window can also be found on edit window for material types such as rolled sections, plates, etc.
- ABM options are also a part of the User Created Standard Part Material window:

Information on the material you are editing may be included in an ABM when the "  ABM " check box is checked.
- The User Created Standard Part Material window lets you edit a standard part .
- It's other main purpose is to you apply certain settings (such as a single color) to multiple materials of different types that are not standard parts.
- To open this window:
- Method 1 : The User Created Standard Part Material window can be opened in Modeling when you double-click a standard part (in Select Items mode) or when you Edit Material and select a standard part.
- Method 2 : Review 2D Items can open a non-editable version of this window in the Drawing Editor .
- Method 3 : Edit Material with multiple materials of different types selected.
- Here's an example:
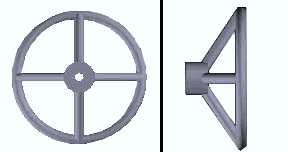
A valve handle created in Modeling by Fusing material. Standard parts can also be created by using " Link to New File " to import a reference model, or by importing various file types using Import Model .
Also see :
- Fuse Material (creates material accessed with this window)
- F2 > Member Type Selection > Miscellaneous -- Library Part (creates a standard part) (
 )
)
- F3 > Material Type Selection > Library Part (creates a standard part) ( )
- Link to New File (creates standard parts for a reference model)
- Standard part (topic)
- Standard parts ( Hide Items window -- for masking standard parts on drawing selection dialogs)
- General Information window (can open from this window)
- Submaterial piecemark (each unique material identified by)
- Altering a miscellaneous member's main view
- MemberMaterial.Material.StandardPart
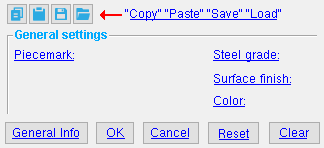
 " Copy " " Paste " " Save " " Load " buttons :
You'll find buttons like these at the top of this window. They apply to all user-editable settings (except " Piecemark ") that are on this window. Click here for more information.
You can " Copy " (
) the settings on this window, then " Paste " (
) those settings to a different rectangular plate.
" Save " (
) saves a file to the form/standard-part folder in the data directory used by the current version of SDS2 software that you are running. Give the file a name that will help other users identify its purpose. " Load " (
) copies over all settings on this window (except " Piecemark ") with the settings that are stored in the file that you select.
" Paste " and " Load " replace mixed entries to a single field with a single entry. " Copy " and " Save " ignore fields with mixed entries, treating them as if they have no entry or do not exist.
------ General settings ------
Piecemark: The submaterial piecemark for the standard part or multiple materials of different types being edited.
For standard parts: You may enter a piecemark of your own choosing. However, the piecemark you enter will remain a system piecemark , which means that it may be changed or combined with other submaterial marks during Create Solids . Standard part piecemarks begin with the material mark prefix for " Miscellaneous ." For the current quantity of standard parts that have been assigned this piecemark, see " Current quantity " on this standard part's General Information window.
For multi-material edit: This field is disabled .
Steel grade: A36 or A572 or etc.
For standard parts created by Fusing material: Steel grades that are available for standard parts depend on the material that was selected for the " Locate material to fuse to " step of creating the standard part. For example, if that material was a channel, then the steel grades that you can select for the standard part come from the Job Option list of " Channel Grades ."
For standard parts associated with reference models: Steel grades are from Home > Project Settings > Job > Plate Grades .
For multi-material edit: This field is disabled if the materials you are editing have incompatible steel grades. This, for example, prevents you from assigning a steel grade for channels to a wide flange section.
Surface finish: None or Sandblasted or Red oxide or Yellow zinc or Gray oxide or Blued steel or Galvanized . This affects the colors of ' Solid ' members in erection views in the Drawing Editor . See ' Color ' to set the color of this material in Modeling .
| sand blasted | red oxide | yellow zinc |
| gray oxide | blued steel | galvanized |
Note: Submaterial piecemarks do not get split apart by surface finish, which means that you can assign different surface finishes to materials (and therefore members) with the same piecemark. When you export a KISS file using ' Model ' as the " Data source " and the box for " Finish " routing in KISS Export Setup is not checked, surface finish data on materials are compiled into the KISS download (G = galvanized; N = none or sandblasted; P = others).
Report Writer: MemberMaterial.Material.SurfaceFinish
Color: A predefined color or a Custom Color . This is the approximate color applied to the standard part or multiple materials of different types when they are displayed in one of the three solid forms .
The predefined colors are set up on the Predefined Colors window. The color swatch next to the list box (
) displays the color that is selected.
Select ' Custom Color ' (last option on the menu) to launch your operating system's color picker and define any color you like.
Please note: Changing the color (without changing anything else) does not cause the material to be made graphical. This means that if the member this material is associated with undergoes Process and Create Solids , the color that is entered here will be overwritten with the default color specified at Home > Project Settings > Job > Modeling Colors .
To close this window :
![]()
![]()
![]()
![]()
" General Information " opens the General Information window, which you can use to review additional information about the standard part or multiple materials you are editing.
Tip: You can even use the General Information window to change the material's " X ," " Y ," or " Z " global coordinates (and thus reposition the material within the 3D model). Pressing " OK " or " Cancel " on the General Information window closes that window and reactivates this window.
"OK" (or the Enter key) closes this window and applies the settings on it to the standard part or multiple materials you are editing.
"Cancel" (or the Esc key) closes this window without saving any changes that you might have made to it.
"Reset" undoes all changes made to this window since you first opened it. The window remains open.
"Clear" automatically selects the default " Steel grade, " " Surface finish ," etc. and zeroes out all fields that require numeric entry.
Note: The " Clear " button can be used when adding material or a legacy miscellaneous member. It is disabled during a Edit Material operation.

