Part Library Manager
Part Library Manager
Any Job that uses the data directory for your current version of SDS2 can access library parts that you have imported into the library.Library parts can be DWG, DGN, IGES, STEP or IFC files.
Like any other material, a library part that has been added to the model can be auto detailed. On member details, the library part's weight, quantity and description (manufacturer + part name) may be listed in the bill of material.
The Edit Part Info window &
Part Library Import Options window .Pressing the " Edit Part Info " button opens the Edit Part Info window. Making changes to the window and pressing " Update " applies those changes to the Part Library Manager window. The current " Library " however, is not updated until you press the " Apply " button on the Part Library Manager window. A version of this window -- named Part Library Import Options -- opens when you import parts. When parts are imported, the library is updated immediately, without your having to press " Update " or " Apply ."
Also see :
|
- Part Library (window for selecting a part to add it to the model)
- Material Type Selection, library part .(window for adding submaterial) (
 )
)
- F3 (opens the above window)
- Member Type Selection, library part (window for adding members) ( )
- F2 (opens the above window as does choosing Model > Member > Add > Prompt for Member Type )
- Standard part (topic -- library parts are copied as when added to the model)
- User Created Standard Part Material (edit window for standard parts)
To open this window :
1. Go to the Start menu.
2. Go to the folder containing your version of SDS2 (v2025 or later).
3. Click the Resources folder, which launches in a new a File Explorer window.
4. Double-click the Part Libraries Manager icon in the File Explorer window.
Creating a new part library, importing parts, etc :
To create a new part library, press the " New ... " button on the selection dialog that opens after you click " Part Library Manger " on the SDS2 Utility Functions window. See step 2, alternative 2 of the " To open this window " instructions.
Another way to create a new part library is to press the " Change Library " button then press " New ... " on the selection dialog that opens.
To transfer a part library to a different SDS2 software installation, copy the library-containing folder that is in the
standardparts folder in the data directory used by your current version of SDS2 software v2016 and higher. When you copy that folder into the " standardparts " folder of a different installation of SDS2, v2016 or higher, that other installation will have access to that part library.
Only one part library is loaded into the Part Library Manager at any one time. That one library is the " Library " that is listed at the top, left of this window.
To create a subfolder in the part selection tree, you can right-click in the tree and choose " Create subfolder ... " on the context menu . If you right-clicked on a subfolder, the subfolder is added inside that subfolder. If you right-clicked outside of a subfolder, the subfolder is placed at the main level of the part selection tree. The " Create Subfolder " button is an alternative to using the context menu.
To import parts into a subfolder in a part library, right-click on the subfolder into which you want the parts to be placed, then choose " Import new parts " on the context menu . Alternatively, you can select the subfolder then press the " Import " button.
To delete parts from the library, hold down the Shift key or Ctrl key and select multiple parts, then right-click and choose " Delete contents " on the context menu .
The axes origin of a library part coincides with the 1st point that is located when the library part is added to the model. Options on the Edit Part Info window can be used to change the axes origin. For example, " Origin point " and " X translation " and " Y translation " and " Z translation " can all be used to change the axes origin. You must press " Apply " to make such changes permanent.
Axis rotation options also influence how a library part is added to the model since they can be used to rotate the part around its various axes. These options are " Rotation x " and " Rotation Y " and " Rotation Z ."
Some changes to this window are made on the fly. You or any other workstation on your network that uses the data directory for your current version of this program can apply to the model changes that you have made to the part library even before you " Close " this window. For example, If you are currently in Modeling and import a new part or add a new library in the Part Library Manager , that new part is immediately accessible to you in Modeling , even before you " Close" this window. On the other hand, changes made using " Edit Part Info " cannot be accessed in Modeling until you press " Apply ."
When a library part is added in Modeling , its link to the Part Library is severed, and it is copied into the model as a standard part . If you delete the original library part, its copy remains in the model as a standard part. If you zip up a copy of the Job and send it to another SDS2 software installation, the part library parts that have been added to the model remain in the copy of the model.
The Part Library Manager does not alter parts already in the model. Those parts are standard parts, and they will not be changed. Only library parts that you subsequently add to the model will show the changes that you have made in the Part Library Manager .
To add parts to the model, you can use the F2 or F3 function keys. F2 adds the part as a member. F3 adds the part as a submaterial of a member that you select.
Library: The name of the part library that is currently loaded.
When you first open this window, this is either the name that you selected ( step 2, alternative 1 ), or the name of the library that you created ( step 2, alternative 2 ).
To rename this library, press the " Rename Library " button.
To change to a different library, press the " Change Library " button.
"Rename Library" opens a dialog for renaming the current " Library " you are editing or reviewing.
1 . Press " Rename Library ."
2 . A rename-cancel dialog opens.
Library name:
My new name 
Alternative 1 : Type in a name, then press " Rename " to rename the current library. The dialog closes, and the new name you entered in is be entered to " Library ." This change is made on the fly without your having to press " Apply ."
Alternative 2 : Press " Cancel " to close the dialog without renaming the library.
Note: The name change you make here is also changed in the associated library parts folder that can be found in the
"Change Library" opens a selection dialog with a list of all part libraries that have been created.
|
1 . Press " Change Library ."
2 (if applicable) . Skip this step if it does not apply. If you made " Edit Part Info " changes to your current " Library " since you opened this window or last pressed " Apply ," a dialog like the following opens.

The current library has been modified.
Save it first?

Alternative 1 : Press " Yes " to save the changes to the current library. Go to step 3.
Alternative 2 : Press " No " to go to step 3 without saving changes to the current library.
3 . A selection dialog opens. Do one (1) of the following:
HILTI ANCHORS

Part libraries that are listed here are maintained in same-named folders that can be found in the Alternative 1 : Double-click the one (1) library you want (or select it and press " OK "), then go to step 4.
Alternative 2 : To create a new library, press the " New ... " button, then enter a library name to the dialog that opens then press " Create ." Go to step 4.
Library name:
My new library 
Alternative 3 : If you decide that you no longer want to change to a different part library, press " Cancel ." Go to step 4.
4 . The Part Library Manager becomes active again. The library you selected or created in step 3 is now the current " Library ." If you pressed " Cancel " in step 3, your current " Library " is the same one that was current before you did step 1.
Search: Lets you enter a character string that will select a part or subfolder whose name (in the tree ) includes the entered string." Search " looks through the current " Library " as it is represented in the part selection tree, beginning with the currently selected part. Pressing ( ![]() ) or (
) or ( ![]() ) invokes the search.
) invokes the search.
|
When a searched-for part is found, the part is selected in the selection tree and displayed in the part viewer . |
1 . Enter the characters (numbers and/or letters and/or special characters) that you want to search for in the part selection tree .
2 . Press the down button (
) if you want to search down from the item that is currently selected in the tree. Press the up button (
) if you want to search up from the item that is currently selected in the tree.
3 . Depending on whether you pressed the down button (
The library part selection tree: The tree consists of subfolders and parts that are stored in the current " Library ." The tree resides in the left pane of the Part Library Manager window.
|
|
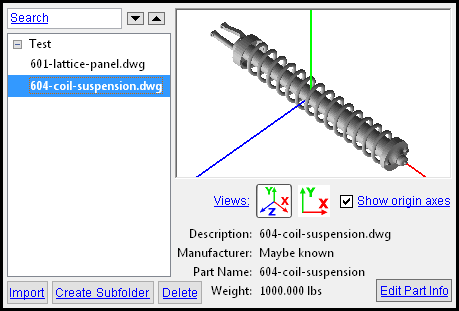
Selecting a part in the part selection tree causes a view of that part to be shown. Part information such as the " Description " and " Manufacturer " is also shown. You can press the " Edit Part Info " button to edit the part information. In this example, the part named 604-coil-suspension.dwg is selected. |
Subfolders containing parts are marked with a [ + ] or [ - ] symbol. Parts and empty subfolders do not have such a symbol next to their name. Pressing the [ + ] symbol next to a subfolder shows the parts and subfolders within that subfolder. Pressing the [ - ] symbol collapses the subfolder so that the parts and subfolders within it are no longer shown.
One way to select a part is to do a " Search ."
Shortcut menus for the part selection tree are context sensitive. You can use them to add subfolders, delete subfolders, rename subfolders or add parts to subfolders.
Shortcut menus: Different context menus open depending on where you right-click or what you select. Changes are made on the fly without your having to press " Apply ."
To add a new subfolder (main level), right-click on a blank area under the part selection tree , choose " Create subfolder ... ," type in the name of the folder, then press " Create ." The new folder is added to the end of the tree.
To add a new subfolder inside of a subfolder, right-click on a subfolder or on any part within that subfolder, choose " Create subfolder ... ," type in the name of the subfolder, then press " Create ."
To delete a subfolder, right-click on a subfolder, then choose " Delete folder ."
To delete a part, right-click on a part, then choose " Delete part ."
To delete multiple parts, hold down the Shift key or Ctrl key and select multiple parts, then right-click and choose " Delete contents ."
To add parts to a subfolder, right-click on the subfolder you want to add the parts to, then choose " Import new parts .... " and select the parts you want to import.
![]()
![]()
![]()
"Import" lets you add parts to a subfolder or to the main level of the part selection tree .
"Create Subfolder" adds a subfolder. To add the subfolder to the main level of the part selection tree, make certain that no subfolder is selected. If a subfolder is selected, " Create Subfolder " adds the new subfolder inside that subfolder. You can right-click on the main level of the selection tree to unselect any subfolder that might have previously been selected.
|
Views: Four buttons let you change views in the part viewer.
|
|
|
one button can be selected at a time |
The selected " Views " buttons sets the perspective that is shown of whichever part is selected in the part selection tree .
Each " Views " button shows a different axes-orientation perspective of the part. To achieve additional views, left-click and drag within the viewer to rotate the part and its axes.
The selected button remains pressed when you select different parts in the part selection tree , thus giving you the same perspective of each subsequent part that you select.
Also see: The orientation of axes can be changed using " Rotation x " and " Rotation Y " and " Rotation Z ." The axes origin can be changed by using " Origin point " and " X translation " and " Y translation " and " Z translation ." These axes changes are saved when you press " Apply ."
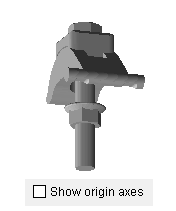
Show origin axes: ![]() or
or ![]() . The X, Y and Z axes are originally defined in the file that was imported to be a library part. This means that a part's origin may have been defined for a purpose unrelated to this program, thus making it more difficult for you to add that part in Modeling . Fortunately, the Part Library Manager gives you ways to adjust the axes origin of a part. You can adjust the origin's placement using the axis origin and X, Y, Z translation and X, Y, Z rotation options found in the Edit Part Info window.
. The X, Y and Z axes are originally defined in the file that was imported to be a library part. This means that a part's origin may have been defined for a purpose unrelated to this program, thus making it more difficult for you to add that part in Modeling . Fortunately, the Part Library Manager gives you ways to adjust the axes origin of a part. You can adjust the origin's placement using the axis origin and X, Y, Z translation and X, Y, Z rotation options found in the Edit Part Info window.
|
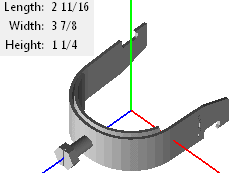
The X axis runs parallel with the " Length " dimension of the part.
The Y axis runs parallel with the " Height " dimension of the part. The Z axis runs parallel with the " Width " dimension of the part. |
|
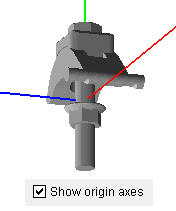
If this box is checked (
), the X axis and Y axis and Z axis of the part is shown. The origin where these axes converge is the insertion point for the part. That insertion point is the 1st point that is located when the library part is added to the model.
If the box is not checked (
), axes are not shown in the part viewer.
Length: The calculated length of the part as measured parallel with the X axis ( red axis ).
Length is is expressed in the primary dimension " Units " and is automatically calculated based on a part's X axis orientation.
The " Length " may or may not correspond to the SDS2 3D model's definition of length for a similar material.
If you change a part's " Rotation Y " or " Rotation Z ," the orientation of the part's X axis changes, and the part's " Length " is recalculated.
You may want to do an " X translation " to reposition the library part's origin. When a part is added to the model, its origin is the 1st point located. Referring to the " Length " reported here can help you to determine how much " X translation " is required.
The actual volume of the part is based on scale information contained in the imported part file. This volume cannot be changed using the Library Part Manager and is the actual volume of the part when it is added to the model.
Width: The calculated width of the part as measured parallel with the Z axis ( blue axis ).
Width is expressed in the primary dimension " Units " and is automatically calculated based on a part's Z axis orientation.
The " Width " may or may not correspond to SDS2 3D model's definition of width for a similar material.
If you change a part's " Rotation X " or " Rotation Y ," the orientation of the part's Z axis changes, and the part's " Width " is recalculated.
You may want to do an " Z translation " to reposition the library part's origin. When a part is added to the model, its origin is the 1st point located. Referring to the " Width " reported here may help you to determine how much " Z translation " is required.
The actual volume of the part is based on scale information contained in the imported part file. This volume cannot be changed using the Library Part Manager and is the actual volume of the part when it is added to the model.
Height: The calculated height of the part as measured parallel with the Y axis ( green axis ).
Height is expressed in the primary dimension " Units " and is automatically calculated based on a part's Y axis orientation.
The " Height " may or may not correspond to SDS2 3D model's definition of height for a similar material.
If you change a part's " Rotation X " or " Rotation Z ," the orientation of the part's Y axis changes, and the part's " Height " is recalculated.
You may want to do an " Y translation " to reposition the library part's origin. When a part is added to the model, its origin is the 1st point located. Referring to the " Height " reported here can help you to determine how much " Y translation " is required.
The actual volume of the part is based on scale information contained in the imported part file. This volume cannot be changed using the Library Part Manager and is the actual volume of the part when it is added to the model.
ID: The index number (integer) that the part library part is given for internal reference.
The " ID " needs to be referenced in scripts for adding an index part parametrically.
|
|
|
opens the Edit Part Info window |
Importing parts opens the Part Library Import Options window.
|
The Edit Part Info and Part Library Import Options windows :
Part type: Material or Fastener .
'
Material ' lets the library part be added as a material that is a standard part . A library part material can be added in Modeling as a miscellaneous member by pressing F2 then selecting " Miscellaneous -- Library Part " on the Member Type Selection window. Such a part can be added as a submaterial of a member by pressing F3 then selecting the member to add the part to, then selecting " Library Part " on the Material Type Selection window. The Part Library window opens for selecting the individual part library material.
'
Part name: An alphanumeric string which may be a number or letter-number combination or just a series of letters. The string, for example, may match a catalog number used for the purposes of ordering. The part name entered here is included in the " Description " for this material or fastener in the member bill of material.
For a part library material , the bill of material description is a combination of " Manufacturer " + " <space> " + " Part name " + " : " + " <space> " + " Description ." In Modeling , the bill of material description is the " Description " on the General Information window of a library part material.
For a part library fastener , the bill of material description is a combination of " Diameter " + " <space> " + " Manufacturer " + " <space> " + " Part name " + " : " + " <space> " + " Description ."
When a library part is imported , if the file has part name metadata, that metadata is entered as the " Part name ." A user cannot overwrite part name metadata at import time. Only IFC files are capable of storing such metadata. The user can overwrite the " Part name " metadata after import time.
When a file that has no part name metadata is imported, the default behavior is to use the filename (without extension) as the part name, with underscores replaced by spaces. If the " Manufacturer " string also appears in front of the filename, it is stripped off before assigning the part name. The user can choose to overwrite this default at import time or to edit the part name later.
Manufacturer: The manufacturer's name . The manufacturer is included in the " Description " for this material or fastener in the member bill of material.
For a part library material , the bill of material description is a combination of " Manufacturer " + " <space> " + " Part name " + " : " + " <space> " + " Description ." In Modeling , the bill of material description is the " Description " on the General Information window of a library part material.
For a part library fastener , the bill of material description is a combination " Diameter " + " <space> " + " Manufacturer " + " <space> " + " Part name " + " : " + " <space> " + " Description ."
When a library part is imported , if the file has manufacturer metadata, that metadata is entered as the " Manufacturer ." A user cannot overwrite manufacturer metadata at import time. Only IFC files are capable of storing such metadata. The user can overwrite the " Manufacturer " metadata after import time.
When a file that has no manufacturer metadata is imported, the library part is, by default, set to " Unknown ". The user can choose to overwrite this default at import time or to edit the manufacturer later. Tip: If you enter a " Manufacturer " at import time, the import program may strip the manufacturer string from the " Part name ."
When you press the " Update " button, the " Manufacturer " shown here is shown as the " Manufacturer " in the Part Library Manager .
When you press the " Apply " button on the Part Library Manager , the " Manufacturer " you entered here is saved to the current " Library ."
Description: The name that is used to identify a part in the part selection tree . If multiple parts with different descriptions are being edited or imported, a gray block indicates mixed entries . The description entered here is included in the " Description " for this material or fastener in the member bill of material.
For a part library material , the bill of material description is a combination of " Manufacturer " + " <space> " + " Part name " + " : " + " <space> " + " Description ."
For a part library fastener , the bill of material description is a combination of " Diameter " + " <space> " + " Manufacturer " + " <space> " + " Part name " + " : " + " <space> " + " Description ."
When a library part is imported , if the file has description metadata, that metadata is entered as the " Description ." A user cannot overwrite description metadata at import time. Only IFC files are capable of storing such metadata. The user can overwrite the " Description " metadata after import time.
When a file that has no description metadata is imported, the library part is, by default, given its filename (minus its extension) as its " Description ." Also, underlines are converted into spaces. The user can choose to overwrite this default at import time.
Diameter: The nominal diameter of the part library fastener . The diameter entered here included in the " Description " for this fastener in the member bill of material. When the " Part type " is not set to ' Fastener ', this option is disabled ( grayed out ).
For a part library fastener, the bill of material description is a combination of " Diameter " + " Manufacturer " + " <space> " + " Part name " + " : " + " <space> " + " Description ."
The " Width " of the fastener (reported on the Part Library Manager window) is totally independent of the value you enter here as its " Diameter ." That is to say, changing the part library fastener's " Diameter " does not change its " Width ." However, you should be aware that the in Modeling the " Width " of a cylindrical part library faster is the diameter of that fastener
Length: The nominal length of the part library fastener . The length that is entered here is the " Length " that is reported in the member bill of material.
The " Length " that is reported on the Part Library Manager window is independent of this " Length ." That length is the calculated length in the model. This length is the nominal length reported in the bill of material.
Remarks: Any information that you want to be reported in the bill of material " Remarks ."
Weight: The nominal weight of the part. The entry made here is reported as the part's " Unit weight " in the member bill of material.
If 0 is entered here, then no " Unit weight " is reported in the member bill of material. You should enter a weight in pounds if the primary dimension " Units " is one of the ' Imperial .. '. choices. The weight you enter should be in kilograms if the primary dimension " Units " is set to ' Metric (mm) '.
When a library part is imported , if the file has weight metadata, that metadata is entered as the " Weight ." A user cannot overwrite weight metadata at import time. Only IFC files are capable of storing such metadata. The user can overwrite the " Weight " metadata after import time.
When a file that has no weight metadata is imported, the library part is, by default, given a " Weight " of 0 (zero). The user can choose to overwrite this default at import time.
Rotation X: A positive (+) or negative (-) number of degrees.
| An example of changing the " Rotation X " (the red axis is the X axis) |
||

|

|
|
| ' 3 7/8 ' inches is the " Height " of the part -- its extents along the green axis (Y axis). | On the Edit Part Info window, a " Rotation X " of ' 90 ' degrees is entered. The " Update " button is pressed. | ' 3 7/8 ' inches is now the " Width " of the part -- its dimension along the blue axis (Z axis). |
The red axis is the X axis.
The X axis runs parallel with the " Length " dimension of the part.
Entering a number to " Rotation X " then pressing " Update " rotates the part that number of degrees around its X axis.
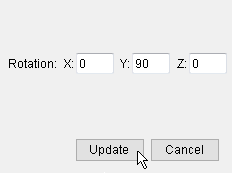
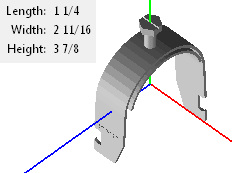
Rotation Y: A positive (+) or negative (-) number of degrees.
| An example of changing the " Rotation Y " (the green axis is the Y axis) |
||
|
|
|
|
| ' 1 1/4 ' inch is the " Width " of the part -- its dimension along the blue axis (Z axis). | On the Edit Part Info window, a " Rotation Y " of ' 90 ' degrees is entered. The " Update " button is pressed. | ' 1 1/4 ' inch is now the " Length " of the part -- its dimension along the red axis (X axis). |
The green axis is the Y axis.
The Y axis runs parallel with the " Height " dimension of the part.
Entering a number to " Rotation Y " then pressing " Update " rotates the part that number of degrees around its Y axis.
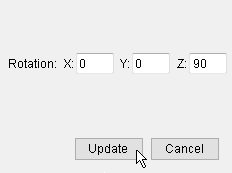
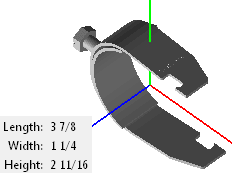
Rotation Z: A positive (+) or negative (-) number of degrees.
| An example of changing the " Rotation Y " (the blue axis is the Z axis) |
||
|
|
|
|
| ' 3 7/8 ' inch is the " Height " of the part -- its dimension along the green axis (Y axis). | On the Edit Part Info window, a " Rotation Z " of ' 90 ' degrees is entered. The " Update " button is pressed. | ' 3 7/8 ' inch is now the " Length " of the part -- its dimension along the red axis (X axis). |
The blue axis is the Z axis.
The Z axis runs parallel with the " Width " dimension of the part.
Entering a number to " Rotation Z " then pressing " Update " rotates the part that number of degrees around its Z axis.
Origin point: Unchanged or Translate or Centered or Lower corner . The origin is the point at which the X, Y and Z axes converge. It coincides with the 1st point that is located when the library part is added to the model. In other words, the origin is the insertion point for the library part.
'
'
'
'
X translation: A positive (+) or negative (-) distance in the primary dimension " Units " or other units .
| An example of changing the " X translation " (the red axis is the X axis) |
||
|
|
|
|
| The origin of this library part is the inside of the washer. | On the Edit Part Info window, an " X translation " of ' -0.5 ' inches is entered, and the " Update " button is pressed. | The new origin is shown in the viewer. To make the new origin permanent, the user can press " Apply ." |
The red axis is the X axis.
The X axis runs parallel with the " Length " dimension of the part.
Entering a distance to " X translation " then pressing " Update " moves the origin point that distance parallel with the length dimension of the part.
Y translation: A positive (+) or negative (-) distance in the primary dimension " Units " or other units .
| An example of changing the " Y translation " (the green axis is the Y axis) |
||
|
|
|
|
| The origin of this library part is at the center of the part. The " Height " of the part is ' 4 ' inches. | On the Edit Part Info window, a " Y translation " of ' 2 ' inches is entered. The " Update " button is pressed. | The new origin is shown on the part viewer. Pressing " Apply " saves this new origin to the library. |
The green axis is the Y axis.
The Y axis runs parallel with the " Height " dimension of the part.
Entering a distance to " Y translation " then pressing " Update " moves the origin point that distance parallel with the height dimension of the part.
Z translation: A positive (+) or negative (-) distance in the primary dimension " Units " or other units .
| An example of changing the " Z translation " (the blue axis is the Z axis) |
||
|
|
|
|
| The origin of this library part (Godzilla) as it was originally shown in the part viewer. The " Width " of the part is ' 50 ' feet. | On the Edit Part Info window, a " Z translation " of ' -25-0 ' feet is entered, and the " Update " button is pressed. | Godzilla's new origin is shown on the part viewer. To make the new origin permanent, the user can press " Apply ." |
The blue axis is the Z axis.
The Z axis runs parallel with the " Width " dimension of the part.
Entering an " Z translation " distance then pressing " Update " moves the origin point that distance parallel with the width dimension of the part. To make the new origin permanent, you can press " Apply ."
Curve error: A positive distance in the primary dimension " Units " or other units .
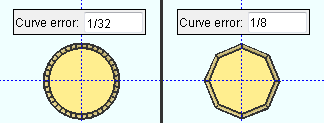
The small " Curve error " such as ' 1/32 ' inch results in a large number of polygons being generated to represent curved surfaces.
Changing to a larger " Curve error " results in fewer polygons being generated to represent curved surfaces. This can, if there are many added library parts, result in faster auto detailing times and less Modeling memory use. However, increasing this distance also results in curved surfaces being modeled less precisely.
The name used in geometry for " Curve error " is. "sagitta" and is sometimes abbreviated as "sag."
Scale factor: A decimal number . This applies when you import DWG files. The option is not available on the Edit Part Info window.
A scale factor of 1 results in the DWG part not being scaled. A number greater than one such as ' 2 ' or 3' scales up the part. A number less than one such as ' 0.5 ' or ' 0.25 ' scales down the part.
For example, you import a cubic part whose " Length " " Width " and " Height " is ' 1 ' unit, but you actually want the part to be ' 3 ' units. So you delete the part and import it again applying a " Scale factor " of ' 3 '. As a result, the " Length " " Width " and " Height " of the cube is reported as ' 3 ' units.
" Import " is available when you import parts. It closes the Part Library Import Options window and updates the current " Library " with the new parts. The new parts immediately become selectable within the subfolder that they were added to on the part selection tree . Each part is identified in the tree by its " Description ."
" Update " closes the Edit Part Info window and applies the settings on it to information about the part that is shown under the part viewer . For example, entering a " X rotation " of 90 causes the part viewer on the Part Library Manager to show the part as rotated 90 degrees around the X axis. The " Update " window does not permanently save your changes -- to do that, you can press " Apply ."
" Cancel " closes the Edit Part Info window without updating the Part Library Manager . On the Part Library Import Options window, " Cancel " closes the window without importing any parts.
![]()
![]()
"Apply" becomes enabled when you " Edit Part Info ." It does not become enabled if you add an empty subfolder or import parts or change the library name.
Pressing the " Apply " button saves part information changes to the current " Library ."
When you add a subfolder or import parts or change the library name, those changes are saved to the current " Library " automatically, without your having to press " Apply ."
As soon as you press " Apply ," the button is disabled ( grayed out ), which indicates that part information changes made to this window have been saved.
Users in Modeling have access to your part-information changes immediately after you press "Apply."
1 . Press the " Close " button.
2 ( if applicable ): Skip this step if it does not apply. If unapplied changes have been made using " Edit Part Info ," a dialog opens to ask you if you want to save those changes. The "current library" referred to in the dialog is the " Library ."
The current library has been modified.
Save it first?Alternative 1 : Press " Yes " to save the changes to the " Library ." Go to step 3.
Alternative 2 : Press " No " to go to step 3 without saving changes to the " Library ."
3 . The Part Library Manager is now closed.

