 Compare Drawings ( Drawing Editor )
Tool summary :
 Example :

|
|

|
|

|
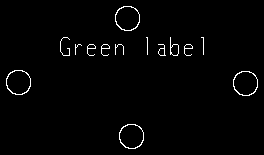
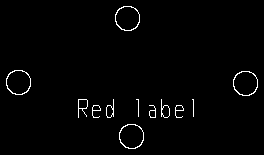
Result of comparison : Green label is in the current drawing, but not in the one compared to. Red label is in the second drawing, but not in the first. Circles shown as dashed (---) are in both drawings. |
 Step-by-step instructions :
See the warning at the top of this help document before you begin.
1 . Skip this step if you are already in the drawing you want to compare.
Alternative 1 : Open a drawing of any type.
Alternative 2 : File > Open Archived Drawing and select an archived drawing.
2 . You should now be in the drawing you want to compare. Invoke Compare Drawings using the following method:
▸ Choose File > Compare Drawings .
▸ Use a keyboard shortcut (if one has been set up).
3 . A drawing selection dialog opens.
3a : Select one (1) of the following drawing types:
Details or
Job standard details or
Global standards or
Submaterial or
Erection views or
Detail sheets or
Gather sheets or
Erection sheets or
Sheet outlines .
3b : The selection list on the drawing selection window now lists drawings of the type you selected in step 3a.

Alternative 1 : Double-click a drawing name (or select a drawing name, then press " OK "). Go to step 4.
Alternative 2 : Press " Cancel " to end this operation. Do not continue.
4 . A warning dialog opens. On it is a list of mismatches between the two drawings.
4a : Press the " OK " button to continue.
5 . The two drawings are compared graphically.
dashed lines (---) are drawn where the two drawings are the same.
green lines are applied to objects in the first drawing (step 2) that are absent in the second drawing (step 3).
red dashed lines are applied to objects in the second drawing (step 3) that are absent in the first drawing (step 2).
6 . See the warning at the top of this help document. At this point, what you should do depends on whether or not you are in an archived drawing.
If you are in an archived drawing: Open a drawing from the Drawing List Panel.
If NOT in an archived drawing: Choose File > Revert , then press " Yes " when prompted " Are you sure? ." This will revert your drawing back to the way it was in step 2.
 Mismatches :
The warning dialog that appears in step 4 lists mismatches. After each mismatch is the value assigned to the first drawing ( step 2 ) followed by the value assigned to the second drawing ( step 3 ). Here are some of the mismatches that may appear:
"Drawing types mismatch" This message occurs when the first drawing is, for example, a member detail, and the second drawing is, for example, a job standard detail. 2 is member detail, 5 is a detail sheet, 3 is a job standard detail, 6 is a gather sheet, 7 is an erection sheet, 9 is an erection view, 10 is a sheet outline, 11 is a global standard.
"Member index mismatch" This message occurs when the member numbers are different. 0 indicates no member number and means the drawing that is not a member detail.
"Quantity mismatch" This message occurs when the " Quantity " reported for the two drawings is different.
"Show window [0] or [1] or [2] or [3] mismatch" Each of these represents a point on the bounding box of the drawing. Together they tell you the approximate size of the drawing.
"Drawing scale mismatch" This message occurs when the " Drawing scale " reported for the two drawings is different.
"Scale length mismatch" This message occurs when the " Material length " reported for the two drawings is different.
"Shorten limit line mismatch" This message occurs, for example, when one drawing has a " Shorten limit line " and the other does not. The value reported is 0 if the drawing does not have a shorten limit line. The value reported is the X-axis location of the shorten limit line if the drawing has one.
"Plotted date mismatch" This message occurs when the " Last printed " date reported for the two drawings is different.


