 Drawing List Panel
Shows you the list of created drawings that you can open. You can also Save As, Rename, Delete, and create New Drawings.
- General Overview
- Tips and Tricks
- Related Tools
Drawing List Panel button: Press this button to collapse and expand the Drawing List Panel.
The Open command also expands the Drawling List Panel when it is collapsed, and switches to the Drawing List Panel when the Drawing Data Panel or the Layer Panel is open.
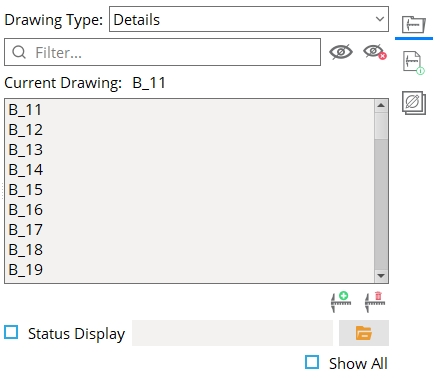
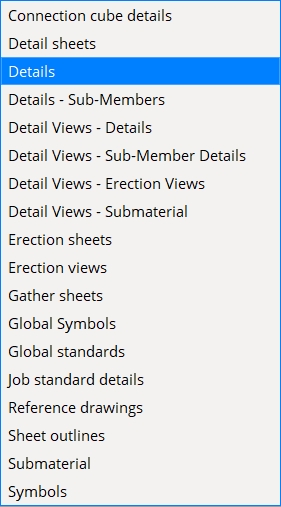
Drawing Type: Select the type of drawing you want to populate the selection list with.
Filter: Type the full or partial name of a drawing. The selection list is filtered to show only the drawing names that contain that text.
 Hide items: Click this button to open the Hide Items window.
Note: The icon changes to
when one or more non-default Hide items settings are applied.
![]() Clear hide items: Click this button to reset the Hide items settings to their default state.
Clear hide items: Click this button to reset the Hide items settings to their default state.
Tip: You can also temporarily override the Hide items settings and list all drawings by
checking the box for Show All.
Selection list: This is the list of the drawing names for the particular Drawing Type you have selected. This is where you can open, save a copy of, or rename a drawing.
Open a drawing:
Double-click a drawing name.
Select a drawing name using your mouse or the up and down arrow keys, then press Enter .
Select a drawing name, right-click on it, and click Open.
Select a drawing name, right-click on it, and click Open in new window to open the drawing in a new Drawing Editor window.
Save a copy of a drawing: Select a drawing, right-click on it, and click Save as to create a copy of that drawing.
Note: The Save as option is deactivated for Submaterial details and Erection view drawings.
Rename a drawing: Select a drawing, right-click on it, and click Rename.
Note: Rename is deactivated for Submaterial details.
The Detail Complete Date Set window
If the drawing you open has its Detail complete date set, a Yes-No-Cancel window appears asking if you want to clear the date.
Press the Yes button to clear the Detail complete date.
Press the No button to keep the Detail complete date.
Press the Cancel button to keep your current drawing open.
Open to restore work lost due to a crash:
Work-loss scenario: You are working on a drawing when a power outage causes you to lose all the work that you have done. Fortunately, you had set the User and Site Options > Drawings > Automatically create recovery files interval to 15 minutes, and you were working on the drawing for more than 15 minutes. As a result, a recovery file was created, and that auto saved file includes the work that you lost when your computer crashed.
To get back the work you lost: After restarting your computer, run the Verify and Fix utility to unlock files that were locked due to the crash. In the Drawing Editor, open the drawing that you were working on. Since an auto saved recovery file of the drawing was saved, a window appears asking if you want to restore work from the auto saved drawing. Click Yes to restore the lost work.
Also see: Restore Backup Drawing
The Save Changes window appears if you have made changes to your current drawing and have not saved them before trying to open a different drawing. There are also options to enter or clear the Detail complete date or Detail frozen date.
Press the Yes button to save your changes and open the different drawing.
Press the No button to discard your changes and open the different drawing. Changes made to the Detail complete and Detail frozen dates are also discarded.
Press the Cancel button to preserve the unsaved changes and keep the current drawing open. Changes made to the Detail complete and Detail frozen dates are discarded.
 New Drawing: Click this button to open the New Data Drawing window and create a new drawing.
Note: New Submaterial details, Erection view drawings, and Connection cube drawings cannot be created.
 Delete Drawing: Click this button to delete the drawing you currently have selected on the Drawing List Panel.
Note: Member details and submaterial details that were created by automatic detailing cannot be deleted.
Status Display: When Status Display is checked you can use a status display file to color code (or mask) the list of drawings.
Show All: Check the Show All box to override the Hide items settings and list all of the drawings.

