Verify and Fix Job ( Home > Utilities > )

For most situations, you should run Verify and Fix with only the default options checked. To do this, simply press " OK " without making any changes to this window.
  • Just because a file has been locked does not mean that there is a problem with that file. If other people are on your network, it may be that somebody else is already in the file. Verify and Fix should not be run if there are other people on your network who are using your current Job. See this warning .
  • Causes of file locking and data corruption
  • Step-by-step instructions

Also see :

page 1 | contents | home > utilities > verify and fix | top


  Causes of file locking and data corruption :

  • Running Verify and Fix while somebody else is working in the same Job you are in may cause both file locking problems and data corruption. See the warning .
  • If you shut down your computer without properly exiting an SDS2 program, the files that were active at that time will be locked and various data throughout your current Job may become corrupted. When you try to access a locked file, an error message appears. Sometimes you can simply press " Ignore " one or several times to get access to that file. Other times you are entirely prevented from accessing the file. To take care of the problem, run Verify and Fix .
  • Changing File Sizes while somebody else is working in the same Job you are in may cause both file locking problems and data corruption.
  • Linux or Windows operating system errors can cause both file locking problems and data corruption. Operating system errors that might occur may be associated with networking. Especially crucial operating system errors are errors that result in SDS2 program system crashes.
  • Software problems can also result in your need to use Verify and Fix . For instance, if an SDS2 program were to allow the user to enter an incorrect file name (which shouldn't, in fact, ever happen), then Verify and Fix would identify the file name as incorrect and fix the problem.
  • Power outages may cause both file locking problems and data corruption.

page 1 | contents | home > utilities > | top


  Step-by-step instructions :

Verify and Fix can be used in the event that data becomes corrupted or files become locked. In most cases you will probably want to run Verify and Fix Member File with only its default options checked. To do this, simply press " OK " without making any changes to the Verify and Fix window. You can also change the defaults on the Verify and Fix window to tailor the operation to your specific needs.

1 . Open the Verify and Fix Member File window:

1a : At Home , click Utilities > Utility Functions . Then, click the " Verify and Fix " button. If prompted to do so, enter the " Utility Password " that has been set up for your network.

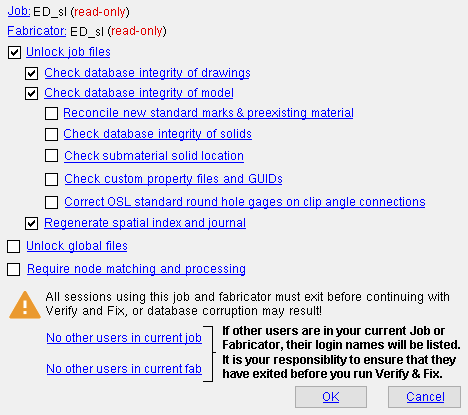
2 . Home and your Utility Functions window close automatically, and the Verify and Fix Job window opens. Only three of the options on this window are checked ( ) by default. The login name and computer name of each workstation accessing your current Job is listed at the bottom of the window.

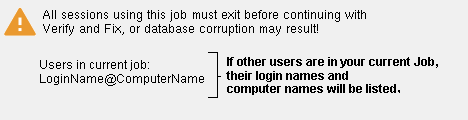
2a : You cannot run verify and fix when there are login names listed on the Verify and Fix Job window. You must first make sure that all users are out of your current Job. Only when the Verify and Fix Job window says " No other users in current job " can you press the " OK " button to run verify and fix. But even then it may still not be safe to continue. If you are unlocking global files , make sure that all workstations have exited all SDS2 programs .

2b : For most situations, you should run Verify and Fix with only the default options checked. To do this, simply press " OK " without making any changes to this window,

3 . Simply press " OK " then go to step 4 if you want to apply the default settings on this window. Before you press " OK ," make sure you have heeded the instructions provided in the warning (step 2a).

Job: read-only . This tells you the name of the current Job . With the exception of " Unlock global files ," all options on this window apply to files in your current Job.

Fabricator: read-only . This tells you the name of the current Fabricator .

Unlock job files: or .

If this box is checked ( ) when you press " OK " to close this window, all files in your current Job will be unlocked. If you are certain that all data in your current Job is correct and that your only problems are locking problems, you may wish to choose this option only. Otherwise this should probably be run in conjunction with a " Database integrity check " of both the model and of drawings . See causes of file locking and data corruption . Also see warning .

If the box is not checked ( ), locked files in your current Job will remain unlocked.

Check database integrity of drawings: or . If you do a database integrity check of drawings (this option), you should also do one on the model ( below ), either at this time or at a later time, to ensure best consistency of data in your current Job. This box should be checked for any Jobs that you plan to merge using Merge Jobs .

If this box is checked ( ) when you press " OK " to close this window, Verify and Fix will open each drawing and sheet file in your current Job and check it for consistency against relevant reference data. For most checks, Verify and Fix corrects any problems it finds (and notify you of such in step 5 ). For other checks, Verify and Fix provides a warning (in step 5 ) and leaves it up to you to fix the problem. For instance, if you have placed the same member detail on more than one detail sheet , Verify and Fix does not correct the problem, but simply warns you that there is a problem.

If the box is not checked ( ), Verify and Fix will not do a database integrity check of drawings. You might want to forego this check, for example, if you are having error problems in Modeling and are in a hurry to get back to work. If all members and submaterials in your current Job have been detailed and are on sheets, it actually takes longer to do an integrity check of drawings than one of the model.

Check database integrity of model: or . If you do a database integrity check on the model (this option), you should also do one on drawings ( above ), either at this time or at a later time, to ensure best consistency of data in your current Job. Also, you must " Unlock Job files ."

If this box is checked ( ) when you press " OK " to close this window, Verify and Fix will perform literally hundreds of checks on the 3D model to find and correct any potential data corruption problems. Verify and Fix checks counts of materials, welds, members, etc. On assemblies, for example, it checks all material to see if it is available in Shapes Properties , confirms that all assembly material is marked as being a part of an assembly, and deletes invalid assemblies. For most checks, Verify and Fix corrects any problems it finds and notifies you of such in step 5 .

If the box is not checked ( ), Verify and Fix will not do a database integrity check of the model. You might want to leave the box unchecked, for example, if you are having error problems in the Drawing Editor and, for now, only want to do a " Unlock Job files " and/or " Database integrity check of drawings ." In such a situation, making the box not checked saves you time for the moment, but you will probably have to run Verify and Fix again, later on.

Reconcile new standard marks with preexisting material: or . A conflict between a standard piecemark and a material in the model may occur if, for example, you have added a plate in the model and subsequently added to the Base / Cap Plate Schedule a plate that exactly matches that preexisting plate and " Break submaterial marks apart by sequence " or " Break submaterial marks apart by zone " is turned on.

If this box is checked ( ), Verify and Fix will assign the appropriate piecemark to all materials in the model that are exactly like standard piecemarks defined in setup. For standard piecemarks broken apart by sequence or zone, appropriate marks are variants on the name of the standard piecemark. For example, if bp1 is the standard " Piecemark " name defined in the Base / Cap Plate Schedule and " Break submaterial marks apart by sequence " is turned on, bp1_1 may be assigned for instances of bp1 that are in sequence 1, whereas bp1_2 may be assigned for sequence 2. Also , Verify and Fix may use the sequence name when re-naming of the standard mark if " Include sequence in submaterial mark " is on.

If the box is not checked ( ), Verify and Fix will not perform this reconciliation. However, reconciliation between the standard marks and the preexisting identical materials may (or may not) still take place during subsequent invocations of Process and Create Solids .

Check database integrity of solids : or .

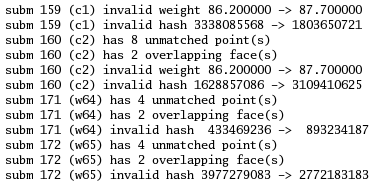
Part of an Output-Request Summary . These messages resulted from a database integrity check of solids. Be aware that hash number changes can potentially result in piecemark changes.

If this box is checked ( ), Verify and Fix will correct problems such as edge spurs or missing or incorrectly rotated solids polygons that might result in weights being calculated incorrectly. For example, the " Weight of item " reported on the General Information window calculates a material's weight based on its solids polygons. Also, when " Shop bill weight based on material " is set to ' Volume ', the weight calculation is based on solids polygons. WARNING : Be sure to save the Output-Request Summary and check it closely. Running a database integrity check of solids may result in piecemarks changing during Create Solids .

If the box is not checked ( ), Verify and Fix does not check for problems with polygons.

Note: In SDS2 software v7.1xx prior to v7.153 (or SDS2 software v7.2xx prior to v7.211), gaps, overlapping faces and incorrect rotations of solids polygons could occur. You should not have to run this check if your Job was created in a program version newer than 7.153 or 7.211.

Check submaterial solid location : or . On very rare occasions (for example, when certain IFC files are imported), material coordinates can become located incorrectly, causing their associated member extents to envelop other members in a Job. This situation can cause SDS2 programs to perform their operations more slowly.

If this box is checked ( ) when you press " OK " to close this window, Verify and Fix will relocate submaterial solids if they are found to be incorrectly located.

If the box is not checked ( ), Verify and Fix does not check for incorrectly located solids.

Check custom property files and GUIDs: or . Unused custom property files result from custom properties having been assigned to members, materials, holes, bolts or welds that no longer exist in the 3D model. GUIDs are global unique identifiers (long strings of characters) that are assigned to members, materials, bolts, welds, etc. for tracking purposes. To do this check, you must also do a " Check database integrity of model ." This box should be checked for any Jobs that you plan to merge using Merge Jobs .

If this box is checked ( ), Verify and Fix finds the unused custom property files and deletes them, thus reducing the space that the Job takes up on the drive in which it is stored. For members, materials, bolts, welds, etc., it assigns new GUIDs where none have been assigned or where invalid GUIDs have been assigned. If a deleted member has been Released , its GUID is deleted.

If the box is not checked ( ), Verify and Fix does not check for unused custom properties or for invalid GUIDs.

Note: In versions of SDS2 programs prior to v7.123, custom properties could be orphaned (become unused) when materials, holes, bolts and welds were regenerated during Process and Create Solids . In program versions prior to v7.150, some bolts and welds added by users did not receive GUIDs or received invalid GUIDs. Consequently, users could not edit those bolts or welds in newer versions of SDS2 programs. This check was added so that older Jobs could run more smoothly in newer versions of SDS2 programs.

Correct OSL standard round hole gages on clip angle connections: or . Do this check to ensure that clip angle gages for standard round holes always match the gages entered into the Standard Clip Angle Settings window.

If this box is checked ( ) when you press " OK " to close this window, any clip angle connection materials whose gages for standard round holes don't match the hole center to center distances entered into the Standard Clip Angle Settings window are deleted. Also, the associated members are marked to undergo Process and Create Solids , and the deleted material's submaterial marks are released. Exception: If a clip angle connection's " Use gage on leg to supporting member for " configuration option is set to ' All hole types ', this check is not performed for that connection.

If the box is not checked ( ), Verify and Fix will not delete such material in your current Job.

Note: In SDS2 software v2015.xx prior to v2015.32 and v2016.xx prior to 2016.13, clip angle gages for standard round holes did not always precisely follow the gages entered into the Standard Clip Angle Settings window. You should not have to run this check unless your Job was created in these older versions.

Regenerate spatial index and journal: or . In v2020 and later, the spatial relationships of members to other members are tracked in a journal and recorded in a spatial index for use by connection design and other functions. If either the index or journal are corrupt or incomplete, connection design may, for example, connect members to others that are not nearby or, conversely, fail to connect them to nearby members. To regenerate the spatial index and its journal, you must also " Unlock Job files ."

If this box is checked ( ) when you press " OK " to close this window, Verify and Fix will rebuild the spatial index and its journal. No check is performed; instead, the choice is applied whether or not the existing database or journal is corrupt.

If the box is not checked ( ), Verify and Fix will not regenerate the spatial index and journal.

Unlock global files: or .

If this box is checked ( ) when you press " OK " to close this window, any global standard detail files, shape files and CNC configurations for the current version of the SDS2 program used to start this utility will be unlocked. Do not check this box unless all users but yourself in your network have exited all affected SDS2 programs (see warning ).

If the box is not checked ( ), locked global files in your current version of this program will remain unlocked.

Require node matching and processing: or .

If this box is checked ( ) when you press " OK " to close this window, Verify and Fix will mark all members in your current Job for node matching, and you will have to Process and Create Solids again. Typically, it does not take long to force a re-node match; however, the next Process and Create Solids will probably take a lot longer than usual.

If the box is not checked ( ), Verify and Fix will not mark members in your current Job for node matching.

Alternative 1 : Press " OK " to have Verify and Fix perform the selected ( ) operations.

Alternative 2 : Press " Cancel " to close this window and end the Verify and Fix operation.

4 . Verify and Fix automatically performs those operations that were selected ( ) in step 3. A progress bar illustrates the progress of the file-repair operations that take place.

4a : When the progress bar reaches 100%, the progress bar window will close automatically if the box is checked ( ) for " Close when done ." If the window does not close automatically, you can close it by checking that same box or by pressing the " OK " button.

5 . Home (which you closed in step 2a) now reopens. If Verify and Fix has found no problems, then nothing happens at this point, and you can go on with your business.

5a : If Verify and Fix found any problems or corrected any problems, a list of messages is output to the Output-Request Summary ( report viewer ). For instance, if files were unlocked as a result of your checking the box for " Unlock job files ," these messages tell you which files were unlocked. If data corruption was found during a check of " database integrity ," the messages state which members were fixed and the problem that was fixed. If the database integrity check identified problems that the user needs to fix, a warning message relays the problem and the affected member.

5b : Optionally press " Print " or " Save " to output the messages displayed on the report viewer to your printer or to disk. Press " OK " when you are done reviewing the list of messages.

Tip: You may at this time want to run the Release Unused Data utility.

page 1 | contents | home > utilities > | top