 Add Model Dimensions Command
Default Shortcut: d + a
Locate two or more points to draw model dimensions that show the distances between those points. Right-click when you are done.
- Step-By-Step
- Tips and Tricks
- Related Tools
1 . Before invoking Add Model Dimensions :
1a :Open ( Ctrl + o ) a view that shows the members, materials or etc. that you want to dimension. The type of view does not matter. If, for example, you add Model Dimensions to members in a plan view, those Model Dimensions will also be visible in an isometric view that shows those same members.
2 . Invoke Add Dimensions using one (1) of the following methods:
▸ Click the Add Dimensions icon, which is pictured above. The icon can be found on the Tools page > Measure section.
▸ Add Dimensions can also be invoked using the Find Tool by searching the command name.
Learn more about alternative methods for launching commands.
3 . Locate - Return mouse bindings become active, and the status line prompts " Locate point: "
3a : Select a Locate option (e.g. EXPT ), then move your mouse pointer (
) so that the point location target (
) snaps to the desired point, then left-click ( Locate ).
3b : Locate additional Model Dimension points in a manner similar to 3a. Note that you now have a Remove mouse biding (middle-click) that lets you undo the location of your last point.
3c : Right-click ( Return ) when you are done locating points.
4 . The Model Dimensions that you added in the previous steps will be visible in your current Modeling session and in subsequent Modeling sessions when you restart this same Job, but the Model Dimensions will not be shown in the Modeling sessions of other users in this same Job. If you want them to be shared by other users, you can Save Dimensions and then instruct those other users to Load Dimensions .
- In multi-user Modeling environments, any Model Dimensions that you add will be seen by you only. They will be retained -- also for you only -- across Modeling sessions.
- Here's an example:
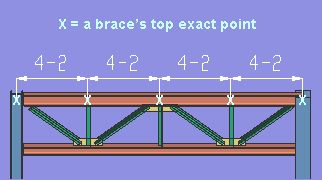
Each of the Model Dimensions in this example were generated by locating the top exact points of vertical braces. In the illustration shown here, these exact points are each marked with an X . They are located at half the nominal depth of the upper beam.
- Dimension Members (another tool for adding model dimensions)
- Erase All Model Dimensions (to remove dimensions)
- Save Model Dimensions (to save dimensions)
- Load Model Dimensions (to load dimensions that have been saved)
- Model Dimensions selection filter (use with Delete to delete dimensions)
- Annotation text scale ( Display Options -- sets the size of a model dimension's label)

