 Exact Point (EXPT) ( Modeling & Drawing Editor )
Tool summary :
- EXPT stands for "Exact Point." It is a snap for locating points associated with objects.
- EXPT can be used in the Drawing Editor to locate a point at the end of a line or arc or at the center of a circle. In Modeling , EXPT can be used to locate a member work point. Simply snap to the point, then left-click ( Locate ).
- EXPT can be one of the Auto point modes that are used for Auto point location.
- You can also use EXPT to locate noticed points . As shown in the first example below, during point location, an EXPT point is marked with the text " Exact ".
- To check the end elevation of a member in the model, you can Add Construction Line , select EXPT as the Locate option, then place your mouse pointer (
 ) so that the point location target (
  ) snaps to the work point at the end of the member. The X-Y-Z display tells the elevation.
- See the examples (
 ) and where exact points occur and the step-by-step instructions .
Also see :
- Modeling and the Drawing Editor (where EXPT can be found)
- Construction line by designating two points
- Construction line by defining a point and an angle
- Point location target (shows the point's position)
- Member workline (ends of detected using EXPT )
- Member lines of concrete members
- X-Y-Z display (shows the point's coordinates)
- Offset Controls (affect EXPT )
- Noticed points (may be created with EXPT )
- Annotation text ( Display Options in Modeling )
- Annotation text ( Display Options in the Drawing Editor )
- status line (shows a dimensional constraint, if one is entered)
- Point Cloud Exact Point (a snap for locating point cloud points)
Examples :
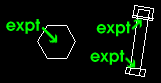
|
|
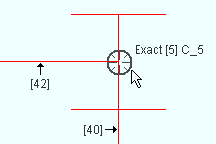
When a member's exact point is snapped to in Modeling , " Annotation text " calls out the member number and piecemark of the member with the lowest number which has that exact point. Members [42] , [40] and [5] in this example all have the same exact point, but it is member [5] that is called out. |
|
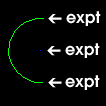
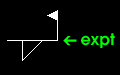
The green arrows in this illustration point to exact points. |
Where exact points occur :
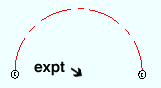
| An arc ( Drawing Editor ) has three exact points, one at each end of the arc and one in the center. |
|
|
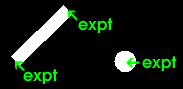
A bevel symbol ( Drawing Editor ) has two exact points. The exact point near the "triangle" moves when the " Angle " is changed |
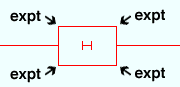
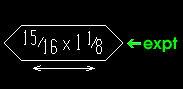
| A 2D bolt ( Drawing Editor ) either has a single exact point at its center or two exact points, one at each end of its grip. |
|

|
A circle ( Drawing Editor ) has one exact point, placed at its exact center. |
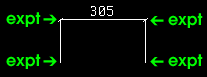
| Concrete pad footings , slabs , walls , etc, ( Modeling ) have exact points at each end of their corners. |
|

|
A construction circle ( Drawing Editor & Modeling ) has a single exact point at its center. The exact point snaps to Drag and Drop Configuration points when you drag the construction circle. |
| A crane placement ( Modeling ) has a single exact point that matches its " Placement location ." |
|
|
A curved grid line ( Modeling ) has a single exact point at the center of the circle it is an arc of. |
| A dimension ( Drawing Editor ) has an exact point at each end of a line segment. |
|
|
A 2D hole ( Drawing Editor ) has exact points at each end or, if it is flat, at its center. |
| A 3D hole ( Modeling ) has an exact point its center. |
|
|
A hole symbol or bolt symbol ( Drawing Editor ) has one exact point. " Symbol location " (hole sym) or " Symbol location " (bolt sym) flips the symbol about the point. |
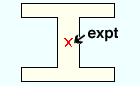
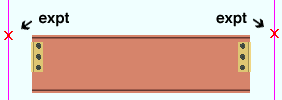
| A member ( Modeling ) has two exact points, the work points of its work line . |
|
|
A line ( Drawing Editor ) has two exact points, one at each end. |
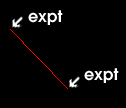
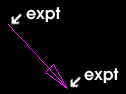
| A pointer ( Drawing Editor ) has two exact points, one at the end of its tail, the other near the arrowhead. |
|
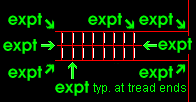
| A stair ( Modeling ) has exact points at the ends of its stringers and at the workpoints of its workline. In Drawing Editor , it has additional exact points at the ends of each tread at their nosings, and one at the top of the FS stringer. |
|
|
|
A symbol ( Drawing Editor ) has one exact point, the reference point that is its insertion point. |
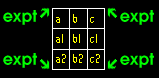
| A table , revision chart or bill of material ( Drawing Editor ) has exact points at each of its four corners. This permits them to be moved using Move/Stretch . |
|
|
A weld symbol ( Drawing Editor ) has a single exact point at its head (the opposite side of its tail). |
Locating a point using EXPT :
1 . Begin this operation in Modeling or the Drawing Editor .
1a : Invoke Add Construction Line or Add Member or Line Add or any other tool that permits the use of EXPT as a Locate option.
2 . Various Locate options become active, and the status line prompts you to locate a point.
2a : Select the Exact Point icon or choose Locate > Exact Point or select ' EXPT ' on the Set Location Mode toolbar item or , if you want to use Auto point location, move your mouse pointer near an exact point as described in step 2b.
2b : Place the mouse pointer (
2c : Continue to perform the operation you began in step 1a.
Tip: For second point location (step 3 if these instructions were to continue), you can optionally type in a distance and/or angle to constrain the second point to the typed-in distance/angle from the first point. The distance/angle you type will be shown in brackets [ ] in the status line .

