 Reference Drawing Tools
- General Settings
- Step-By-Step
- Tips and Tricks
- Related Tools

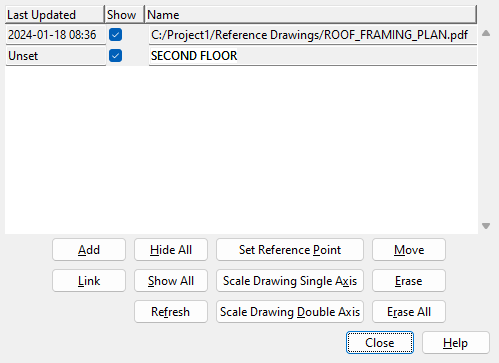
Last Updated : Shows the date and time that the reference drawing was imported. This will only show if the reference drawing was created using Link Reference Drawing. All other reference drawings show ' Unset ' .
If this box is checked (
), the reference drawing is visible in the model.
If the box is not checked (
), the reference drawing is not visible in the model.
Name : The file path or name of the drawing that has been added as a reference drawing. If there is no file path associated with the name, that means the file was added from the drawings list using the Add button. If there is a file path associated with the name, that means the file was added using the Link button
Add : You can add a detail , job standard detail , reference drawing or 2D erection view as a reference drawing in Modeling . See the steps below:
1 . Press the " Add " button
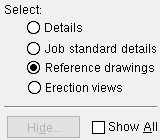
2 . The Select One Reference Drawing window opens. Select the drawing type ( '
Details ' or '
Job standard details ' or '
Reference drawings ' or '
Erection views ') that you want to be listed in the window. Double-click the name of the drawing you want (or select it, then press " OK ").
2nd_Floor
HVAC_Plan
Site_Drawing


Optional for details : The " Hide ... " button lets you adjust which members are shown on the selection list when " Details " is the selected drawing type. The " Show All " button shows details that are not current.
3 . Locate - Pan - Return mouse bindings become active along with various Locate options. The reference drawing is shown on screen.
Alternative 1 : Left-click ( Locate ) where you wan the reference drawing to be placed..
Alternative 2 : Right-click ( Return ) to cancel adding the reference drawing.
Note : If you have previously placed the drawing you selected in step 2 but have since erased it, the drawing will go to the location it was previously placed. If you want to move that drawing, use " Move ."
4 . The newly added reference drawing will be shown in the model. On this window, you will find that the name of the drawing you added is listed and that " Show " is checked (
).
Link : You can link to .dxf, .dxb, .dwg, .dgn or .pdf files in Modeling . The externally-linked drawing is added to your 3D model in the same manner as it is when you " Add " a reference drawing.
1 . Press the " Link " button
2 . A file selection window opens. Select the file you wish to import ( .dxf, .dxb, .dwg, .dgn or .pdf ). The selected file is converted into a reference drawing.
3 . Locate - Pan - Return mouse bindings become active along with various Locate options. The reference drawing is shown on screen.
Alternative 1 : Left-click ( Locate ) where you wan the reference drawing to be placed..
Alternative 2 : Right-click ( Return ) to cancel adding the reference drawing.
4 . The newly added reference drawing will be shown in the model. On this window, you will find that the name of the drawing you added is listed and that " Show " is checked (
).
To view the reference drawing: In the Drawing Editor , open the job reference drawing into which the .dxf, .dxb, .dwg, .dgn and/or .pdf files has been converted. The name of the reference drawing will be the name of the .dxf, .dxb, .dwg, .dgn and/or .pdf file, minus the extension. The drawing name will be truncated to 53 characters if the original file that the drawing was converted from had a name that was longer than 53 characters.
You cannot save changes that you make to such reference drawings in Drawing Editor . You can, however, scale the drawing in Modeling when, on the Reference Drawing Tools window ( this window ), you select the drawing and press the " Scale Drawing Single Axis " or " Scale Drawing Double Axis " button. This changes the reference drawing.
Hide All :
Sets all reference drawings that have been placed in the model hidden. All of the drawings that are listed on this window will be set to " ![]() Show ."
Show ."
Show All :
Sets all reference drawings that have been placed in the model be shown. All of the drawings that are listed on this window will be set to " ![]() Show ."
Show ."
Refresh : Updates the reference drawings in Modeling with any changes that have been made inside of Drawing Editor.
Set Reference Point : Allow you to change the insertion point that is used when you " Add Reference Drawing " or " Move " a reference drawing. The actual Drawing Editor drawing will change as a result of this operation. The drawing's current position in the model will be unaffected. See the steps below:
1 . Click the Name or Last Updated date to select the Reference drawing. Select the " Set Reference Point " button.
Note : The text may be highlighted or the section may be underlined in blue to show which drawing is selected.
2 . The status line prompts, "Verify reference drawing reference location." A reference point symbol identifies the reference point's location on the drawing. Yes - No mouse bindings become active.


reference point symbol Alternative 1 : Left-click ( Yes ) if the reference point is where you want it, and you want to end this operation.
Alternative 2 : Right-click ( No ) to relocate the reference point.
3 . Locate- Pan -Return mouse bindings become active along with various Locate options.
Alternative 1 : Left-click ( Locate ) at the location where you want the reference point located.
Alternative 2 : Right-click ( Return ) to cancel this operation and keep everything as it was.
Scale Drawing Single Axis :
This invokes the Scale Drawing Single Axis tool. This tool allows you to scale drawings that you
Scale Drawing Double Axis :
This invokes the Scale Drawing Double Axis tool. This tool allows you to scale drawings that you
Move : Allows you to reposition a reference drawing in the model. See the steps below:
1 . Click the Name or Last Updated date to select the Reference drawing. Select the " Move " button.
Note : The text may be highlighted or the section may be underlined in blue to show which drawing is selected.
2 . Locate- Pan -Return mouse bindings become active along with various Locate options. Select the Locate option that you want. The reference drawing will be moved based on the drawings " Reference Point ".
Alternative 1 : Left-click ( Locate ) at the location where you want the reference drawing to be placed. The reference drawing is moved.
Alternative 2 : Right-click ( Return ) keeps the reference drawing at its original location.
Erase : Removes the reference drawing that is selected when the button is clicked.
Click the Name or Last Updated date to select the Reference drawing. Select the " Erase " button to remove the selected drawing.
1 . Click the Reference Drawing Tools icon, which is pictured above. The icon can be found on the Tools page > Reference Objects section as well as the Import/Export page > Drawings section.
Alternative: Invoke Reference Drawing Tools using the Find Tool by searching the command name and clicking the icon, which is pictured above.
Learn more about alternative methods for launching commands.
2 . The Reference Drawing Tools window opens. Click the Link button to import a new reference drawing or the Add button to place a reference drawing.
3 . Click the Close button to exit the Reference Drawing Tools window.
- Reference Drawings in Modeling (topic)
- Reference Drawing Add
- Reference Drawing Erase
- Reference Drawing Erase All
- Reference Drawing Link
- Reference Drawing Move
- Reference Drawing Refresh
- REFD ( Locate option for reference drawings)


