The Edit Angle Dimension window ( Drawing Editor )
| Options on this window are read-only if you are editing an angle dimension that is not on a comment layer and your current drawing is not a crane placement drawing . If your current drawing is a crane placement drawing, you can add or edit objects on non-comment layers as well as on comment layers. Instructions on this page assume you are NOT in a crane placement drawing. |
The Edit Angle Dimension window opens when you :
- Double-click an angle dimension's label or dimension line or leg
- Angle Dimension Edit
- Ang Dimension Edit All
- Edit Angle Dimension (multiple)
Note: If you opened this window using Angle Dimension Edit All or by a multi-edit , the contents of many fields may be gray, which indicates mixed entries but does not prevent you from editing that field.
Also see :
- Angle dimensions (topic)
- Objects > Angle Dimensions > Add
- Display measurement unit for angle dimensions ( Dimension Settings in Fabricator Setup )
- Angle dimension precision ( Dimension Settings in Fabricator Setup )
- Dimension labels font (affects auto detailing)
- Dimension labels style (affects auto detailing)
- Grayed out fields (indicate mixed entries or that the field is disabled)
- Multi Items Edit (related window)
page 1 | contents | objects > angle dims > | objects -- angle dims | top
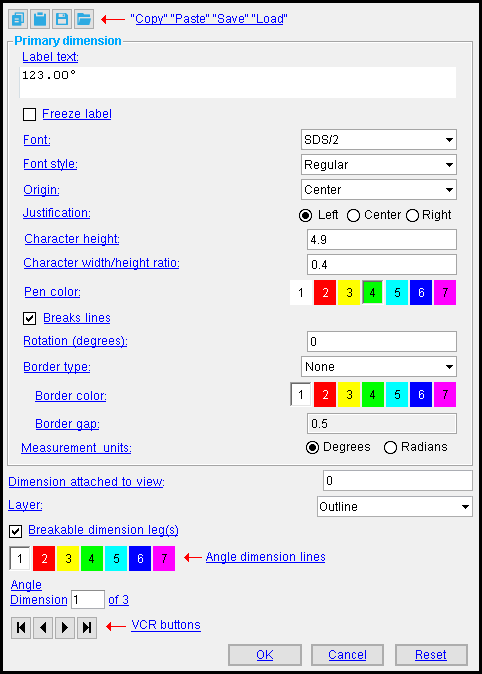
![]() " Copy " " Paste " " Save " " Load " buttons :
" Copy " " Paste " " Save " " Load " buttons :
- These buttons appear on this window only if the dimension (or dimensions) you are editing are on a comment layer . Click here for more information.
- You can " Copy " (
 ) the settings on this window, then change the " Dimension__of " number you are editing using the VCR buttons, then " Paste " (
  ) those settings to the newly selected angle dimension.
- " Save " (
 ) saves a file to a folder (
  ) that is used by your current version of SDS2 Site Planning. Give the file a name that will help users in other Jobs on your network identify its purpose. " Load " (
  ) changes settings for that section to the settings that are stored in the file that you select.
- Tip: Right-click a " Load " button to get a list of recently created forms that can be applied to the section which that " Load " button governs. Selecting the name of a form from the list populates the fields in that section with the form settings that were saved under that name.
- " Paste " and " Load " replace mixed entries to a single field with a single entry. " Copy " and " Save " ignore fields with mixed entries, treating them as if they have no entry or do not exist.
page 1 | contents | objects > angle dims > | objects -- angle dims | top
------ Primary dimension ------
If you change the numerical value that the program enters to this field automatically, you must check "
Freeze label " if you want that numerical value to stay as specified after you press " OK ."
If the degree symbol (°) is written after a number in the " Label text " and you switch the " Measurement units " to ' Radians ', then (upon pressing " OK ") the degree symbol ° will be changed to radians and the numerical value of the number is recalculated. This happens regardless of the choice made for " Freeze label ."
If you delete the degree symbol (°) but keep the number in front of it then switch the " Measurement units " to ' Radians ', the program will not automatically write in the word radians. You will have to type in the word radians manually. Also, if you switch back to degrees, you will have to enter the degree symbol manually. The degree symbol can be entered by holding down the Alt key then typing 0176 using your numerical keypad.
If you delete the number and want the program to automatically recalculate the correct " Label text ," you can do the following to get the auto-calculated value re-entered: 1 . Type the characters "2 radians". 2 . Switch the " Measurement units " to ' Radians ' and uncheck "
Freeze label " then press " OK ." 3 . The label text will automatically be recalculated. If you want the degrees instead of radians, simply switch the " Measurement units " to ' Degrees '.
You can type non-numerical text in front of and/or in back of the automatically entered label text, and your typed text will be maintained even if you, for example, switch the " Measurement units " and regardless of the choice made to " Freeze label ."
In other ways , entering of angle dimension label text works much the same way as does entering " Label text " for a regular dimension.
Key Bindings for Text Entry
(when the cursor is in the text-entry area)key action bound to key Alt +num,
[Num Lock] oninserts characters 0160 to 0255.
Enter creates a line break Ctrl +a selects all text Ctr+Enter executes " OK " Ctr+c * copies selected text Ctrl+x * cuts selected text Ctrl+v * pastes cut or copied text Tab moves focus to next widget Esc executes " Cancel " * = applies to all text entry fields.
Freeze label: ![]() or
or ![]() . This applies if you have changed the number that the program calculates automatically for " Label text ."
. This applies if you have changed the number that the program calculates automatically for " Label text ."
If this box is checked (
If the box is not checked (
Note 1: If you delete the automatically caclulated number entirely, then replace it with text, you effectively freeze the " Label text ." The choice you make to " Freeze label " will not matter. The number will not come back until you manually type in a new number.
Note 2: If you type in non-numerical text before and/or after the number, that text will remain after you press " OK ," regardless of the choice made fo " Freeze label ."
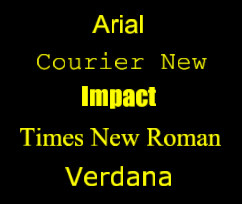
Font: Any font that is listed can be selected for the " Label text ."
|
Tip : For a TrueType font , such as any of those shown here, set the " Character width/height ratio " to ' 0.6 ' to have the font rendered at its native width. |
Be sure to also choose the " Font style " that you want. The " Character height " sets the font size. If you select the ' SDS2 ' font, be aware that the " Pen color " affects the thickness of the font when it is plotted.
Font style: The style (' Bold ' or ' Bold Italic ' or ' Italic ' or ' Regular ') of the selected " Font ." Different fonts may have different styles available to them.
Available font styles are listed alphabetically in the font style list box , and the first style that is listed is selected by default. You may, instead of using the default, prefer to choose ' Regular ', which is generally the most popular style for a particular font. ' Regular ' is the only choice that is available for the ' SDS2 ' font. To adjust the stroke thickness of the ' SDS2 ' font, you can change the " Pen color ."
Also see: " Dimension labels font " and " Dimension labels style " in Drawing Presentation (setup) determine the font and font style that are applied automatically to angle dimension labels that are generated during automatic detailing .
Origin: Lower left or Left center or Upper left or Lower center or Center or Upper center or Lower right or Right center or Upper right . The origin ( o ) of a dimension label is highlighted along with the dimension label when the dimension label is selected.
|
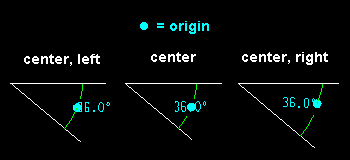
Examples: To orient the text block so that its origin point is at its center left, select ' Center left '. To center the text block over its origin, select ' Center '. To place the origin to the center, right of the text block, select " Center, right ."
Tip: Instead of using " Origin " to reposition an angle dimension label, you can Shift-drag the dimension label to a new position.
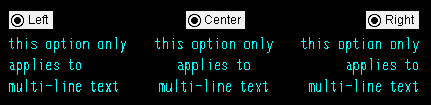
Justification: Left or Center or Right . This applies when multiple lines have been entered as the " Label text ."
|
Also see: To reorient a single line of text with respect to its origin, reset the " Origin ."
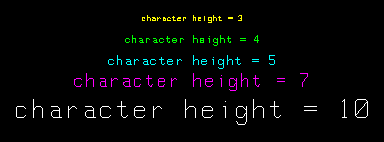
Character height: The height ( in millimeters ) of letters/numbers that make up the angle dimension label. This value is independent of the " Drawing scale " of your current drawing. Assuming that the sheet that this drawing will eventually be placed on has a scale of 1:1 and you do not re-scale the labels and the printer does not adjust the scale, this will be the actual height of characters on the plotted sheet.
|
Font dependencies: This applies to whatever font is selected as the angle dimension " Font ," regardless of whether that font is a TrueType font or the ' SDS2 ' font.
Character width/height ratio: The width/height of the characters that make up the angle dimension label.
|
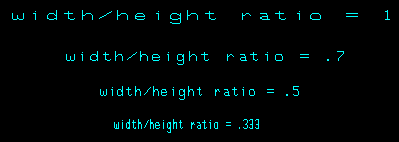
Font dependencies: This applies to whatever font is selected as the angle dimension " Font ," regardless of whether that font is a TrueType font or the ' SDS2 ' font. For a TrueType font, a ratio of ' 0.6 ' renders that font at its native width. A ratio larger than ' 0.6 ' stretches the font. A ratio less than ' 0.6 ' compacts the font. For the ' SDS2 ' font, ' 0.4 ' is the default choice.
Pen color: 1 or 2 or 3 or 4 or 5 or 6 or 7 . No button is pressed if you are editing multiple angle dimensions that are drawn with different pens. This only affects the angle dimension label, not the angle dimension line or, if applicable, its legs.
|
|
|
The selected button sets the on-screen display color of angle dimension labels and, if you are using the 'SDS2 ' font , it sets the printed thickness (though not the displayed thickness) of that font. |
For a TrueType font, the " Pen color " affects the display color of the text, but does not affect the plotted appearance of the " Font " so long as all pens in Line Weights are set to print in black. By default, all pens in Line Weights are set to print in black.
For the ' SDS2 ' Font, the pen color sets the stroke weight (thickness) of the angle dimension characters. Line Weights assigns a particular thickness to each " Pen color ."
Breaks lines: ![]() or
or ![]() . The setup options " Break material lines at label interference " or " Break dimension lines at label interference " must be checked for this option to apply.
. The setup options " Break material lines at label interference " or " Break dimension lines at label interference " must be checked for this option to apply.
|

If this box is checked (
If the box is not checked (
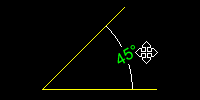
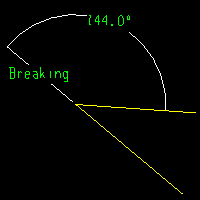
Rotation (degrees): A positive or negative (-) number from 360 to -360 degrees. Tip: If you grab the dimension label and rotate it as shown in the example below, the " Rotation (degrees) " will be updated on this window.
|
||||

An entry of ' 0 ' (zero) orients the lettering horizontally.
A ' positive number ' of degrees rotates the label counterclockwise from horizontal.
A ' negative (-) number ' of degrees rotates the label clockwise from horizontal.
Border type: None or Rectangle or Cloud .
|
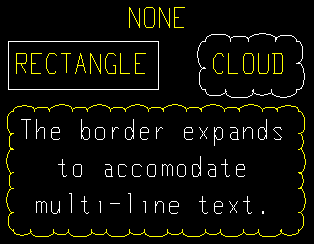
Note: A cloud border and rectangular border is part of the dimension, not an object that is distinct from the dimension. This means, for example, that you cannot select cloud borders with the Selection Filter set to ' Clouds '. Nor can you select a rectangular border with the Selection Filter set to ' Lines '. Unless you Explode the dimension, the dimension and its border are always selected together.
Border color: 1 or 2 or 3 or 4 or 5 or 6 or 7 . No button is pressed if you are editing multiple dimensions whose borders are drawn using different pens.
|
|
| If you use the defaults in Line Weights , the choice made here sets the thickness of the border (as well as its on-screen display color). |
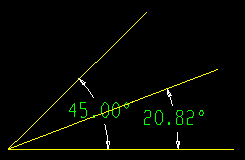
Border gap: A distance (in the primary dimension " Units "). In the example below, the gap is measured using Add Dimension .
|
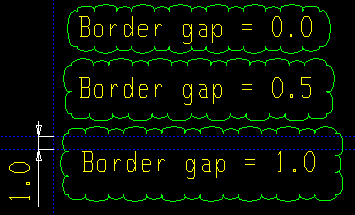
Note: You enter a " Border gap " of '0.5' inches and your " Drawing scale " is ' 1 ' (Base 12). The actual gap on the printed drawing will be 1/12 x 0.5 = 0.04167 inches. This is different than " Character height ," which sets the actual height of characters in the printed drawing.
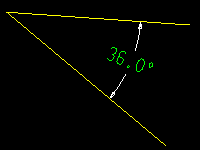
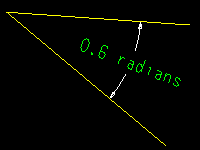
Measurement units: ![]() Degrees or
Degrees or ![]() Radians . For this switch to work, the " Label text " needs to have a number entered to it. That number will be recalculated if this setting has changed when you press " OK ."
Radians . For this switch to work, the " Label text " needs to have a number entered to it. That number will be recalculated if this setting has changed when you press " OK ."
|
'
Degrees ' indicates that the unit of measure for a number entered to " Label text " is degrees. If you switch this from ' Radians ' to ' Degrees ' then press " OK ," that number will be recalculated as described in the warning below.
'
Warning: If you change the " Measurement units ," a number entered to " Label text " will be recalculated. This is true regardless of the number and regardless of the choice made to " Freeze label ." The recalculation is based on the angle between the two lines that this angle dimension is drawn between. The recalculation is not a conversion of the number -- it is a recalculation of the number.
Setup: " Display measurement unit for angle dimensions " in Dimension Settings ( Fabricator Setup ) sets the choice that is made here when an angle dimension is first added.
Also in setup: Since 2π radians = 360°, you will probably want more places after the decimal point when the " Measurement units " is ' Radians ' as opposed to when it is set to ' Degrees '. The choice made to " Angle dimension precision " in Dimension Settings ( Fabricator Setup ) specifies the number of places after the decimal point to which an angle dimension is calculated.
page 1 | contents | objects > angle dims > | objects -- angle dims | top
------ Options that apply to the entire dimension ------
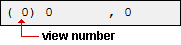
Dimension attached to view: A number designating the view that this angle dimension is attached to. This applies mainly to member details , since member details are likely to show more views than submaterial details , the only other type of drawing on which you might find multiple views. For instance, a column detail may have a view of face A, face B and face C. It may also have various section views (Section A-A, Section B-B, Section C-C). All graphical objects that are in a particular view are assigned the same number.
Assigning the correct number to an object (line, weld symbol, label, etc.) provides maximum compatibility when the comment layer you add that object to is viewed or printed in a full-featured SDS2 program .
|
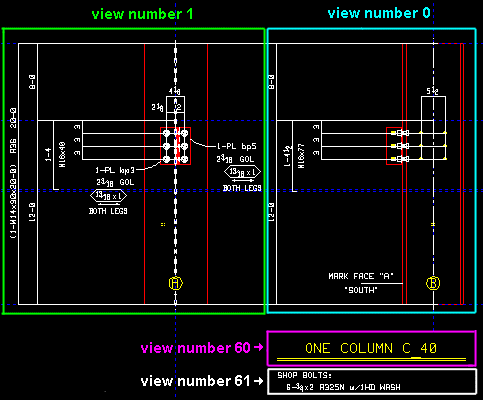
To show a view's number, you can add the X-Y-Z Display to your toolbar.
In the Drawing Editor , the X-Y-Z Display shows the view number that the point location target (
) is over.
Layer: The drawing layer (any layer given a " Name ") that the dimension you are adding or editing will be placed onto when you press " OK " to close this window. If that layer happens to be hidden (not marked " Show "), the dimension will disappear after the first Redraw .
![]()
If the layer listed here is a non-comment layer: Options on this window are read-only .
If this window is editable: You can only select a comment layer from the list box's selection menu (
).
Defaults: For an Objects > Angle Dimension > Add operation, the default selection (
Breakable dimension leg(s): ![]() or
or ![]() . The setup option " Break dimension lines at label interference " must be checked for this option to apply. If that setup option is turned off (not checked), then the dimension legs are never broken, no matter what choice you make here.
. The setup option " Break dimension lines at label interference " must be checked for this option to apply. If that setup option is turned off (not checked), then the dimension legs are never broken, no matter what choice you make here.
|
If this box is checked (
If the box is not checked (
Defaults: " Breakable dimension leg(s) " is checked by default, regardless of the choice in setup and regardless of whether or not the dimension is added by the user or generated by auto detailing.
Angle dimension line pen: 1 or 2 or 3 or 4 or 5 or 6 or 7 . No button is pressed if you are editing multiple dimensions that are drawn with different pens. This only affects the angle dimension's line and legs, not the label.
|
|
| The selected button sets the printing pen number (and on-screen display color) of the dimension lines. Line Weights assigns a printing thickness to each of the seven pens. |
Angle dimension _ of __ (not applicable to Add Dimension or multiple edit) : The number of the one angle dimension you are editing and the total count of all angle dimensions in your current drawing. You can use the VCR buttons to select a different dimension and edit it while still on this window. When a dimension on a shown layer is selected, it is displayed in green. The selected dimension must be on a shown layer for it to be shown.
|
|
| VCR buttons (first-previous-next-last) for selecting an angle dimension to edit. |
Note: If you change to one angle dimension, then select a different angle dimension number, the first angle dimension remains changed even if you press " Cancel " on this window.
page 1 | contents | objects > angle dims > | objects -- angle dims | top
To close/reset this window :
![]()
![]()
![]()
"OK" (or the Enter key) closes this window and completes the operation you are performing. Your changes are not written to disk until you Save your current drawing.
Note: After making changes to this window and pressing " OK ," you can still undo your changes by using Revert or Undo . If you Save to make your changes permanent, you can no longer Revert , but you can still Undo .
"Cancel" (or the Esc key or the ![]() button) closes this window without saving any of the changes you have made. " Cancel " only cancels the changes made to the dimension whose number is currently selected as the " Dimension _ of __ ."
button) closes this window without saving any of the changes you have made. " Cancel " only cancels the changes made to the dimension whose number is currently selected as the " Dimension _ of __ ."
Tip: Although " Cancel " does not cancel changes made to dimensions previously edited on this window, Undo (after you have closed this window) does undo all those changes.
"Reset" undoes changes made to the dimension currently selected as the " Dimension _ of __ ." This window remains open.
page 1 | contents | objects > angle dims > | objects -- angle dims | top