Access Control
- General Overview
- How To Open
- The ProjectAdministrator
- Example
- Tips and Tricks
- Related Tools
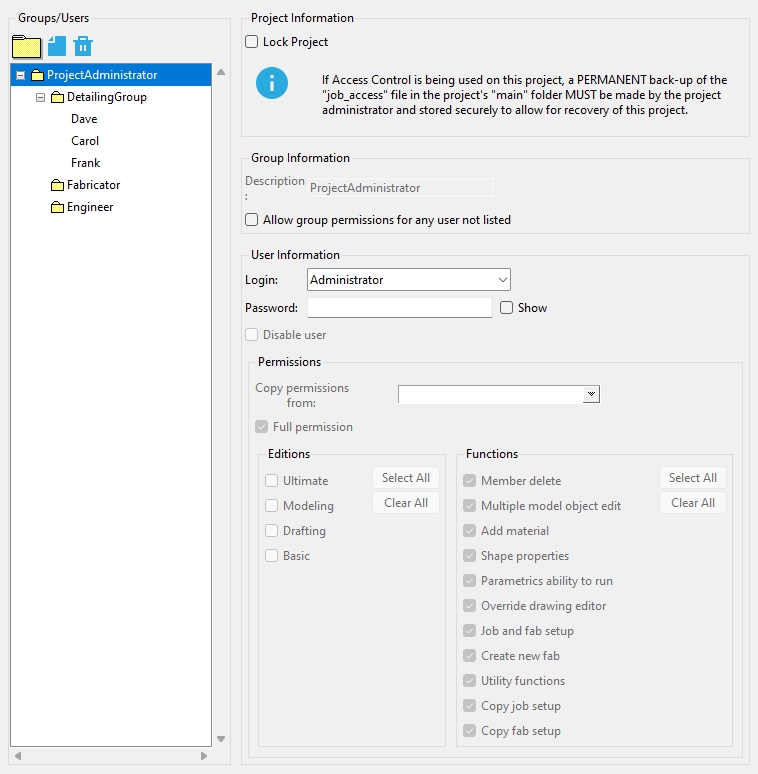
The Groups/Users tree
![]() Pressing the Add group icon adds a new group folder (
Pressing the Add group icon adds a new group folder ( ![]() ) to the Groups/Users tree. Changing the Description changes the name of that folder. Before clicking the Add group icon, select the item in the tree you want the new group to be under. For example, select ProjectAdministrator in the tree if you are adding a new major group that represents an independent Windows computer network.
) to the Groups/Users tree. Changing the Description changes the name of that folder. Before clicking the Add group icon, select the item in the tree you want the new group to be under. For example, select ProjectAdministrator in the tree if you are adding a new major group that represents an independent Windows computer network.
|
|
Press the folder icon (the Add Group icon) to have a new folder ( |
![]() Pressing the Add user icon adds a new user to the Groups/Users tree. The user is added under the group that you selected before you clicked the icon. You should then select a Windows login name on the Login combo box menu to give that user access to the Job. Entering the Login name also changes the name in the tree. Note in the example shown below that the Password is grayed out (disabled). The Windows network password of a user is private (known only to that user) and should be kept that way to preserve accountability. When you add a user, that user inherits the Permissions that have been assigned to the group you selected when you pressed the Add user icon. You may, if you so choose, want to make changes to those Permissions.
Pressing the Add user icon adds a new user to the Groups/Users tree. The user is added under the group that you selected before you clicked the icon. You should then select a Windows login name on the Login combo box menu to give that user access to the Job. Entering the Login name also changes the name in the tree. Note in the example shown below that the Password is grayed out (disabled). The Windows network password of a user is private (known only to that user) and should be kept that way to preserve accountability. When you add a user, that user inherits the Permissions that have been assigned to the group you selected when you pressed the Add user icon. You may, if you so choose, want to make changes to those Permissions.
|
| Press the file icon to have a new user name appear in the tree. Enter a Login to enter change the name of that user in the tree. |
Why add a user? Unless
Allow group permissions for any user not listed is checked on, users must be added in order for them to access a Job using a particular Edition. For example, if newt was not listed in the above example, newt could not use the Editions assigned to the group which in the above example is called "NameOfGroup".
![]() Pressing the Delete group or user icon deletes the selected entry in the tree (along with its associated Login, Permissions, etc.).
Pressing the Delete group or user icon deletes the selected entry in the tree (along with its associated Login, Permissions, etc.).
An alternative: If you don't want to permanently remove a set of permissions for a particular user, you can check the box for Disable user.
Project Information
If this box is checked (
If the box is not checked (
), the Permissions that are entered will apply. A set of Permissions is entered for each of the various groups and users in the Groups/Users tree.
Tip: If you are transferring a Project for an outside office to review using SDS2 Viewer, you may want to
Group Information
Description: A text string that describes the group. For example, if the permissions are being set up for an external group such as a fabricator or an engineering office, you might enter the person's name (spaces are allowed) or the name of the group. The Description for the ProjectAdministrator is hard-coded to be ProjectAdministrator.
Allow group permissions for any user not listed: ![]() or
or ![]() .
.
If this box is checked (
If the box is not checked (
For multiple groups that are set to
User Information
Login: The login name of the ProjectAdministrator, group administrator or user. For a ProjectAdministrator or a group administrator, this name can be a made-up name. For a user, this must be a user name on your Windows network.
|
|
| The Login applies to the user (newt) that is selected in the tree. Note that since it is a user that is selected, no Password can be entered. |
For the ProjectAdministrator, you can type in any name you like. The ProjectAdministor's name or Administrator would be a good choice. You will also need to enter a Password. The Login applies to the ProjectAdministrator when the top folder (
) is selected in the Groups/Users tree. For the example above, ProjectAdministrator is not selected (newt, a user, is selected).
For the group administrator, you can type in any name you like. Once a name and password have been entered, the name-password combination can be used to open Access Control. The Login applies to the group administrator when a folder (
For a user, you can select any of the Windows login names that are automatically populated on the Login combo box menu. The SDS2 data directory maintains a file listing all users that have run a program in an SDS2 installation, and it is that list that populates the menu. As shown in the example above, the Password for a user is grayed out (disabled) since Windows network login passwords are private. For a user to open the Access Control window, the user must log in as a group administrator or the ProjectAdministrator.
Password: A text string that you want to be used as the password for the ProjectAdministrator or for a group administrator. In the Groups/Users tree, the ProjectAdminsitrator is the top ![]() and a group administrator is any
and a group administrator is any ![]() other than the top
other than the top ![]() . This is the password that the administrator must type in order to open Access Control after access controls have been put into effect.
. This is the password that the administrator must type in order to open Access Control after access controls have been put into effect.
If this box is checked (
If the box is not checked (
Permissions
These permissions include permissions for editions and permissions for functions. To see the permissions for a particular group or user, select that group or user in the tree.
Copy permissions from: any user that is on the listbox menu. The menu lists the permissions for the group or for each user that is in the group (except the user that is selected to be copied to).
|
In this example, Frank is the user selected to be copied to. Frank is in the detailingGroup. Consequently, the permissions that can be selected on the Copy permissions from listbox are those for DetailingGroup and Dave and Carol. |
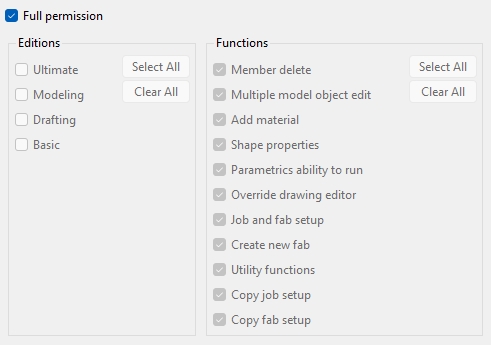
Full permission: ![]() or
or ![]() . This applies to the permissions of users or groups that are indented beneath the currently selected group in the tree.
. This applies to the permissions of users or groups that are indented beneath the currently selected group in the tree.
|
|
| Example: A ProjectAdministrator creates a group for a fabricator (called Fabricator) and sets the permissions to be those shown above. The Job is later sent to the fabricator and opened in the SDS2 Fabricating program. The fabricator group administrator, after entering the supplied Login and Password for the Fabricator will have permissions like those shown on the right if the ProjectAdministrator turned off |
|
If this box is checked (
If the box is not checked (
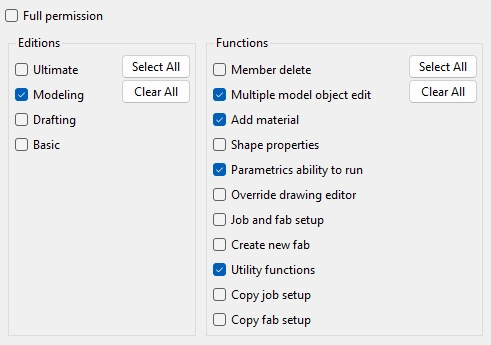
Editions
Permissions for specific SDS2 Editions may be turned on ( ![]() ) or turned off for a group or user when Full permission is turned off (
) or turned off for a group or user when Full permission is turned off ( ![]() ).
).
Ultimate: ![]() or
or ![]()
Modeling: ![]() or
or ![]()
Drafting: ![]() or
or ![]()
Basic: ![]() or
or ![]()
Functions
Permissions for Functions may be turned on ( ![]() ) or turned off (
) or turned off ( ![]() ) for a group or user. Some of these Functions are similar to those on the Passwords list, but these Functions apply to your current Job as opposed to your office's computer network.
) for a group or user. Some of these Functions are similar to those on the Passwords list, but these Functions apply to your current Job as opposed to your office's computer network.
|
If the box is not checked (
Multiple model object edit: ![]() or
or ![]()
|
If the box is not checked (
Also see: This functionality is redundant to setting a Multiple Object Edit Password at Home > Utilities > Utility Functions. You may prefer to use the Utility Functions equivalent if it is available to you and you want to set up a network-wide password.
|
If the box is not checked (
If the box is not checked (
Also see: This functionality is redundant to setting a Delete Password at Home > Utilities > Utility Functions. You may prefer to use the Utility Functions equivalent if it is available to you and you want to set up a network-wide password.
Parametrics ability to run: ![]() or
or ![]()
|
If the box is not checked (
| Drawing Editor restrictions from Dimension Settings setup: | |||
|
If the box is checked (
If the box is not checked (
|
If the box is not checked (
|
An example of a Fabricator selection dialog without a New button. Click here to see what this same dialog looks like with a New button. To open a dialog like this one, press Change Fabricator on the Home window. |
If the box is not checked (
|
If the box is not checked (
If the box is checked (
If the box is not checked (
If the box is checked (
If the box is not checked (
To open the Access Control window
Case 1: To open the Access Control window for the first time, before a ProjectAdministrator has been assigned:
1. Go to the Start menu.
2. Go to the folder containing your version of SDS2.
3. Click the Resources folder, which launches in a new a File Explorer window.
4. Double-click the Access Control Permissions icon in the File Explorer window.
5. A new window appears prompting you to enter a password for Access Control Block.

Pressing the Change Password button on this window opens the Change Access Control Block Password window, which lets you change the password for your current Job only. If you don't know the control block password, contact your support representative.
For additional information, see the documentation for User and Site Options > Site > Access control block password.
Case 2: If your Windows login name has not been added as a user in Access Control (but a ProjectAdministrator has been defined) and
Shown at left is the Access Control Station Error dialog. Pressing the Permissions button opens the Access Control Login dialog (shown below).
You will have to enter the Login name (User) and Password of the ProjectAdministrator or of a group administrator in order to open the Access Control window. Once you are on the Access Control window, you can provide future access to the Project for yourself by adding a user, then entering your own Windows login name to that user's Login name.
Case 3: After your Windows login name has been added as a user you will have to enter the Login name and Password of the ProjectAdministrator or of a group administrator in order to open the Access Control window.
The Project Administrator
The ProjectAdministrator is the Job access control manager for all groups which are to have access to that Job. He or she has the responsibility to manage the logins and passwords of all group administrators and is empowered to assign permissions to those groups. The ProjectAdminsitrator sits at the top of the hierarchy which is the Groups/Users tree.
In this example, the ProjectAdministrator added three groups (detailingGroup, Fabricator and Engineer), each of which represents an independent Windows computer network.

Once you, the project administrator, have completed setting up Access Control , follow the instructions shown next to the information symbol (on the window) and copy the job_access file located in the Job's main folder. The ProjectAdministrator is the person who adds groups (
The ProjectAdministrator may also choose to add users to a group that is within the computer network in which the administrator is a user. For example, in a network environment with multiple SDS2 users, the ProjectAdministrator might be the team leader of the detailers charged with modeling and detailing the current Job, or the ProjectAdministrator might be the person who appointed the team leader. To ensure accountability and best protect intellectual property rights, the ProjectAdministrator should be one person only; that is to say, only one person should have access to the Login name and Password of the ProjectAdministrator.
The ProjectAdministrator should add users only to groups that are within the detailing group's computer network. Since only users that have been added to a group can have access to the Job, this means that if the ProjectAdministrator wants access to the Job, the administrator must add himself or herself as a user.
The ProjectAdministrator should not add users to groups on external networks. The adding of users to external groups should be done by the individual group administrators.
For the detailing group -- that is, the group that is on the ProjectAdministrator's local computer network -- the ProjectAdministrator may choose to set permissions for individual users to restrict them from performing operations that are outside of the scope of their responsibilities. Or the ProjectAdministrator may choose to delegate that responsibility to the detailing group's administrator. In some organizations, the ProjectAdministrator and the detailing group administrator may, in fact, be the same person, even though -- for the purposes of Access Control -- they have different login names and passwords.
For external groups, the ProjectAdministrator should apply Access Control permissions to the current Job in such a way that the Job can only be modified in permissible ways. This can help to ensure that the detailing group's rights to proprietary information are preserved and that Modeling work not yet paid for is not editable by those external groups or any third parties that may, for whatever reason, gain access to copies of the Job.
Example
This example shows that the ProjectAdministrator has access to all group administrator login names and passwords on his or her own network, while an individual group administrator, at least initially, only has access to his/her own login name and password, which was given to him/her by the ProjectAdministrator. For this example, ![]() Allow group permissions for any user not listed is checked off for all permissions.
Allow group permissions for any user not listed is checked off for all permissions.
|
The ProjectAdministrator, who we will call Floyd, adds three groups (DetailingGroup, Fabricator and Engineer), each of which represents an independent Windows computer network. Floyd's Windows login name is Dave, so he adds the user Dave under the detailingGroup. This is the Groups/Users tree that Floyd sees when he presses OK to close Access Control. |
|
The detailingGroup administrator is on the same computer network as Floyd and therefore could also be Floyd, but Floyd has given her a unique Login name and Password, so we will call her Barney. Since her Windows login name is Carol, she adds a user named Carol. She also adds a user named Frank. This is the Groups/Users tree that Barney sees when she presses OK to close Access Control. |
|
Floyd also gave the Fabricator group administrator an unique Login name and Password. We will call that group administrator Goober. Floyd sends Goober a zipped copy of the Job via e-mail. When Goober attempts to open the job, Access Control requires that he enter the name and password that Floyd gave him. Since Goober will be the only person working in the Job and his Windows login name is Goober, he adds a user named Goober. |
|
The Engineer group administrator we will call Opie. Floyd sends a copy of the Job to Opie along with the Login name and Password that Floyd assigned to the Engineer group. The illustration at left shows the Groups/Users tree that Opie sees when he first enters Access Control. Opie decides that, instead of using SDS2 Basic to review the Job, he will use SDS2 Viewer which he has installed on his personal laptop. |
|
When Floyd the ProjectAdministrator opens Access Control sometime after Barney and Goober have made their changes, Floyd is able to see the changes that Barney made, since Barney and Floyd are on the same computer network. However, Floyd cannot see the changes that Goober made since Goober is on a different computer network than Floyd. |
- Copy Project Items > Access Control Block (Utility Functions)
- Access control block password
- Passwords

