"  Additional Holes " connection design locks
|
||
"
|
||
|
User Defined Connections: Settings that are locked (
) in a user defined connection file will automatically be locked on a member edit window for which that file is the " Input connection type ." You can, if you so choose, manually lock additional settings on the member edit window, and your changes will be retained, through multiple processes, so long as you do not change to a different connection then switch back to the original user defined connection.
Column Edit: To change a setting, first set it to locked (
). Related settings that are unlocked (
) may be updated, and the "
Left/Right end limit state " calculations will be updated. Settings that are locked (
) will not be changed by connection design , even if doing so might prevent a connection failure.
Connection design locks :
Number of holes: 0 or 1 or 2 or 3 or 4 or 5 or 6 or 7 or 8 (a counting number). If " Number of holes " is unlocked ( ![]() ), then the number shown here is the number of rows that have been filled out on the Additional Holes screen for Base/Cap Plate Schedule.
), then the number shown here is the number of rows that have been filled out on the Additional Holes screen for Base/Cap Plate Schedule.
' 0 ' specifies no additional holes -- no " Hole 1 " or etc.
' 1 ' specifies one hole, which will have a set of locks under a heading named " Hole 1 ."
' 2 ' specifies two holes, which will have two sets of locks, one set under a " Hole 1 " heading, and a second set under a " Hole 2 " heading.
And so on . . . Up to 8 holes can be specified. Each hole that is specified will have its own set of locks.
"Hole 1" or etc: Each hole contained in the " ![]() Additional Holes " leaf has its own heading named "Hole 1" or etc. The number of headings matches the selected " Number of holes ." Under each of the headings is a set of locks like those documented below.
Additional Holes " leaf has its own heading named "Hole 1" or etc. The number of headings matches the selected " Number of holes ." Under each of the headings is a set of locks like those documented below.
Bolt diameter: The diameter of the bolt (in the primary dimension " Units " or other units ). Bolts may be generated automatically if this "additional hole" is in a user base/cap plate that frames to, for example, a beam's top or bottom flange. If the specified " Hole type " for this hole is set to be "
Matchable ,".the matching holes phase of Create Solids will automatically match this hole to the beam and generate a bolt through this hole and the matched hole. The bolt will be the " Bolt diameter " that is specified here.
Hole diameter: The diameter of the hole (in the primary dimension " Units " or other units ). A diameter of zero (' 0 ') designates a CNC mark .
Hole type: Standard round or Short slot or Oversize or Long slot or Anchor bolt or Plug weld .or Grout or User slot #1 or User slot #2 or Vent/Drain .
' Standard round ' designates that the hole in the column plate is a standard round hole. A standard round hole is, by default, matchable ("
Matchable ").
' Short slot ' designates an oblong hole with a relatively short slot length and a diameter that is typically 1/16 inch larger than the input bolt diameter. A short slot is, by default, matchable ("
Matchable "). The matched hole will be standard round.
' Oversize ' designates an oversized round hole in the column plate. An oversized round hole is, by default, matchable ("
Matchable "). The matched hole will be standard round.
' Long slot ' designates an oblong hole with a relatively long slot length and a diameter that is typically 1/16 inch larger than the input bolt diameter. A long slot is, by default, matchable ("
Matchable "). The matched hole will be standard round.
' Anchor bolt ' designates a hole for an anchor bolt in the column plate. An anchor bolt hole is, by default, matchable ("
Matchable ").
' Plug weld ' designates that the hole is a plug weld hole. By default, plug weld holes are not matchable ("
Matchable ").
' Grout ' designates that the hole is a grout hole, which is for pouring grout under a base plate. By default, grout holes are not matchable ("
Matchable ").
' User slot #1 ' and ' User slot #2 ' are slots whose slot lengths are set, based on the " Bolt diameter ," from user-entered length settings maintained at Home > Project Settings > Job > Bolts, Washers, and Holes > User Slot Lengths . A user slot is, by default, matchable ("
Matchable "). The matched hole will be standard round.
' Vent/Drain ' is a vent hole or drain hole for galvanizing. By default, vent/drain holes are not matchable ("
Matchable ").
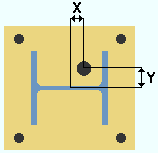
Horizontal reference (x): A positive or negative distance (in the primary dimension " Units " or other units ). An additional hole's "X" dimension is measured parallel with the plate's " Length " from the center of the plate to the center of the hole. The center of a user base/cap plate is the center of the plate's " Length " and " Width " defined on the Base/Cap Plate Schedule .

X = Horizontal reference (x). This example shows a column whose " Plate rotation " is zero, whose " Column rotation " is zero, whose " Offset parallel to web " is zero, and whose " Offset parallel to flange " is zero. The center of such a column coincides with the center of the user base plate. Assuming that the column's " Plate rotation " is zero, the following is true:
If the column frames to nothing (" Indeterminate end "), the "X" dimension is parallel with the column web. For a column in a plan view whose " Column rotation " is zero, a positive distance would place the "additional hole" to the right of the center of the user base / cap plate, while a negative distance would place the "additional hole" to the left of the plate's center.
If the column frames to a beam or joist, this dimension is parallel with the work line of the beam or joist.
Horizontal reference (y): A positive or negative distance (in the primary dimension " Units " or other units ). An additional hole's "Y" dimension is measured from the center of the plate to the center of the hole. The center of a base/cap plate is the center of the plate's " Length " and " Width " defined on the Base/Cap Plate Schedule .

Y = Horizontal reference (y). This example shows a column whose " Plate rotation " is zero, whose " Column rotation " is zero, whose " Offset parallel to web " is zero, and whose " Offset parallel to flange " is zero. The center of such a column coincides with the center of the user base plate.. Assuming that the " Plate rotation " is ' 0 ', the following is true:
If the column frames to nothing (" Indeterminate end "), the "Y" dimension is perpendicular to the column web. For a column in a plan view whose " Column rotation " is zero, a positive distance would place the "additional hole" above the center of the user base / cap plate, while a negative distance would place the "additional hole" below the plate's center.
If the column frames to a beam or joist, this dimension is parallel with the work line of the beam or joist.


