 Clash Report ( Modeling )
Tool summary :
Also see :
- Report viewer (the printed clash report is output to)
- Esc (keep pressing to end Clash Report )
page 1 | contents | home > reports > system reports > | reports >
 Step-by-step instructions :
You must be in Modeling , and members must be displayed in one of the three solid forms in order for you to obtain a Clash Report on them. The following instructions assume that you are in using a 3-button mouse.
2 . Invoke Clash Report using any one (1) of the following methods:
Method 1 : Click the Clash Report icon. The icon can be taken from the group named ' Reports ' and placed on a toolbar (classic) or the ribbon (lightning). Ribbon configuration is done using Customize Interface .
Method 2 : If " Modeling layout style " is ' Classic ', you can use the menu system to choose Report > Clash Report .
3 . The Clash Report dialog opens. On it are the following options.
Tolerance: The distance of separation between materials (in the primary dimension " Units " or other units ) at which Clash Report begins detecting clashes. ' 0 ' makes Clash Report consider materials that are flush with one another to be clashing. ' 1/8 ' (when using imperial dimensioning) instructs Clash Report to find materials that are as close or closer together to one another than 1/8 of an inch.
Print clashes?:
or
. If this box is checked (
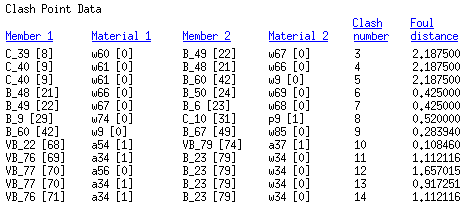
), you will get a report like that shown below when your press " OK ."

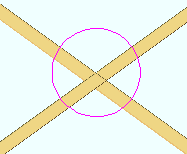
4 . Clash Report checks the entire 3D model for materials displayed in solids forms that are as close or closer together to one another than the " Tolerance " you entered in step 3. Circles are drawn around junctures of materials that Clash Report finds. The status line reports the number of clashes found. If you checked the box for " Print clashes? ," a clash report is output to the report viewer ( Output-Request Summary ) -- click here for information on how to output the printed report after reviewing it on screen. Report - Tolerance - Return mouse bindings become active.
|
|
|
bindings |
Alternative 1 : Left-click ( Report ) to continue on to step 5.
Alternative 2 : Middle-click ( Tolerance ) to obtain another clash report, presumably with a different tolerance. Go back to step 3 .
Alternative 3 : Right-click ( Return ) to end this operation. Do not continue. You might do this, for example, if you printed clashes and do not want to continue.
5 . Locate- Pan -Return mouse bindings become active, and the status line prompts, " Select clash to review ."
|
|
|
bindings |
Alternative 1 : Place the mouse pointer near a clash circle and left-click ( Locate ). Continue on to step 6.
Alternative 2 : Right-click ( Return ) to go back to step 4 .
6 . The circle blinks once, and the status line prompts, "Is this the clash you want to review?" Yes - No mouse bindings become active.
|
|
|
bindings |
Alternative 1 : Left-click ( Yes ) to continue on to step 7.
Alternative 2 : Right-click ( No ) to go back to step 5 .
7 . A window opens with options for " Mtrl " " Data " and " Return ."
Alternative 1 : Press the " Mtrl " button to highlight the materials that are clashing. Press the " Data " button to open the Clash Report Data window (continue on to step 8).
Alternative 2 : Press the " Return " button to go back to step 5 .
8 . The Clash Report Data window reports the member piecemarks and member numbers and the material piecemarks of the materials that are clashing.
Clash point number: The number ( 1 or 2 or 3 ...) that Clash Report stores internally to identify the clash that is circled. Since clash detection is done in order of member number , this clash number will be the same if you run the Clash Report again using the same tolerance and the same model if the same members are displayed in a solid form .
Foul distance: The distance (in the primary dimension " Units ") along the edges of the two materials or into the face of a material where the two materials are as close or closer to one another than the " Tolerance " that is entered.
Member one: The piecemark & number of the one member (of the two clashing members) that has the lower member number .
Material one: The submaterial mark of the one material (of the two clashing members) that has the lower member number .
Member two: The piecemark & number of the one member (of the two clashing members) that has the higher member number .
Material two: The submaterial mark of one material (of the two clashing members) that has the higher member number .
Ignore this CLASH:
or
. If this box is checked (
) the clash circle you located in step 4 will disappear after you press " OK ."
Alternative 1 : Press " OK " to continue on to step 9
Alternative 2 : Press " Cancel " to go back to step 7 .
9 . The window with options for " Mtrl " " Data " and " Return " again becomes active. If in step 6 you selected " Ignore this CLASH ," the clash circle will be removed.
Alternative 1 : Follow these instructions beginning with step 7 to edit the same clash number again.
Alternative 2 : Press the " Return " button to go back to step 5 to review/erase additional clashes. You can then right-click ( Return ) to go back to step 4, then right-click ( Return ) to end the operation.
Tip: If you get stuck in the Clash Report , keep hitting the Esc key until you get out.
page 1 | contents | home > reports > system reports > | reports > | top


