 CMU Wall ( Modeling > F2 >
  Concrete > select " CMU Wall" )
Tool summary :
- Adds a CMU wall to the 3D model. Common practice is to lay out points counterclockwise.
- CMU stands for concrete masonry unit. However, the masonry units that comprise a CMU wall do not necessarily have to be concrete. A CMU wall's primary masonry unit is defined by its " Field block " template.
- The points you locate set the bottom elevation(s) of the CMU wall. The height of the wall is set on the CMU Wall Edit window by choices you make to " Start height " and " End height " for a selected " Wall segment ." The thickness of the wall is defined by the selected " Field block " and " End block " templates. That thickness is oriented with respect to the wall's layout points per the choice made to " Reference " (' Center ' or ' Interior ' or ' Exterior ').
- Wall layout points can be adjusted using the " Diagram " on the CMU Wall Edit window. Curved walls can be achieved. Layout points do not necessarily have to be in the same plane.
- See (on this page or the CMU Wall Edit page):
- To add a CMU wall (this page) (
 )
)
- Wall properties (edit window page)
- Wall segments (edit window page)
- Diagram (edit window page)
- To add a CMU wall (this page) (
Also see :
- Modeling (where a CMU wall can be added or edited)
- CMU wall (definition)
- Concrete Setup > CMU Templates (lists available CMU templates)
- Add CMU Template (setup window that opens when you add a new CMU template)
- CMU Template Editor (setup window with settings for an individual CMU template)
- Move Layout Nodes (another way to edit the layout )
- Rebar System (may be added to a CMU wall )
- Rebar Area Layout (like Rebar System , except the user locates points to define the area)
To add a CMU wall :
|
Before adding a CMU wall , you should confirm that the " Field block " and " End block " templates that define the shape and dimension of the masonry units are listed in Concrete Setup > CMU Templates . Be aware that you can select ' None ' for " End block " if you want the wall to be composed of a single type of masonry unit.
A CMU wall can be added in Modeling by pressing F2 to open the Member Type Selection window, then double-clicking " CMU wall ."
CMU walls are typically laid out in a plan view . Using the point locator INCL to locate the CMU wall work points puts the bottom of the wall at the elevation of the plan view. If you want to use point locator options other than INCL , consider employing the Z filter toggle (
) to ensure that all located points snap to the elevation of the plan view.
The member line of a CMU wall runs along the bottom of the wall.
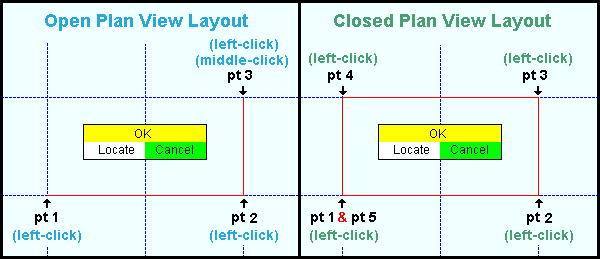
CMU walls are added as a layout. To achieve an open layout, you need to middle-click ( OK ) after you left-click ( Locate ) the final point. A closed layout is achieved when you left-click ( Locate ) the final point at the same location as the 1st point. For both of types of layout, the first point you locate establishes the left end of the layout. Common practice to lay out points counterclockwise.
After you have located points as described above, the CMU Wall Edit window opens. Note that this window includes settings for all of the CMU wall segments that you laid out. Be aware that if you press " Cancel " on this window, you will end this CMU wall layout operation without adding the wall.
Before you press " OK " to close this window, you must enter the template that you want to use as the " Field block ."
After you press " OK " to close the CMU Wall Edit window when adding such a wall for the first time, you need to right-click ( Cancel ) in order to end the layout operation.


mouse bindings

