DWF 3D Import ( Modeling )
Also see :
- Modeling (where Model > Reference Model is available)
- Reference model (topic)
- Reference Models (window from which you can do a 3D DWF import)
- Rotate Material (window opens when you import)
- Standard parts (imported entities from the DWF file are modeled as)
- Importing items into a Job (index)
- Tip 1 : Your operating system may be equipped with a viewer that lets you look at a .dwf or .dwfx file before you import it into Modeling . If your operating system doesn't have such a viewer installed, consider downloading a free DWF viewer from the internet.
- Tip 2: You can preview how the DWF file will look in Modeling -- including its scale, default rotation and origin point -- without actually adding it to the model. Just press the " Cancel " button on the Rotate Material window, which opens in step 7 . Knowing the origin is important since its location relative to the reference point located in step 5 positions the DWF file in the model.
- Tip 3: Locating a reference point ( step 5 ) is optional. If you uncheck "
 Locate model origin ," the DWF model will be located at the 0, 0, 0 global coordinate .
- DWF stands for Design Web Format. Pressing " Link to New File " (
 ) on the Reference Models window can import DWF or DWFx files. These files can be used, for example, to bring piping, vessels and various types of machinery into the 3D model.
- An imported .dwf or .dwfx file comes into Modeling as a reference model , which means that it is attached to a reference model member . Each distinct material in the original file is modeled as a standard part that is a distinct submaterial of that reference model member. This means that a large .dwf file can include hundreds or thousands of submaterials.
- Before doing a DWF 3D Import , you may want to Change File Sizes to provide space for the extra submaterials that will be generated.
- When " Visible " Is checked (
 ) for a particular DWF reference model on the Reference Models window and that model resides in your current view, the model can be shown in the Model Tree .
- If you do a DWF 3D Import then hit the Delete key to remove the newly added member, you can Undelete , Visual Undelete , or Quick Undelete to get that member back.
Depending on your choice to " Locate model origin " in step 4 , the DWF model will be located at the 0, 0, 0 global coordinate, or it will be placed at the point you locate in step 5 . For best results using the " Rotation " options, you should begin this operation in a plan view. See tip 2 for information on how to determine the origin point.
Steps 1, 2 & 3 : See steps 1, 2 & 3 for the " Link to New File " button on the Linked Models window.
4 . The DWF 3D Import window opens. This window also opens when you press " Refresh " ( ![]() ) for a previously imported DWF file.
) for a previously imported DWF file.
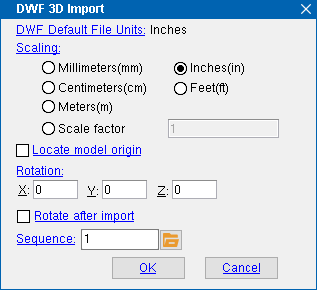 |
In most cases, you will get best results if you select " Scaling " units that match the reported " DWF Default File Units ." |
DWF Default File Units: read-only . This reports the units that are in the DWF file you selected in step 3. In other words, this is the scaling that was used when the original DWF model was created.
Scaling: Millimeters (mm) or Centimeters (cm) or Meters (m) or Inches (in) or Feet (ff) or Scale factor . In most cases, you should select the units that correspond to the " DWF Default File Units " reported above. Doing so should result in the imported items being scaled to match members and materials in your 3D model. You should enter a " Scale factor " only as a last resort.
| Default Units | Scaling | Result |
| ' Millimeters ' | ' Centimeters ' | Scale is 10 times larger than if ' Millimeters ' had been selected. |
| ' Inches ' | ' Feet ' | Scale is 12 times larger than if ' Inches ' had been selected. |
Locate model origin:
Rotation: The positive or negative (-) number of degrees of rotation that you want the DWF model to be rotated around the " X " and/or " Y " and/or " Z " global axes . Positive rotation is counterclockwise. Negative rotation is clockwise. You will probably find the results of the rotation most easy to interpret if you are in a plan view .

Y and X axes that you can rotate around in a plan view. The Z axis in a plan view is perpendicular to these axes.
X:
0
Y:
0
Z:
0 " X " and "Y" "Y" and " Z " values of ' 0 ' import the DWF model at its default rotation. Rotate after import:
Sequence: Any sequence name from the Sequence Names setup list can be entered here. To assign the sequence, you can type in its name, or you can press the "file cabinet" browse button (
) and double-click a sequence name that is on the list. The sequence will be reported in the " Sequence " column on the Reference Models window. Assigning a reference model member a sequence gives you the ability to color code, isolate or mask that member using Status Display > General status options > Sequence or " Zone ." It is much like assigning a " Sequence " to any other member.

Alternative 1 : Press the " OK " button at the bottom of the DWF 3D Import window to import the file. If you turned on "
Alternative 2 : Press the " Cancel " button to end this operation without importing the file. Do not continue.
5 (if applicable) : If you checked the box for " ![]() Locate model origin ," Locate - Pan - Return mouse bindings become active along with various Locate options. The status line prompts, "Locate a reference point. "
Locate model origin ," Locate - Pan - Return mouse bindings become active along with various Locate options. The status line prompts, "Locate a reference point. "
|
|
|
bindings |
Alternative 1 : Select the appropriate Locate icon (if it's not selected already), place the mouse pointer (
) so the point location target (
) snaps to where you want the reference point, then left-click ( Locate ). Go to step 6 .
Alternative 2 : Right-click ( Return ) to cancel the DWF 3D Import operation and keep everything as it was before step 2. Do not continue.
Tip: This is your last opportunity to zoom in or zoom out of the model. After you locate this point, most navigation tools are disabled.
6 . A progress bar is shown on screen as DWF 3D Import generates the material polygons needed to represent the imported items.
Possibility 1 : Skip step 7 and go to step 8 if you did not check the box for "
Possibility 2 : Go to step 7 if you checked the box for "
7 . The Rotate Material window opens along with a representation of the one new reference model member that the imported items are submaterials of. Do one (1) of the following:
Alternative 1 : Press " Cancel " to end the operation without importing anything.
Alternative 2 : To accept the member's present rotation, press the " OK " button. Go to step 8.
Alternative 3 : Change the members's rotational settings and then press " OK " if you want to rotate the member around various axes that originate at the reference point you located in step 5 or the 0, 0, 0 global coordinate , depending on the choice you made to " Locate model origin ."
8 . The DWF file you selected in step 3 has now been imported into your current view in Modeling as a reference model member . The reference model will now be listed as an item on the Reference Models window and, since it can be seen in your current view, it should also be shown in the Model Tree .

