 Dx/Dy Offset (DXDY) ( Modeling & Drawing Editor )
Tool summary :
More about this point locator :
- Quick instructions:
- Detailed instructions:
Also see :
- Modeling and the Drawing Editor (where DXDY can be found)
- Screen axes ( DXDY functions with respect to)
- Construction line by designating two points
- Construction line by defining a point and an angle
- Offset Controls (affect DXDY )
- Depth checking (does not affect DXDY )
page 1 | contents | locate > | top
 Quick instructions for DXDY to locate a second point :
| DXDY to add a sloping beam
(instructions assume that you are using a 3-button mouse) |
|
|
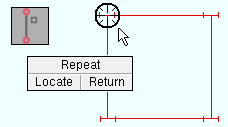
1 . Invoke Add Beam , then left-click ( Locate ) when the target ( |
|
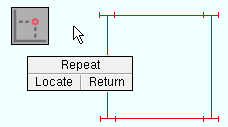
2 . The status line prompts, "Locate second point ." Select DXDY as the Locate option, then left-click ( Locate ) anywhere in the drawing area. |
|
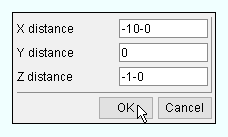
3 . In the DX/DY Offset window, enter the X, Y and Z distance from the first point to the beam's second point, then press " OK ." |
|
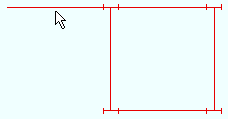
4 . When you are done making entries to the Beam Edit window, the beam appears in the view. |
page 1 | contents | locate > | top
 DXDY to lay out an octagonal shape :
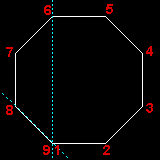
| Note: " Use this point as new base position " must be checked ( |
| DXDY entries to create an octagon using Add Lines | |||
|
Point | X distance | Y distance |
| 2 | 2-9 15/16 | 0 | |
| 3 | 2-0 | 2-0 | |
| 4 | 0 | 2-9 15/16 | |
| 5 | -2-0 | 2-0 | |
| 6 | -2-9 15/16 | 0 | |
| 7 | -2-0 | -2-0 | |
| 8 | 0 | -2-9 15/16 | |
| 9 | 2-0 | -2-0 | |
Note 1: Point 1 was located using INCL .
Note 2: 2-9 15/16 is the square root of 2-0 squared plus 2-0 squared (per the Pythagorean theorem). Each side of the octagon is this length.
Note 3: Most layouts let you middle-click ( Done ) the last point instead of making the DXDY entries that are shown for point 9 .
page 1 | contents | locate > | top
 DXDY to locate a second point (also see the quick instructions ) :
When DXDY is used to locate a second point, the dimensions you enter (in step 4 ) are measured from the first point you input.
1 . Begin this operation in Modeling or the Drawing Editor .
1a : Invoke Construction Line Add or Add Beam or Line Add or any similar tool that prompts you to locate two points.
2 . The status line prompts, " Locate a first point ."
2a : With one of the other Locate options active ( Auto , EXPT , etc.), left-click ( Locate ) when the point location target (
) is where you want this first point. This first point is used as the reference point for DXDY .
3 . The status line prompts, " Locate a second point ."
3a : Select the DXDY icon or choose Locate > DxDy Offset , then left-click ( Locate ).
4 . The DX/DY Offset window opens.
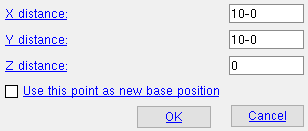 |
The distances you enter on this window establish point coordinates with respect to screen axes . |
X distance: A positive or negative (-) distance (in the primary dimension " Units " or other units ) from the point entered in step 2 of this procedure (or the reference point added in step 3 of the next procedure ). Entering a positive distance places the new point that distance directly to the right of the reference point. Entering a negative (-) distance places the new point that distance directly to the left of the reference point. Entering 0 (zero) places the new point at the X coordinate of the reference point.
Y distance: A positive or negative (-) distance (in the primary dimension " Units " or other units ) from the point entered in step 2 of this procedure (or the reference point added in step 3 of the next procedure ). Entering a positive Y distance places the new point that distance above the reference point. Entering a negative Y distance places the new point directly below the reference point. Entering 0 (zero) places the new point at the Y coordinate of the reference point.
Z distance: A positive or negative (-) distance (in the primary dimension " Units " or other units ) from the point entered in step 2 of this procedure (or the reference point added step 3 of the next procedure ). This prompt only appears if you are executing DXDY in Modeling . Entering a positive Z distance places the newly added point that distance toward you, out of the screen, from the reference point. Entering a negative Z distance places the newly added point that distance directly away from you, into the screen, from the reference point. Entering 0 (zero) places the new point at the Z coordinate of the reference point. You may enter a Z distance beyond the limits of depth checking , but the value you enter does not override Offset Controls .
Use this point as new base position:
or
. "This point" is the point you are currently defining. This option applies to operations such as Move Material . It also applies to a ' Single ' copy done repeated times in a Copy Members operation. For a typical two-point add operation, this option is irrelevant since there will be no additional points that will be located in that operation. If this box is checked (
), the next point you locate using DXDY in your current operation will be dimensioned from the point you are currently defining. If this box is not checked (
), the next point located is dimensioned from the last point that dimensioning was from (in that operation).
Alternative 1 : Press the " OK " button to cause a new point to be offset from the reference point per the X, Y, Z distances entered on this window.
Alternative 2 : Press the " Cancel " button to, instead of locating the Dx/Dy point, close the window, choose a different Locate option, and continue with whatever operation you invoked in step 1.
page 1 | contents | locate > | top
 DXDY to locate a first point :
When DXDY is used to locate a first point, you must locate a reference point to dimension from.
1 . Begin this operation in Modeling or the Drawing Editor .
1a : Invoke Construction Line Add or Add Beam or Line Add or any similar tool that prompts you to locate a point.
2 . The status line prompts, " Locate a point ."
2a : Select the DXDY icon or choose Locate > DxDy Offset , then left-click ( Locate ).
3 . The status line prompts, " Locate a reference point ."
3a : Select any Locate icon used for point location ( Auto , INCL , INCL , FRPT , etc.).
3b : Place the mouse pointer (
) so the point location target (
) snaps to the on-screen location where you want the reference point, then left-click ( Locate ).
4 . The DX/DY Offset window opens.
4a : See step 4 of the previous procedure.


