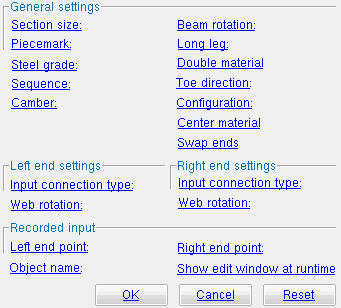
The Parametric Beam Add window
| Quick Notes |
Also see :
- Modules
- Parametric Point Maps
- Member attributes for beams (some of these can be added to a script)
Warning :
- If you are using imperial dimensioning, make entries to fields on this window in decimal inches, not fractions. Also, do not use hyphens (-). If you enter a fraction using integers, Python truncates the results of the division operation to an integer (examples: 1/8 = 0 ; 5/4 = 1 ). If you enter fractions with decimal points, Python calculates the precise decimal value (examples: 1.0/8.0 = .125 ; 5.0/4.0 = 1.25 ). If you enter a hyphen, Python interprets the hyphen as a minus sign (examples: 1-2 = -1 ; 3-2 = 1 ). See numbers (floating point numbers and integers). Also see Units("...") , which set whether you need to enter dimensions in decimal inches or millimeters.
------ General settings ------
Section size ( obj . SectionSize or obj.section_size ): ![]() " String " plus a string or
" String " plus a string or ![]() " String " plus a variable . Connections can be designed for wide flange , channel , welded plate W and tube beams.
" String " plus a variable . Connections can be designed for wide flange , channel , welded plate W and tube beams.
If the box for " String " is checked (
), you can type in the section size that you want, or you can press the "file cabinet" browse button (
) and double-click any section that is on the list of available materials in the local shape file . For example, if you were to enter W14x90 , the resulting line of parametric code would read: obj.SectionSize = "W14x90" (where obj is the " Object name "). Note from this example that you do not have to put the section size in quotes.
If the box for " String " is not checked (
), you can assign this beam the section size of a previously added material or member main material. For example, you could enter mem1.SectionSize to get the section size of a previously named member object called mem1 . In the parametric code, the variable will not be in quotes, since the variable itself is not a string, though it returns a string.
Piecemark ( obj . Piecemark or obj.piecemark ): Blank or a user piecemark .
If you leave this blank : No line for assigning a piecemark is included in the code generated by this window. A system piecemark will be assigned to the parametrically added member when that member undergoes Process and Create Solids ..
If you enter characters here : Be sure to put them in quotes ("..."). The resulting code is something like: obj.Piecemark = "my_pcmk" , and this member is assigned my_pcmk as its user piecemark at the time this script is Run . Warning : If you do this, it is your responsibility to ensure that you Run the script in a Job where there are no members that have already been assigned that piecemark. If you do not properly track user piecemarks, you may get members that are physically quite different but share the same user piecemark.
Tip: A script can read piecemarks (user or system) as shown in the following example:
# Prints the piecemark of the member that the user selects.
from member import MemberLocate
from param import ClearSelection
mem1 = MemberLocate("Select a member")
print("The piecemark is: ", mem1.Piecemark)
ClearSelection()
Steel grade ( obj . MaterialGrade or obj.grade ): Any steel grade ( "A36" or "A572" or etc.) from the list of " Wide Flange Grades " (for wide flange beams) or " Channel Grades " (for channel beams) or " HSS/TS Grades " (for tube beams).
Example: Selecting A36 adds a line to the parametric code that reads: obj.MaterialGrade = "A36" (where obj is the " Object name " and "A36" is a string from one of the aforementioned setup tables).
Sequence ( obj . ErectionSequence or obj.sequence ): Any sequence name (a string ) from Home > Project Settings > Job > Zone and Sequence > press Sequence Names.
Example: Entering 2 designates a line of parametric code that reads: obj.ErectionSequence = "2" (where obj is the " Object name "). Note that 2 is automatically placed in quotes ("2") since it should be interpreted as a " string " instead of an integer .
Warning: If you enter a sequence that is not in the Sequence Names list, you will not be able to add this member.
Tip: Remove the line obj.ErectionSequence = "xxx" if you want to apply the default sequence (line 1 in Sequence Names ).
Camber ( obj . Camber or obj.camber ): Not applicable at this time. obj.Camber returns exactly the same value as obj.MidOrdinate , but is read-only.
| Tip : To get a camber annotation (of -2 in this example), use a text editor to add the following lines of code to the script that adds this beam: | |
|
|
|
When the script is Run , the beam is created with a camber annotation of -2. Be aware that if the object is named something other than memadd1 , you need to use that object name instead of memadd1. |
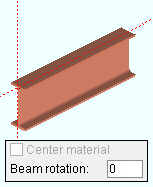
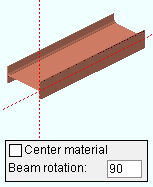
Beam rotation ( obj . Rotation or obj.rotation ): The positive or negative floating point number of degrees ( 180.0 to -180.0 ). This sets the rotation from web vertical. If you are looking along the beam work line toward the left end of the beam, a positive entry rotates the beam counterclockwise around its workline that number of degrees.
Rotation = 0
Rotation = 90
0 (zero) degrees sets the web of the beam to be vertical. The selection made to the " Web rotation " field may override an entry of 0 made here. The parametric code reads: obj.Rotation = 0 (where obj is the " Object name ").
A number between +/-180.0 degrees rotates the beam the specified number of degrees from vertical.
90.0 degrees orients the web of the beam so that it is horizontal. The parametric code reads: obj.Rotation = 90.0 (where obj is the " Object name ").
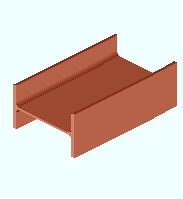
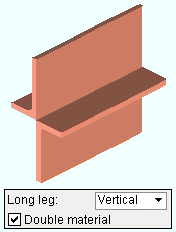
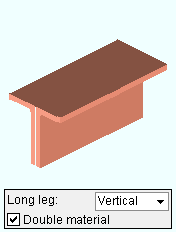
Long leg ( obj . LongLegOfAngleIsVertical or obj.LLV ): Vertical ("VT.") or Horizontal ("HZ."). This applies when angle material has been entered as the " Section size ." The choice you make here results in the entry of a string ( "VT." or "HZ." ) to the parametric code.
"VT."
|
"HZ."
|
If Vertical is selected, the long leg of the angle(s) will be vertical when 0 is entered as the " Beam rotation ." The parametric code reads: obj.LongLegOfAngleIsVertical = "VT." (where obj is the " Object name ").
If Horizontal is selected, the long leg of the angle(s) will be horizontal when 0 is entered as the " Beam rotation ." The parametric code reads: obj.LongLegOfAngleIsVertical = "HZ." (where obj is the " Object name ").
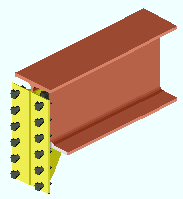
Double material ( obj . DoubleMaterial or obj.is_double ): ![]() ( "Yes" ) or
( "Yes" ) or ![]() ( "No" ). This applies when the " Section size " is an angle or channel. Connection design can create connections on double channel beams. The choice you make here results in the entry of a string ( "Yes" or "No" ) to the parametric code.
( "No" ). This applies when the " Section size " is an angle or channel. Connection design can create connections on double channel beams. The choice you make here results in the entry of a string ( "Yes" or "No" ) to the parametric code.
If this box is checked (
If the box is not checked (
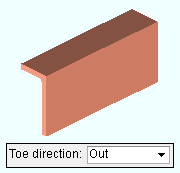
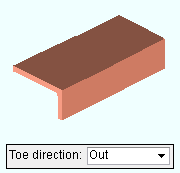
Toe direction ( obj . ToeIO or obj.toeio ): "In" or "Out" . This applies when the " Section size " is a single channel or angle. The choice you make here results in the entry of a string ( "In" or "Out" ) to the parametric code.
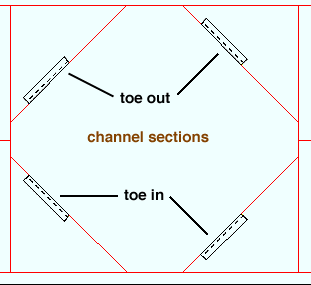
"In" signifies toe in. It points the toe of the angle (flanges of the channel) down in a plan view (toward the right if the workline of the beam is vertical). It points the toe of the angle (flanges of the channel) toward you if you are facing the near side of the member in an elevation view. The parametric code reads: obj.ToeIO = "In" (where obj is the " Object name ").
"Out" signifies toe out. It points the toe of the angle (flanges of the channel) up in a plan view (toward the left if the workline of the beam is vertical). It points the toe of the angle (flanges of the channel) away from you if you are facing the near side of the member in an elevation view. The parametric code reads: obj.ToeIO = "Out" (where obj is the " Object name ").
Configuration ( obj . Configuration or obj.configuration ): "Star" or "Back to back" . This field appears as an option only when the box for " Double material " has been checked. The choice you make here results in the entry of a string ( "Star" or "Back to back" ) to the parametric code.
"Star"
"Back to back"
"Star" lays out the two angles so that the outside corner of each angle is along the work line of the beam. The parametric code reads: obj.Configuration = "Star" (where obj is the " Object name ").
"Back to back" lays out the two angles so that one leg of each angle is back-to-back. The parametric code reads: obj.Configuration = "Back to back" (where obj is the " Object name ").
Center material ( obj . CenterMaterial or obj.center_mtrl ): ![]() ( "Yes" ) or
( "Yes" ) or ![]() ( "No" ). This applies when 90 is the " Beam rotation ." The choice you make here results in the entry of a string ( "Yes" or "No" ) to the parametric code.
( "No" ). This applies when 90 is the " Beam rotation ." The choice you make here results in the entry of a string ( "Yes" or "No" ) to the parametric code.
|
|

|
If this box is checked (
If the box is not checked (
Swap ends ( obj . SwapEnds or obj.swap_ends ): ![]() ( "Yes" ) or
( "Yes" ) or ![]() ( "No" ). The choice you make here results in the entry of a string ( "Yes" or "No" ) to the parametric code.
( "No" ). The choice you make here results in the entry of a string ( "Yes" or "No" ) to the parametric code.
If this box is checked (
If the box is not checked (
------ Left end settings ------ | ------ Right end settings ------
| Tip 1: The left end is the " Left end point " end of this member. Process and Create Solids will switch the left and right ends if the " Left end point " is to the right of the " Right end point. " Tip 2 : Additional attributes not on this window are available for left/right setbacks and left/right end reactions . |
Input connection type ( obj . LeftEnd.InputConnectionType ) or ( obj . RightEnd.InputConnectionType ): "Auto standard" or "Plain end" . The choice you make here results in the entry of a string ( "Auto standard" or "Plain end" ) to the parametric code.
Auto standard instructs connection design to create an appropriate system connection based on the beam's framing situation . Auto standard connections have a number of advantages . For the left end, the parametric code reads: obj.LeftEnd.InputConnectionType = "Auto standard" (where obj is the " Object name ").
Plain end prevents connection design from creating a system connection on this end. Process and Create Solids will automatically cope and set back a beam with a " Plain end ". For the left end, the parametric code reads: obj.LeftEnd.InputConnectionType = "Plain end" (where obj is the " Object name ").
Web rotation ( obj . LeftEnd.MemberRotationType ) or ( obj . RightEnd.MemberRotationType ): "Auto" or "Web Vertical" or "Hip and Valley" or "Web Normal" .The choice you make here results in the entry of a string ( "Auto" or "Web Vertical" or "Hip and Valley" or "Web Normal" ) to the parametric code.
"Auto" lets the progrram make a choice to this field for you.
"Web Vertical" makes the web of the beam vertical to the world.
"Hip and Valley" rotates the web of the beam to keep the flange of the beam being input in the same plane as the flange of the sloping beam it is framing into.
"Web Normal" rotates the web of the beam being input as needed to keep the CONNECTION in the beam perpendicular to the flange of the sloping beam it is framing into.
Example: You frame a beam into a sloping beam to form a roof support. The other end of the beam has a plain end and frames into concrete. For the framing end, you designate " Web Normal ". For the opposite end, you designate " Auto " in order to keep the beam from being twisted.
To close this window :
"OK" (or the Enter key) closes this window and saves your changes to RAM.
"Cancel" (or the Esc key) closes this window without saving any changes that you have made to it.
"Reset" undoes all changes made to this window since you first opened it. The window remains open.

