 Material Add Shaped Rebar ( Modeling )
Tool summary :
Also see :
- Add Material
- F2 >
 Concrete/Rebar > Shaped Rebar (adds a legacy miscellaneous member)
- Dimension precision (sets precision for distance entries)
- Material Change Options (may open after you press " OK ")
- Submaterial piecemark (each unique material identified by)
- Submaterial detail (2D drawing of a material)
- Rebar (topic)
- Grayed out fields (indicate mixed entries or that the field is disabled)
- Altering a miscellaneous member's main view
 Shaped rebar layout :
|
1 . Shaped rebar can be added to the 3D model as a submaterial of a member or as a miscellaneous member. Do one (1) of the following:
To add the shaped rebar TO a member (pre-selection method):
To add the shaped rebar AS a new member : F2 > filter for "
Concrete/Rebar " > double-click " Miscellaneous - Shaped Rebar " > continue to step 2.
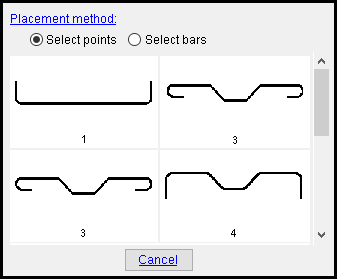
2 . The Select Rebar Shape dialog box opens. On it are settings for the shaped rebar that you are adding.
 |
First select the placement method ( 2a ), then select the desired rebar shape template ( 2b ). Or you can press " Cancel ' to end the Add Shaped Rebar operation. A nice example of the ' |
2a : Choose a " Placement method ." '
Select bars ' will require you to select the ends of rebar dowels that have already been placed in the model. '
Select points ' will allow you Locate points anywhere, even out in space.
2b : Select a rebar shape template from the visual list.
3 . When you have selected a rebar shape template (2b), the Select Rebar Shape dialog box closes, and the Edit Rebar Shape window opens. A preview of the to-be-added rebar layout is shown on screen. Do one (1) of the following:
Alternative 1 : Press " Cancel " to prevent the rebar shape from being added.
Alternative 2 : Change the rebar shape material's settings and then press " OK "
Alternative 3 : Press the " OK " button to accept the rebar shape.
4 . If you pressed " OK " in step 3, do one of the following:
If you selected ' Select points ' , Locate- Pan -Return mouse bindings become active. Select the appropriate Locate option, then locate two points to define the shaped rebar ends.
If you selected ' Select bars' , placement works as for Alternative 1, except that point locations are limited to the ends of rebar that have already been placed in the model.
5 . Do one (1) of the following:
Scenario 1 : If you are adding this material as a submaterial, follow the step-by-step instructions for Add Material (skipping to step 9.) to complete the operation.
Scenario 2 : If you are adding this material as a miscellaneous member, the Shaped Rebar window will open again after you have selected all of the points required by the rebar shape that you chose. Do one(1) of the following:
Alternative 1 : Go back to step 2 and select another rebar shape template from the list.
Alternative 2 : Press " Cancel " to complete this operation.
 Options on the Select Rebar Shape dialog :
Placement method: Select points or Select bars .
'
Select points ' will allow you Locate points.
'
Select bars ' will require you to select the points at the ends of rebar dowels that have already been placed in the model.

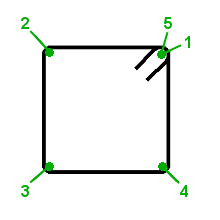
1 . These points define a Type T1 shape template, as shown in the Rebar Shape Template Editor . In this example, you must select five rebar ends in the order shown when placing shaped rebar using the " Select bars " option.

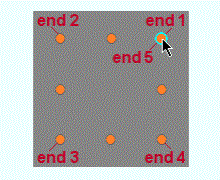
2 . Select the five rebar ends in the order required by the shape template. Left-click ( Locate ) when each rebar end is highlighted. In this example, a concrete column was previously placed using a template that added eight vertical rebar. The first required bar end is shown selected. 
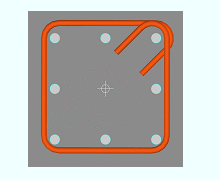
3 . When all five points are entered, the material is added.
Rebar shape templates: A rebar shape template from the Rebar Shape Template Editor . Each template's name is displayed below its picture.
 To close this window :
![]()
"Cancel" (or the Esc key or the
button) closes this window and ends the Add Shaped Rebar operation.


