 Rotate X ( Modeling )
Tool summary :
Also see :
- Modeling (where Rotate X is a tool)
- Screen axes ( Rotate X mouse pointer movement operates with respect to)
- Global axes ( Rotate X changes view positioning with respect to)
- Current view location (changed by Rotate X )
- Save View As (to save view changes made using Rotate X )
- Undo View Change (undoes Rotate X )
- Revert (undoes a series of Rotate X operations)
page 1 | contents | navigate > | navigate -- navigation mode | navigation
 Step-by-step instructions :
1 . Invoke Rotate X using one (1) of the following methods:
Method 1 : Click the Rotate X icon, which is pictured above. The icon can be taken from the group named ' Navigate -- Navigation Mode ' ( Modeling ) and placed on a toolbar (classic) or the ribbon (lightning).
Method 2 : If the " Modeling layout style " is ' Classic ', you can use the menu system to choose Navigate > Rotate X .
Method 3, 4 or 5 : Rotate X can also be configured to be invoked using a keyboard shortcut , the context menu , or a mode . For the lightning interface, this configuration is done using Customize Interface .
2 . Your mouse pointer changes its appearance ( ![]() ). Hold down any mouse button and drag the mouse pointer horizontally or diagonally across the screen. Note that if you drag diagonally, only the horizontal component of the drag affects the rotation.
). Hold down any mouse button and drag the mouse pointer horizontally or diagonally across the screen. Note that if you drag diagonally, only the horizontal component of the drag affects the rotation.

|
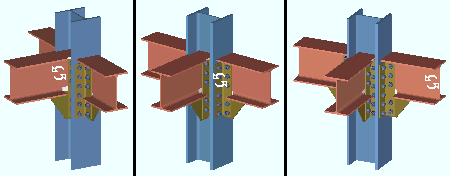
| In this example of Rotate X , the view rotates around the column. |
3 . Release the mouse button that you are holding down when the display is rotated to the perspective that you want.
Tips: At this point you have not actually created a new view; you have simply relocated your current view. Use Save View As to actually create a new view. If you don't like the change you just made to your current view, use Undo View Change to undo that change. If you have made a series of changes and want to go back to your original view, use Revert .
page 1 | contents | navigate > | navigate -- navigation mode | navigation | top


