 Context Menu Editor ( Modeling & Drawing Editor , ' Classic ' or ' Lighting ')
Also see (lightning) :
- Customize Interface ( Context Menu Editor is opened from)
- Shortcut menu configuration ( Context Menu Editor can edit one such file at a time)
- Role configuration file (may contain multiple roles)
- Role switcher (each role has an associated keyboard configuration file)
- A role (may be assigned 1 context menu configuration, but other roles can have the same menu config)
- Lightning role configuration (role configuration file loaded when, for example, Modeling is launched)
- Note: A single context menu file can be used across multiple roles in multiple role configurations.
Also see (classic) :
- Toolbar configuration file (context menu settings reside in)
- Modeling default ( User and Site Options > Toolbars > " Modeling " > loaded at startup)
- Drawing Editor default ( User and Site Options > Toolbars > " Drawing Editor " > loaded at startup)
- Load Configuration ( Settings > )
- Delete Toolbar Configuration ( Home > Utilities > Utility Functions > )
Also see (lightning & classic) :
- Context menu ( Modeling )
- Context menu ( Drawing Editor )
page 1 | customize interface > shortcut menu configuration > edit | settings > | top
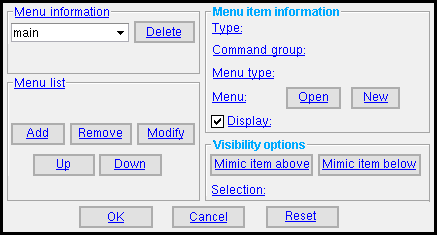
------ Menu information ------
Select the menu that you want to configure : main ( Modeling ) or model_tree ( Modeling ) or main ( Drawing Editor ) or special (a cascade menu in the Drawing Editor ) or any_custom_cascade_menu .
' main ' ( Modeling ) is the context menu you get when you right-click ( Menu ) in the drawing area in Modeling .
' model_tree ' ( Modeling ) is the context menu you get when you right-click ( Menu ) in the Model Tree .
' main ' ( Drawing Editor ) is the context menu you get when you right-click ( Menu ) in the drawing area in the Drawing Editor .
' special ' ( Drawing Editor ) is a cascade menu found in the default ' main ' context menu in the Drawing Editor .
' any_custom_cascade_menu ' may be any name, and you may have multiple cascade menus with different names. You get a cascade menu by pressing the " New " button next to " Menu " after selecting ' Custom ' as the " Menu type ."
Note: When you select a menu here, the " Menu list " updates to show the items (commands, cascade menus, separators) that are currently placed on that menu.
![]() erases the selected menu . You cannot delete the ' main ' or ' model_tree ' menus. You can, however, delete cascade menus that you have added. When you do so, its listing is deleted from the " Menu list " for any other menus that incorporate that cascade menu.
erases the selected menu . You cannot delete the ' main ' or ' model_tree ' menus. You can, however, delete cascade menus that you have added. When you do so, its listing is deleted from the " Menu list " for any other menus that incorporate that cascade menu.
page 1 | customize interface > shortcut menu configuration > edit | settings > | top
------ Menu list ------
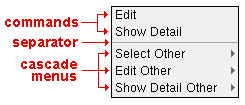
| Items that may be listed here are commands, cascade menus or separators. If, under " Menu information ," you selected a cascade menu that has not yet been configured, then no items are shown here, and you will need to " Add " items to the cascade menu. |
The " Menu list " shows the items that are available on whatever context menu or cascade menu is selected under " Menu information ."
To add an item under another item, select the item you want the new item to be under, then press " Add ."
To modify an item, select the item, then press " Modify ."
To remove an item, select the item, then press " Remove ."
To move an item, select the item, then press " Up " or " Down ."
page 1 | customize interface > shortcut menu configuration > edit | settings > | top
------ Menu item information ------
| To enable these settings, you need to select an item on the " Menu list " then press " Add " or " Remove ." |
Type: Command or Cascade Menu or Separator .

' Command ' is for invoking a tool by selecting a command on whatever context menu is selected under " Menu information ."
' Cascade Menu ' is for opening a cascade menu from the context menu.
' Separator ' is a dividing line (----) on the context menu.
Command group: Applies when ' Command ' is the " Type . "
|
1 . Select a command group.


command group
2 . On the command list, select the command that you want added to the " Menu list ."


command list
| Erection View Detailing : File | View - Tiles | Navigate | Navigate - Navigation Mode | Navigate - Surface Mode | Settings | User Modes | Selection | Solids | |
| Assembly Editor : File | Edit | View | View -- Solids Mode | View - Tiles | Navigate | Navigate - Navigation Mode | Navigate - Surface Mode | Model | Model - Construction Lines | Model - Construction Circles | Model - Member | Model - Material | Model - Hole | Model - Bolt | Model - Weld | Locate | Settings | User Modes | Selection | |
| The "Model Tree Only" command group | |
| Edit This | Edit the item that is hovered with the mouse pointer ( |
| Select | selects the item that is hovered. |
| Expand All | expands the Model Tree . |
| Collapse All | collapses the Model Tree . |
Menu type: Custom or Select Other or Edit Other or Show detail Other .
' Custom ' lets you define your own context menu submenu. Press the " New " button to give the cascade menu a name and add that name to the currently shown " Menu list ." Press " Open " to load the new cascade menu into the " Menu list " so that you can " Add " commands to it.
' Select Other ' is a built-in context menu submenu (not user-configurable) that lists items under the mouse pointer (
) in the model. As you highlight an item on the list, that item highlights in the model. Choosing an item on the list selects it in the model. There is a same-named and functionally equivalent cascade menu in the Drawing Editor . In Modeling only: " All pcmk " (for example, " All B_31 ") is available as an item on the Select Other menu for selecting all members in your entire model which have that piecemark. Similar functionality is also available for selecting (in the entire model, not just the view) all submaterial with the same minor mark (e.g., " All a12 "). If a member or material under a mark is not selectable, due a member's " Model complete date " or a locked member end, ' Select Other ' will -- instead of providing options for " All mem_pcmk " or " All sub_mark " -- provide selection options such as " 3/4 B_31 " and " 3/4 a12 ", which indicate that 3 out of the 4 total members or submaterials under the mark will be selected.
VIDEO 
Right-click is used to open the context menu and choose " Select Other " and " E dit Other " ' Edit Other ' is the same as ' Select Other ,' except that choosing an item opens the edit window for that item (click here , here , here for examples). For labels in the Drawing Editor , a listing is provided for editing all labels with the same text. In Modeling , " All pcmk " (for example, " All 4 B_82 " or " All 10 a3 ") is available as an item on the submenu for editing all members or submaterials with that mark.
VIDEO 
The same video as is shown above, for " S elect Other ." ' Show Detail Other ' is the same as " Select Other " except that choosing an item starts up the Drawing Editor and shows the detail of the selected member or material. See Show detail .
Note: For " Select Other " or " Edit Other " or " Show detail Other ," the functionality of the cascade menu is built-in. You cannot change this functionality. All you can do is uncheck " Display " and change the menu label that appears on the menu.
Menu: Press ![]() or select one of the menus previously defined (see menu information ).
or select one of the menus previously defined (see menu information ).
makes the custom " Menu " that is selected also selected under " Menu information " so that you can use " Add " " Remove " " Modify " " Up " " Down " to make changes to that menu.
Display: ![]() or
or ![]() . This applies, for example, when you have selected an item other than a separator in the " Menu list " and pressed " Modify ." It lets you rename the item that is selected.
. This applies, for example, when you have selected an item other than a separator in the " Menu list " and pressed " Modify ." It lets you rename the item that is selected.
If this box is checked (
), the item is give the name that is currently shown on the " Menu list ."
If the box is not checked (
), you can rename the item that is currently selected on the " Menu list ." Tip: When renaming an item, you can put an _ (underscore) in front of a letter to underline the letter in the context menu. For example, typing " E_xample " here results in " E x ample " on the actual context menu. When the context menu is open, pressing the key corresponding to that letter invokes the command.
Displayed in: details and/or Job standard details and/or Global standards and/or Submaterial and/or Erection views and/or detail sheets and/or Gather sheets and/or Erection sheets and/or Sheet outlines .
The item that is currently selected on the " Menu list " will be visible on the context menu when that context menu is used in a drawing of a type whose box is checked (
) here.
This, of course, only applies to the Drawing Editor since you can only be in a drawing when you are in the Drawing Editor .
page 1 | customize interface > shortcut menu configuration > edit | settings > | top
------ Visibility options ------
![]() and
and ![]() apply the visibility " Selection " setting of the item above or below the currently selected item on the " Menu list " to that currently selected item. It does not matter if the item is a command or cascade menu or separator.
apply the visibility " Selection " setting of the item above or below the currently selected item on the " Menu list " to that currently selected item. It does not matter if the item is a command or cascade menu or separator.
Selection: Default or Always or Any or None or An Object Type or By Expression or Custom .
| Option | The item selected on the " Menu list " is visible |
| ' Default ' | ... when the selected object is an object that can be selected using the ' Default ' selection filter ( Modeling ) or ' Default ' selection filter ( Drawing Editor ). |
| ' Always ' | ... whenever the context menu is open. |
| ' Any ' | ... whenever any object is selected. |
| ' None ' | ... whenever no object is selected. |
| ' An Object Type ' | ... whenever any object of the one selected type is selected. This applies even if objects of other types are selected. |
| ' Custom ' | ... whenever any item of any one or more selected type is selected. ' Custom ' lets you select more than one object type. |
|
You can select any one of these object types directly on the " Selection " menu ( |
| Selectable object types or Custom object types in Modeling : Group Member , Members , Members in Groups, Member Ends , Material , Welds , Holes , Bolts , Beams , Columns , Vert Braces , Horiz Braces , Joists , Girts (legacy) , Purlins , Misc. , Stairs , Cons. Lines , Cons. Circles . |
| Selectable object types or Custom object types in the Drawing Editor : Arcs , Arc dimensions , Bevels , Bolts (2D only), Circles , Clouds , Cons. Circles , Cons. Lines , Dimensions , End Points , Holes (2D only), Labels , Lines , Members , Sheet Items , Pointers , Polygons , Polygon Sides , Sheet Lines , Welds . |
page 1 | customize interface > shortcut menu configuration > edit | settings > | top
Buttons for editing the context menu :
" Add" inserts a command or cascade menu or separator on the " Menu list ." After you press " OK ," the menu selected under " Menu information " will show the new command or cascade menu or separator you added.
1 . Optionally select on the " Menu list " the item (command or cascade menu or separator) under which you want the new item to be located, then press the " Add " button.
2 . Select a " Type " (' Command ' or ' Cascade Menu ' or ' Separator ')
Possibility 1 : If you selected ' Command ', select a " Command group " and a command from the list , then go to step 3.
Possibility 2 : If you selected ' Cascade Menu ', choose ' Custom ' as the " Menu type ." Press the " New " button to give the menu a name and add that name to the currently shown " Menu list ." Press " Open " to load the new cascade menu into the " Menu list " so that you can " Add " commands to it. For other things you can do if you selected ' Cascade Menu ', see " Menu type ."
Possibility 3 : If you selected ' Separator ', go to step 3.
3 . The item (command or cascade menu or separator) is added to the " Menu list " under the area you selected in step 1. If you made no selection in step 1, the new item is placed at the bottom of the " Menu list ."
"Remove" deletes the item that is currently selected from the " Menu list ."
"Modify" is the same as " Add ," except that this alters the currently selected item on the " Menu list ." If all you want to do is rename an item, see " Display ."
"Up" moves the currently selected item up on the " Menu list ."
"Down" moves the currently selected item down on the " Menu list ."
page 1 | customize interface > shortcut menu configuration > edit | settings > | top
![]() To close this window :
To close this window :


"OK" (or the Enter key)
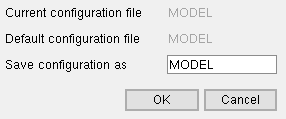
For ' Classic ' , when you press " OK " to close the Context Menu Editor, the Save Configuration File dialog opens, giving you the option to save your changes or not. Also, you can type a new file name. If you choose to not save (" Cancel "), any new entry you made here, in the Context Menu Editor , will be available for your use only during your current Modeling or Drawing Editor session.

" Default ... " is the file selected under User and Site Options > Toolbars > Modeling . " Current ... " and " Default ... " are different when Load Configuration was used. For ' Lightning ' , pressing " OK " opens a yes-no dialog if you have made changes to this window. Press " Yes " to save your changes. The Customize Interface window reactivates. Any changes you made in the Context Menu Editor are written to the " Shortcut menu configuration " file that is entered on the Customize Interface window. Please be aware that that same file may be used across different roles .
Shortcut menu configuration:
my_personal_menu 

"Cancel" closes this window without saving any changes.
"Reset" undoes changes made to this window since you first opened it. The window remains open.
page 1 | customize interface > shortcut menu configuration > edit | settings > | top


