 XML CNC Download ( Modeling )
Tool summary :
- Generates one or more XML files with embedded CNC data.
Various XML options are provided on the XML CNC Options window. - In addition to the embedded CNC data, the XML file contains tags that further describe the piece with information such as member number, material index, weight, quantity and position.
- Even custom properties, welds and bolt, nut, washer information are included.
- The surface field for welds is populated with the values "NS TF Underside", "NS BF Topside", "FS TF Underside", or "FS BF Topside" for the respective faces.
- Third-party software can import the XML file and build a similar model, adding its own fabrication information as needed. Initially this tool was developed for use with Controlled Automation's DSTV Viewer. Other third-party packages may also be able to import XML files generated with this tool.
- Here is an outline of the step-by-step instructions on this page:
Step-by-step instructions :
Step 1 : Before downloading the XML file
1a : Make certain that the Job that you want to download CNC data from is your current Job and that it is complete and ready.
1b : On the Computer Numerically Controlled window, confirm that the currently selected " CNC configuration " is the setup configuration that you want. Also make sure that the " CNC type " is correct. The " CNC type " sets the file format of the download file . Usually, the type is " CNC type " is ' DSTV '.
1c : User and Site Options > Output > " CNC " sets the file folder (
) that the Save As window will open to in step 5 . You may at that point, change the file name or choose a different destination.
1d (if applicable) : You may want to create a new file folder (
Step 2 : In Modeling , invoke CNC XML Download
2a : Start up Modeling and select a view that shows the portion of the model that you want to download to the XML file.
2b (if outputting a PDF) : You need to display the members you are downloading in one of the three solid forms if you plan to " Generate pdf also."
2c (optional) : In Select Items mode, use Select or Select+ (or draw an area box or Select Members by Number or use the Model Tree ) to select the member(s) that you want to XML download. Use Select- if you want to deselect members.
2d : An XML CNC Download icon can be added to your ribbon. The icon, keyboard shortcut or context menu command can be found in the group named ' Model -- Member '. Customize Interface is used to configure ribbons, keyboards, the context menu and modes.
Step 3 : Select members if prompted to do so . If you did not do step 2c, XML CNC Download prompts you to use Select Item(s) mode options to select the member(s) you want to XML download. Skip this step if you already selected members in step 2c .
|
|
|
Select Item(s) bindings |
3a : Locate- Pan -Return mouse bindings become active along with Locate options. Select or Select+ or drawing an area box to select the members that you want to XML download, then press the Enter key (or right-click and choose " OK " on the context menu ) to continue on to the next step.
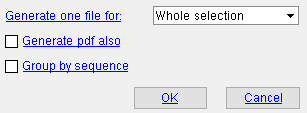
Step 4 : Make choices to the XML CNC Options window
Generate one file for: Whole selection or Each sequence or Each member . The members you selected, above, will be placed into a single .xml file or into a separate file for each sequence or will each be given a separate .xml file based on the choice you make here. See step 5 .
Generate pdf also:
or
. Checking this box generates a .pdf file for each .xml file that is generated. The .pdf file(s) will be placed in the file folder you specify in step 5 .
Group by sequence:
4a : Press the " OK " button at the bottom of the window to go on to step 5. Or you can press " Cancel " if you want to end this operation.
Step 5 : Enter the name of the file, or the folder for the files
5a : A dialog opens for designating the path.
Possibility 1: If you chose to generate one file for the whole selection , you can re-name that file or choose a different file folder (
Possibility 2: If you chose to generate files for each member , the files will be named automatically for each member. You cannot change their names on the Save As window, but you can choose a different file folder (
5b : After you press " OK " on the Save As window, a progress bar appears on screen as the downloading takes place. You may also get CNC error or warning messages . The .xml file(s) and optional .pdf file(s) are placed in the location you specified.

