 Table Add ( Drawing Editor )
Tool summary :
Also see :
- Drawing Editor (where Table Add is a tool)
- Tables (topic)
- Defaults for new tables ( Fabricator > Detailing > Drawing Presentation > the " Tables " tab > )
- Table Edit (window that opens when you add a table)
- Explode (transforms a table into its component lines and labels)
Step-by-step instructions :
A table can be added to any Drawing Editor drawing. To edit a table after it has been added, double-click one of its lines. Double-click a table's label to edit the label text. Drag a vertical line leftward to increase the column width. Drag the rightmost vertical line to reposition the table's lines but not its labels.

|
1 . Invoke Table Add . |
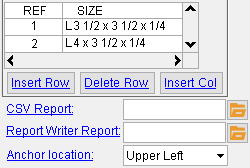 |
2 . On the Table Edit window, use buttons such as " Insert Row " to create cells, then enter text to those cells. Alternatively, automatically generate the table by entering a CSV file or Report Writer report. You may want to reset the " Anchor location ." Press " OK " to continue. |
|
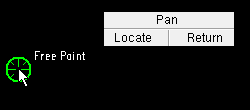
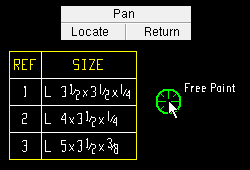
3 . Place the mouse pointer ( |
|
4 . The table is placed. Either use Locate (left-click) to place a duplicate of the table. Or, if you are done adding tables, right-click ( Return ). |
▸ Click the Table Add icon. The icon can be taken from the group named ' Objects -- Tables ' and placed on the ribbon.
▸ Table Add can also be invoked using a keyboard shortcut , the context menu , or a mode . For the ' Lightning ' layout style, configuration of the interface is done using Customize Interface .
Note 2: Right-click ( Return ) in step 3 or 4 ends the operation.

