Drawing Editor Objects (topics)
|
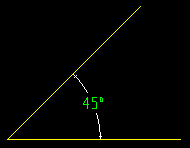
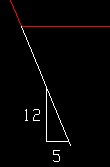
An angle dimension measures the angle between two lines, two polygon sides or a line and a polygon side. The lines cannot be parallel, but they do not have to touch one another. The measured angle can be expressed in radians or degrees. |
Angle dimension tools: Angle Dimension Add dimensions the angle between two lines or polygon sides. Angle Dimension Edit lets you edit the angle dimensions that you select. Angle Dimensions Edit All edits all angle dimensions that are on shown layers, Angle Dimension Erase deletes the angle dimensions that you select. Angle Dimension Erase All deletes all angle dimensions that are on shown layers.
Also: Dimension settings can be found on the Edit Angle Dimension window or on the " Angle Dimensions " section of the Multi Items Edit window. You can edit multiple dimensions and " Save " and " Load " form files containing dimension settings. The display of " Dimensions " (including angle dimensions) can be turned on/off on the Display Options window.
Moving an angle dimension or its parts: You can Shift-drag an angle dimension label to a new position. You can drag an angle dimension label to rotate it, thus updating the " Rotation (degrees) " field. You can drag an angle dimension line (the line with arrows) to expand or contract its arc length while keeping its label the same. You can drag an angle dimension line (the line with arrows) to a new quadrant and thus cause the angle dimension to be recalculated.
Plotting of angle dimensions: The drawing pen number applied during auto detailing of dimension labels is the " Dimension label pen color " set in Drawing Presentation . During printing, the pen number of the dimension label sets the plotted stroke weight of the text if you are using the SDS2 font. " Dimension pen color " sets the pen number that is applied to dimension lines and legs during auto detailing, and this pen number in turn sets the plotted line thickness of dimension lines and legs. To change the line color and line thickness assigned to a pen number for plotting and printing, see Line Weights .
Setup: Fabrictor Setup > Dimension Settings > the " General " tab > " Display measurement unit for angle dimensions " sets the default units to be ' Degrees ' or ' Radians '. The " Angle dimension precision " sets the number of places after the decimal point that the calculated angle dimension is rounded to.
Archived drawings are used for revision tracking. An archived drawing is a copy of a member detail , erection view drawing or submaterial or detail sheet or gather sheet or erection sheet . Automatic revision tracking is only available for member details, submaterial details and erection view drawings.
|
If you Open Archived Drawing while in a drawing in the Drawing Editor , you may get a list of archived drawings. The first item on this list -- 6_BASE -- is the base drawing . |
Relationship to base drawing: A base drawing is a type of archived drawing. A drawing can have many archived drawings, but only one base drawing. When a new base drawing is created, an archived drawing of that drawing is also created ( Exception: " Disable automatic creation of ARCHIVED drawings "). See the examples that are shown for Create Base Drawing to better understand the relationship between base drawings and archived drawings.
To manually create an archived drawing: Archive Current Drawing .
To open an archived drawing: Open Archived Drawing .
Why open an archived drawing? To Compare Drawing with the latest incarnation of that drawing. You can also use Create Base Drawing to make the archived drawing you have open into a base drawing. If the archived drawing you have open is already a base drawing, then Create Base Drawing gives you the option to create an archived copy of it.
To delete archived member details: Start up the Delete Project Items utility, select Archive Member details " or ' Erection View Archive details ' or ' Submaterial Archive details ' as the category of items you want to delete, then select the names of the archived drawings you want to delete.
File names: The same naming scheme is used for the archived drawing file names for members. submaterials, erection view drawings, etc. An archived drawing's file name is " a number " followed by " _rev " and a " second number " (examples: 4_rev0 , 4_rev1 ). The " second number " serves as a relative time stamp: 4_rev0 was archived first, 4_rev1 was archived second. The file name of a base drawing ends in " _BASE " (example: " 3_BASE ").
Arcs are partial circles or partial ellipses. An elliptical arc has its own add tool, but can also be created by rotating a circular arc on its edit window.
Arc add tools: Arc Add (the legacy tool), Arc Add Center, Start, End , Arc Add Center, Start, Angle , Arc Add Continuous , Arc Add 3 Point , Arc Add Ellipse (
). The Arc Edit window opens for arcs added using these tools when User and Site Options > Drawings > "
: Always show Arc Edit window " is on (checked).
Other arc tools: Arcs Edit lets you edit the arcs that you select. Arc Edit All edits all arcs that are on shown layers. Arc Erase deletes the arcs that you select. Arc Erase All deletes all arcs that are on shown layers. Shield and Trim (
Also: Arc settings are shown on the Arc Edit window or on the " Arcs " tab of the Multi Items Edit window. The display of " Arcs " can be turned on/off on the Display Options window. An arc has three exact points . To move an arc, drag it in Select Items mode. You can edit multiple arcs and " Save " and " Load " archived files of arc settings. INCR snaps to the intersection of a construction line or construction circle with an arc.
Setup for adding arcs: The last-added or last-edited arc sets the defaults for subsequently added arcs.
|
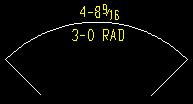
This arc dimension shows both the "arc distance" (primary) and the "on radius" dimension (secondary). |
What it does: An arc dimension measures the length of the arc between two points on a circle. SDS2 cannot generate elliptical arc dimensions -- arc dimensions are always circular.
Arc dimension tools: Dimension Add Arc adds arc dimensions that measure the distance between points on a circle. Arc Dimension Edit lets you edit the arc dimensions that you select. Arc Dimension Edit All edits all arc dimensions that are on shown layers. Arc Dimension Erase deletes arc dimensions that you select. Arc Dimension Erase All deletes all arc dimensions that are on shown layers.
Also: Dimension settings are shown on the Edit Arc Dimension window or on the " Arc Dimensions " section of the Multi Items Edit window. You can edit multiple dimensions and " Save " and " Load " archived files of dimension settings. You can base arc dimensions off of a circular object such as a construction circle or circle or arc or another arc dimension . You can add a chain of arc dimensions by locating points . The display of " Dimensions " (including arc dimensions) can be turned on/off on the Display Options window.
Moving and stretching arc dimensions: This is done in roughly the same way that you move/stretch parts of dimensions in Select Items mode. Hold down the Shift key to move a dimension label. Movement of the leg of an arc dimension is constrained around the radius of the circle that the arc dimension measures points on -- this means that the distance shown on the dimension label changes, but the " on radius " dimension always remains the same. Dragging an arc dimension label rotates it, updating " Rotation (degrees) " on its edit window.
Printing of arc dimensions: The drawing pen number applied during auto detailing of dimension labels is the " Dimension label pen color " set in Drawing Presentation . During printing, the pen number of the dimension label sets the plotted stroke weight of the text if you are using the SDS2 font. " Dimension pen color " sets the pen number that is applied to dimension lines and legs during auto detailing, and this pen number in turn sets the plotted line thickness of dimension lines and legs. To change the line color and line thickness assigned to a pen number for plotting and printing, see Line Weights .
Setup: Drawing Presentation (primary and secondary dimensions). " Show "on radius" dimension for arc dimensions " is an option in Home > Project Settings > Fabricator > Dimension Settings. .
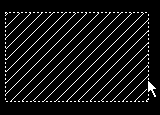
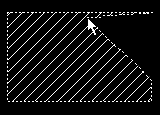
| An area box drawn from left to right. | 
|
An area box drawn from right to left. |
To draw an area box: Hold down the left mouse button in Select Items mode and drag your mouse pointer (
) diagonally across the screen. Items within the periphery of the area box are selected or deselected depending on whether you have no key pressed ( Select ) or the Shift key pressed ( Select + ) or the Ctrl key pressed ( Select- ) or the Shift+Ctrl keys pressed ( Toggle ).
Direction matters: If User and Site Options > General > " Point selection by area box " is set to ' Directional ', then the direction you draw the area box (left to right versus right to left) controls whether or not the entirety of an object needs to be inside the area box for it to be selected.
An area box can select or deselect: An area box drawn using Select or Select + selects items. An area box drawn using Select- deselects items that are already selected. An area box drawn using Toggle inverts the selection state of items so that previously selected items are deselected and previously deselected items are selected.
Selectivity varies: An area box can be used to select multiple lines, circles, end points or labels as a group. Set one or multiple selection filters to limit the type of objects you want to select within the area box (lines and/or circles and/or labels, etc.).
Also see: Lasso
Base drawings are used for revision tracking. A base drawing is a copy of a member detail , erection view drawing or submaterial or detail sheet or gather sheet or erection sheet . For member details, erection views and submaterial, a base drawing may be created automatically.
|
If you File > Open Archived Drawing while in a drawing in the Drawing Editor , you will be able to select a base drawing (if one exists). |
How a base drawing affects auto detailing: When "
" Detail with revisions " Detail Members " Detail with revisions " Detail Submaterial " Detail with revisions " Detail Erection Views Automatic creation of base drawings: When the box is not checked for Home > Project Settings > Fabricator > Sheet Revisions > "
Disable automatic creation of BASE drawings ," Sheet Item Add and Detail Sheet Autoloading and Gather Sheet Autoloading create a base drawing when a member detail or submaterial detail or erection view drawing is placed on a sheet. A new base drawing is also created automatically for each sheet item on a sheet when you " Lock ... " during an Edit Revision Chart , or when you " Lock sheet revision chart " during printing, or when you use the Lock Sheet Revisions change option. Increment Sheet Revisions creates a new base drawing for the items on each sheet being incremented.
Base drawings for members can be deleted using the Delete Project Items utility -- just select ' Member Base details ' or ' Erection View Base details ' or ' Submaterial Base details ' as the category of items you want to delete, then select the names of the base drawings you want to delete.
User creation of base drawings: Create Base Drawings is a Change option that allows you to create a base drawings for all of the drawings or sheets that you select. File > Create Base Drawing creates a base drawing of the last-saved version of your current drawing or sheet.
How base drawings and archived drawings relate: When a new base drawing is created from a member detail, an archived drawing is also created (unless the box is checked for " Disable automatic creation of ARCHIVED drawings "). See the examples that are shown for Create Base Drawing .
To open a base drawing: Open Archived Drawing and choose the drawing whose file name ends in " _BASE " (example: " 3_BASE ").
Effect on Detail Members : If the box for " Detail with revisions " is checked during Detail Members , the auto detailing program clouds (on the revision layer of the new drawing) the following items that it detects are different on the base drawing:
Effect on Detail Submaterial and Detail Erection Views : Automatic detailing behaves in a manner that is similar to the way that it behaves for Detail Members .
Effect on detail sheets, gather sheets, erection sheets: A base drawing has no special utility in these types of drawings. It is simply the archived drawing whose file name ends in " _BASE ".
Bevel symbols are used to designate the angle of a cut or workline.
|
This bevel symbol shows the bevel of the edge of a plate. Bevel symbols can optionally be made to report the angle in degrees. |
Bevel symbol tools: Bevel Symbol Add adds a symbol that reports the slope (rise and run) of a bevel. Bevel Symbol Edit lets you edit the bevel symbols that you select. Bevel Symbol Erase deletes the bevel symbols that you select. Bevel Symbol Erase All deletes all bevel symbols that are on shown layers. " Bevel symbols " is an option in Display Options that can be used to turn on/off the display of bevel symbols.
Also: Bevel symbol settings are shown on the Bevel Symbol window or on the " Bevels " tab of the Multi Item Edit window. A bevel symbol has two exact points . In Select Items mode, grab a bevel symbol's tail to move the bevel symbol; grab the bevel's triangle to stretch the symbol or flip it. There is also a " Flip symbol " option on the Bevel Symbol window. You can edit multiple bevel symbols and " Save " and " Load " archived files of bevel symbol settings. You can Edit > Explode bevel symbols into component lines and separate rise and run labels .
Printing: The drawing pen number applied to a bevel symbol during auto detailing is set in Drawing Presentation using the option " Bevel pen color ." During printing, this pen number sets the plotted line thickness of the bevel symbol. If you are using the ' SDS2 ' font , it also sets the stroke weight of that font. To change the color and line thickness that is assigned to a pen number for plotting and printing, see Line Weights .
Setup: " Bevel pen ," " Bevel symbol base dimension ," " Show bevel angle degrees with bevel symbol ,"
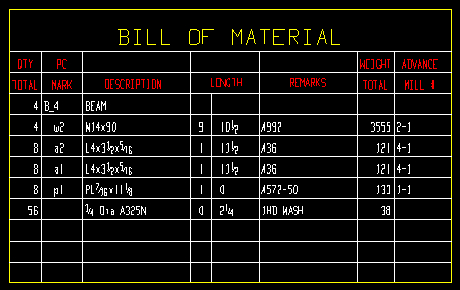
A bill of material may be found on a sheet outline or on a detail sheet or member detail . Other Drawing Editor drawing types can have a bill of material on them, but automated compilation of bill data works best when you place the bill of material on a sheet outline or a detail sheet or member detail.
|
|
This example of a bill is from a detail sheet. The bill of material was originally added to a sheet outline . When the detail sheet was created from that sheet outline, the bill of material was blank. That is, it had no bill data (shown here with white lettering). The bill data was automatically added to the bill when Sheet Item Add was used to add a detail named B_4 to the detail sheet. |
Bill tools: Edit Bill , Place Bill , Place Total Weight , double-click a bill to open the Bill of Material Layout edit window.
To place a bill of material: On a sheet outline, use Place Bill . You can use that sheet outline (including the physical bill) as a template for many different sheets. You can also use Place Bill to place as many bills of material as you like. The first bill placed is bill 1. The second one placed is bill 2. Hovering a bill of material with your mouse pointer (
Order among multiple bills: When you perform an operation that inputs data to a bill of material (e.g., Sheet Item Add ), bill 1 is filled out first, then bill 2, and so on.
Bill of material layout override: A new Bill of Material Layout override window, which can be opened by double-clicking a physical bill of material, lets you change that bill's layout. Also editable for an individual bill of material is the " Maximum number of rows ", which allows the bill height to expand dynamically to accommodate new data as sheet items are added. Material data is separated in the member bill of material by a maximum of five rows or the " Maximum spacing between items " A new option lets you " Wrap fields to next line " when a cell in a bill contains too much data to fit into the available space. " Header Justify " and " Column Justify " let you set the justification of text within the bill of material. " Outside pen color " and " Inside pen color " let you edit the thickness of the lines that make up the bill of material. " Title text " lets you change a bill of material's title. " Rotation " lets you rotate a bill of material.
Bill of Material Layout verses Bill of Material Layout: The Bill of Material Layout setup override window has the same name as Home > Project Settings > Fabricator > Bill of Material Layout . The setup override window only makes layout changes to the one bill of material that you double-click . Also, the setup override window does not affect which columns are shown in the bill editor . Changes made to the Bill of Material Layout setup window affect the next bill that is placed, but do not affect currently placed bills. Also, changing the Bill of Material Layout setup window can change which columns are shown in a member's bill editor -- that change will be applied immediately -- no auto detailing is required.
To delete a bill of material, select the bill of material, then press the Delete key or choose Edit > Delete .
To move a bill of material, simply drag the bill to a new location. Since each corner of a bill of material is an exact point , you can also move a bill of material using Edit > Move/Stretch .
Order within a bill: Data is compiled into a detail sheet 's bill in the order that details are placed onto the sheet. Details are placed onto a sheet using Sheet Item Add or Detail Sheet Autoload . To see the bill data for a particular member detail on a detail sheet, simply select the detail that you want -- its data will be highlighted. To change the order of bill data, use Sheet Bill Reorder .
To edit bill data: Open the appropriate member detail or erection view drawing, then Edit Bill . When you open the detail sheet, the revised bill data (white lettering in the above example) is shown in the bill.
|
Bill data in this example is the text that is displayed in the color white. Data compilation is the means by which the bill data is entered to a bill of material. |
| Drawing Type | Data Compilation |
| all drawing types except submaterial |
You can manually type data into the bill editor , which is opened using Objects > Bill of Material > Edit Bill . If you have placed a bill onto a drawing or sheet using Objects > Bill of Material > Place Bill , data entered into the bill editor will also be entered to the placed bill. |
| member details |
A member detail automatically has bill data compiled into its bill editor when that member is auto detailed . If you Objects > Bill of Material > Place Bill on a member detail or detail sheet with member details on it, the bill data from auto detailing will be compiled into the placed bill. Data can also be compiled into a member detail's bill of material using Add Standard Detail , Detail Sheet Autoload , Add Bolt , Material Drafting . |
| sheet outlines | Data typed to the bill editor will be placed at the top of the placed bill. If the sheet outline is used for a detail sheet , additional bill data will be compiled into the bill of that sheet when member details are added using Sheet Item Add . |
| global or job standard details | The bill editor can be used to edit the bill of material associated with a standard detail. When you Add Standard Detail to a detail sheet with a bill of material on it, you can optionally " Add to bill of material (on Locate) ." |
| detail sheet | A bill can be placed directly onto the sheet or onto its sheet outline (before the sheet is created using that sheet outline). Data typed to the bill editor of the detail sheet will be at the top of the placed bill. Additional bill data will compile into the bill when member details are added using Sheet Item Add or when you Add Standard Detail with " Add to bill of material (on Locate) ." |
Setup considerations for bill tools:
- Home > Project Settings > Fabricator > Bill of Material Layout configures the appearance of the physical bill when it is added using Place Bill under the same current Fabricator . They also set what information will be reported when you use Edit Bill .
- Fabricator > General Detaling/Fabrication Options > " Shop bill weight based on material volume or dimensions " determines how weight will be calculated and reported in the bill of material and on the total weight line .
- " Shop bill weight precision " (from 0.1 to 1) and " Always add unit weights up " (
- Fabricator > Bolt Detaling Fabrication Options > " Plot field bolt bill of material information " can be used with " Summarize field bolts listed on details " to include field bolt information on the plotted bill of material. This information will be associated with either the supporting or supported member as specified by the Home > Project Settings > Fabricator > Bolt Settings > " Field bolts listed on which members ."
- Fabricator > Member and Material Piecemarking > the " Main Member " tab > " Use the member mark for member material in shop bill " lets you choose whether you want the member piecemark or the submaterial piecemark to identify the main member material in the shop bill of material.
- Fabricator > Detailing > Drawing Presentation > the " Bill of Material " tab has options you can use to define the spaces between bill columns , bill items character height , and height/width ratio that will be applied to subsequently place bills of material. Also found under that tab are: " Show grid " " Wrap fields to next line " " Outside pen color " " Inside pen color " " Maximum spacing between items " " Minimum number of rows " " Maximum number of rows " " Title text " " Title character width/height ratio " " Title font " and " Title font style ."
- Fabricator > Detailing > Drawing Presentation > the " Fonts " tab > " Bill of material font " and " Bill of material font style " are two options that also affect the appearance of a bill of material when it is first added using Objects > Bill of Material > Place Bill .
- Fabricator > Detailing > Drawing Presentation > the " Primary Dimensions " tab > " Dimension precision " lets you to set the accuracy of dimensions on details and of " Length " and other dimensioning fields on the bill of material. If you try to make an entry that is more precise than is specified, that entry is rounded up.
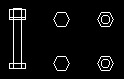
Bolts (auto detailed and user added)
|
User-added and auto-detailed bolts can be modified using the same tools. |
User-added versus auto-detailed bolts: User-added bolts are bolts added using Add Bolt User-added bolts in the Drawing Editor . Auto-detailed bolts are generated from the 3D model during auto detailing of members or erection views. Only shop bolts are auto detailed on member details -- field bolts may optionally be listed on the member's bill of material, but they are not drawn on the detail.
Tools for user-added and auto-detailed bolts: The display of " Bolts " can be turned on/off on the Display Options window. Delete , Bolt Mode , Add Bolt (see warning ), Edit Bolt , Erase Bolt , Erase All Bolts and the ' Bolts ' selection filter apply to all bolts, regardless of how they were generated. Bolt settings are shown on the Bolt Edit window or on the " Bolts " tab of the Multi Items Edit window. You can edit multiple bolts and " Save " and " Load " archived files of settings. You can move bolts by dragging them in Select Items mode, or by using Edit > Move/Stretch , but you cannot move auto-detailed bolts if the setup option " Lock outline layer " is on, since auto-detailed bolts are always added to the outline layer of a member detail. You can Edit > Explode bolts into component lines, including lines with dash patterns .
Tools for auto-detailed bolts: To review the 3D settings (from the 3D model) of an auto-detailed bolt, you can use Review 2D Items , or you can double-click the bolt with the selection filter set to ' Polygons ' -- either method will open a non-editable version of Modeling's Bolt Edit window.
Please note: Modifying holes or bolts in the Drawing Editor does not in any way affect corresponding holes and bolts in Modeling .
Bolt symbol tools: Bolt Symbol Add places a bolt symbol. Bolt Sym Combo adds a bolt symbol in combination with optional pointers and leader lines. Bolt Symbol Edit lets you edit the bolt symbols that you select. Bolt Symbol Erase lets you delete the bolt symbols that you select. Bolt Symbol Erase All deletes all bolt symbols that are on shown layers.
Also: Bolt symbol settings are on the Bolt Symbol Input window . You can drag a bolt symbol in Select Items mode. You can use Copy Objects to copy a bolt symbol. A bolt symbol has one exact point . The symbol has a " Symbol location " option which controls its position with respect to its exact point (' Left ' or ' Right ' or ' Top ' or ' Bottom ').
Setup for auto-detailed bolt symbols: " Symbols font " and " Symbols font style " and " Labels character height " and " Labels width/height ratio " in Drawing Presentation control the font settings of bolt symbols that are generated during Erection View Detailing when "
A checkered plate pattern is drawn on plate materials during Detail Members or Detail Submaterial when the box is checked for " Checkered " on a material edit window for a bent plate or multi-bend plate or multi-sided flat plate or rectangular plate or rolled plate or round plate . The pattern is shown as a small sample on the plate.
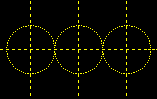
Circles and ellipses . In versions of SDS2 software prior to v2018, ellipses were circles that had been rotated. Now ellipses and circles have different edit windows and different add tools: Ellipses and circles, however, are not distinct object types. When they are multi-ediited together, the Ellipse Setup window opens.
|
Three perfect circles. |
Circle add tools: Circle Add Radius (
Ellipses add tools: Ellipse Add Center (An add tool for circles and ellipses: Circle Offset .
Tools common to circles and ellipses: Circle Edit lets you edit the circles that you select. Circle Edit All edits all circles that are on shown layers. Circle Erase deletes the circles that you select. Circle Erase All deletes all circles that are on shown layers. Shield and Trim (
Also: Settings for circles can be found on the Circle Setup window or on the " Circles " tab of the Multi Items Edit window or on the Ellipse Setup window. The display of " Circles " (and ellipses) can be turned on/off on the Display Options window. A circle or ellipse has one exact point . To move a circle or ellipse, drag it in Select Items mode. You can edit multiple circles and " Save " and " Load " archived files of circle settings. INCR snaps to the intersection of a construction line or construction circle with a circle.
Clouds are used to enclose a group of items on a detail so that an informative annotation can call out a feature that is common to all items in the group.
|
Part of a submaterial detail. The cloud (drawn in yellow) groups the three holes together so that all three holes can be identified as 13/16 x 1 slots. |
Cloud tools: Cloud Add lets you add clouds by locating points or drawing an area box. Cloud Edit lets you edit clouds that you select. Cloud Edit All edits all clouds that are on shown layers. Cloud Erase deletes the clouds that you select. Cloud Erase All deletes all clouds that are on shown layers.
Also: Settings for clouds can be found on the Cloud Edit window or on the " Clouds " tab of the Multi Items Edit window. The display of " Clouds " can be turned on/off on the Display Options window. To move a cloud, drag it in Select Items mode.To stretch a cloud, drag the end points for one side of the cloud in Select Items mode with the ' End Points ' or ' Default ' or ' All ' selection filter set, or use Move/Stretch . You can edit multiple clouds and " Save " and " Load " archived files of cloud settings.
Setup for clouds: See " Designation for non-standard holes on details " (affects auto detailing). " Cloud pen color " sets the pen for auto detailed clouds. The last-added or last-edited cloud sets the default pen (plotted line thickness) and line type (dash pattern) for clouds added using Cloud Add.
Also note: During Detail Members , auto detailing clouds changes on member details if " Detail with revisions " is selected during Detail Members and the detail being generated is different than an earlier detail known as the base drawing . A base drawing is created automatically when a member detail is placed on a sheet. Auto detailing draws clouds in a way that does not interfere with Shorten and Unshorten .
CNC marks are holes with zero diameter which, when applied by a punch or drill, become shallow divots on the surface of a material. These are represented on Drawing Editor details by an X.
|
CNC marks are dimensioned on submaterial details such as this one. |
Purpose of CNC marks: CNC marks on shop materials may be used as reference points for fastening submaterials to a member's main material, or they might serve as guide points or identification marks for erection purposes.
Computer numerical control: The CNC Module has the capability of automatically downloading the position of CNC marks (as well as holes, copes, etc.) to CNC machines.
Setup of CNC marks: CNC marks can be generated automatically per Home > Project Settings > Fabricator > CNC Center Marks or Home > Project Settings > Fabricator > Position and Match Marks .
Manually creating CNC marks: CNC marks can also be generated in Modeling by using Add 3D Hole to add a hole of zero diameter.
Warning : CNC marks (and holes) added in the Drawing Editor cannot be downloaded to CNC machines.
Construction lines/circles are dashed lines, circles or ellipses that appear in both Drawing Editor and Modeling.
|
The construction circles in this example are perfect circles. Construction circles can also be ellipses. |
Purpose of: Construction lines and circles are used with Locate options for adding objects to a drawing. They may also be used for measuring distances using the Ruler . As described in this warning , auto detailing may add construction lines in order to constrain materials in different views during Shorten Drawing .
Special characteristics: Unlike other graphics that appear on drawings in the Drawing Editor , construction lines/circles are not Plotted . User and Site Options > General > " Default color " applies to construction lines and circles in both Modeling and the Drawing Editor .
Do not erase vertical construction lines that were placed onto member details by auto detailing. Doing so may result in shortening problems.
Construction line tools: Construction Line Add lets you add construction lines by locating points, basing off of other lines, or by designating a point and an angle. Construction Line Add To Material adds construction lines through vertex points of a selected material. Construction Lines Edit lets you edit the construction lines that you select. Construction Line Edit All edits all construction lines that are on shown layers. Construction Lines Erase deletes the construction lines that you select. Construction Line Erase All deletes all construction lines that are on shown layers. The display of " Construction Lines/Circles " can be turned on/off on the Display Options window. Settings for construction lines can be found on the Construction Line Edit window or on the " Construction Lines " section of the Multi Items Edit window. " Construction lines " in Display Options can be used to turn on/off the display of construction lines.
Construction circle add tools: Construction Circles Add Radius and Construction Circle Add Diameter and Construction Circle Add 2 Point and Construction Circle Add Tan Tan Radius and Construction Circle Ellipse Add Center and Construction Circle Ellipse Add Axis End are add tools for construction circles.
Other construction circle tools: Construction Circle Edit lets you edit the construction circles that you select. Construction Circle Edit All edits all construction circles that are on shown layers. Construction Circle Erase deletes the construction circles that you select. Construction Circle Erase All deletes all construction circles that are on shown layers. The display of " Construction Lines/Circles " can be turned on/off on the Display Options window. Settings for construction circles can be found on the Construction Circle Edit window or on the " Construction Circles " section of the Multi Items Edit window. "
Material construction lines and circles are generated using Construction Line Add Material . To delete material construction lines and circles, do this (select the same material then invoke Construction Line Add Material again).
Selection: To select (or edit with a double-click) construction lines or construction circles in Select Items mode, the selection filter must be set to ' Con Lines ' or ' Con Circles ' or ' Material Construction Lines ' or ' All '. You can select construction line or construction circle circle end points (for moving) when the selection filter is ' End Points '. Click here for instructions on how to select construction lines by area (in Select Items mode).
Moving: Click here for instructions ( Drawing Editor only) on how to move a construction line or construction circle in Select Items mode. Since construction lines and construction circles have end points , you can also move them by grabbing their end points.
Setup: User and Site Options > General > " Default color " and " Allow multicolored construction lines ."
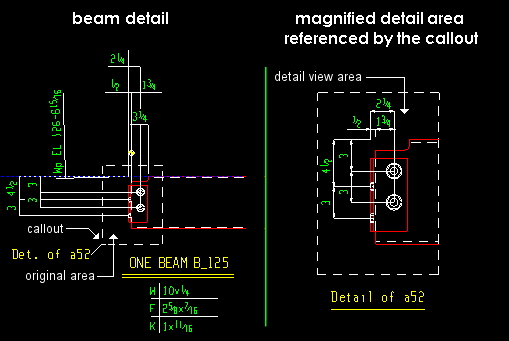
Detail view drawings are drawing files that were originally created within member details , erection view drawings or submaterial details . The drawing files can be edited independently of the drawings that they were created in. If you added a detail view to a member detail, you can annotate your detail view area differently than the area within the callout of your current detail. For example, you may want to alter dimensions to fit within the frame of the detail view area.
|
| A detail view is a original area/detail view area pair that can be placed on a member detail, erection view drawing or submaterial detail. |
|
If you File > Open Detail View Drawing while in a drawing in the Drawing Editor , you will be able to select a detail view drawing (if one exists). |
To manually create a detail view drawing: You can Detail View Add in a member detail, submaterial or erection view. The results of your adding the detail view will be seen immediately in the parent drawing (e.g., the member detail), but you will need to open the detail view drawing to make modifications to that detail view.
To open a detail view drawing while in the parent drawing: Open Detail View Drawing . Alternatively, you can double-click the detail view on the original creating parent drawing to open the Detail View Area window. Then, on that window press the " Open " button.
To open a detail view drawing from any Drawing Editor drawing: Open the Drawing List Panel, select the drawing type Detail Views - Details, Detail Views - Submaterial, or Detail Views - Erection Views, and double-click the detail view file name.
To delete detail view drawings: Open the original creating parent drawing the detail view is placed in. Select the detail view and press the Delete key. This removes the detail view drawing as well as the original view area and detail view area on the parent drawing. Deleting also removes the detail view drawing from all drawings or sheets that it has been added to as a sheet item.
To add a detail view drawing as a standard detail: Add Standard Detail or Add Standard Detail to Several . The detail view is added to the drawing as lines, labels and dimensions, which can individually be modified or deleted. Only detail view drawings whose creating drawing is a submaterial can be added in this way.
To add a detail view drawing as a sheet item: Sheet Item Add . The sheet item is linked to detail view drawing. You can modify the sheet item by opening and changing the original detail view file. The types of drawings that a detail view drawing can be added to as a sheet item depends on the drawing type of the creating drawing .
A detail view drawing can be added as a sheet item IF its creating drawing is one of these drawing types: submaterial detail member detail, 2D erection view, sheet outline or detail/erection/gather sheet. member detail
(including " Sub-Members ")sheet outline or detail/erection/gather sheet. 2D erection view sheet outline or 2D erection view or detail/erection/gather sheet. A 2D erection view cannot be added as a sheet item to itself. Sheet items cannot be added to job/global standard details. File names: A detail view drawing's file name starts with the parent drawing's name followed by the " Annotation " text. The parent drawing is the name of the drawing in which the detail view was orignally added. For example, if a member detail has the piecemark " 1B4 " and the member detail's detail view's " Annotation " is ' 1 ', then the detail view's file name is " 1B4_1 ".)
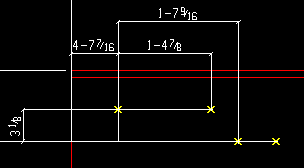
Dimensions show the distance between two points.
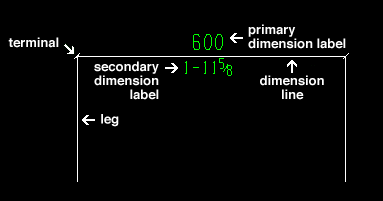
Dimension tools: Dimension Add (
Also: Extension Dim Type sets whether or not extension dimensions have tails. Settings for dimensions can be found on the Edit Dimension window or on the " Dimensions " tab of the Multi Items Edit window. There are a variety of ways to move/stretch parts of dimensions in Select Items mode. Hold down the Shift key to move a dimension label. The display of " Dimensions " can be turned on/off on the Display Options window. You can edit multiple dimensions and " Save " and " Load " archived files of dimension settings. You can Edit > Explode dimensions into component lines and separate primary and secondary labels .
Printing of dimensions: The drawing pen number that is applied to a dimension label during auto detailing is set in Drawing Presentation using the option " Dimension label pen color ." If you are using the SDS2 font, the " Dimension label pen color " also sets the stroke weight of printed text. The default pen number for dimension lines and legs is set during auto detailing based on the setup option " Dimension pen color ." During printing, the pen number sets the line thickness of dimension lines or legs. To change the line color and line thickness that a drawing pen applies during printing and printing, see Line Weights .
Setup: See Dimension Settings (mostly applies to auto detailing of members), Drawing Presentation (primary and secondary dimensions).
End points appear as cyan-colored circles when ' End Points ' as a selection filter . and you select them in the Drawing Editor .
|
End points are usually also exact points . |
Where end points appear: End points may appear on the ends of lines, pointers, clouds and dimensions. A construction circle's end point is its center point, and a construction line also has an end point. A label's end point is the " Origin " of the label. A workpoint is also a type of end point.
Tools for end points: You can select ' End Points ' as a selection filter . Objects with end points (including clouds and material polygons ) can be stretched using Edit > Move/Stretch . In Select Items mode, you can drag an object's end points to stretch the object.
Selection of end points: If ' End Points ' is the only selection filter, the end points of any type of object can be selected. However, if ' End Points ' and ' Dimensions ' are selection filters, only the end points of dimensions can be selected. In general, end points other than those of holes and workpoints will be selected only if their parent objects are also present in the selection filter.
Note: Delete does not erase end points. Use Area Clip to cut off parts of objects.
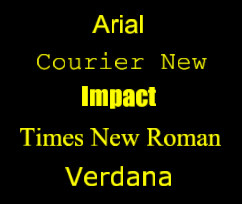
Fonts can be applied to text that appears in member details , submaterials , erection view drawings , or any other drawing type that you can open in the Drawing Editor . When selecting a TrueType font, you should also select a style (' Bold ' or ' Bold Italic ' or ' Italic ' or ' Regular ').
|
|
|
Tip: For a TrueType font, such as any of those shown here, set the " Character width/height ratio " to ' 0.6 ' to render the font at its native width. A ratio larger than ' 0.6 ' stretches the font. A ratio less than ' 0.6 ' compacts the font. For the ' SDS2 ' font, use the ratio that you think looks best -- ' 0.4 ' is an attractive choice and the default. |
|
- In Windows operating systems, available fonts are contained in a Fonts folder accessible from the Control Panel. Each list box for selecting fonts within the Drawing Editor lists all TrueType fonts available to the operating system. Each list box also lists the ' SDS2 ' font. In addition, if your current Job was created on a different computer, fonts available on that other computer should also be selectable in list boxes, since the Job maintains, in a
 fonts folder within that Job, copies of fonts that are used in that Job. In the unusual event where a font used in a Job cannot be embedded (is not embeddable), that font will not be copied into the fonts folder.
- Pen selections set the printed thickness of the SDS2 font, in much the same way that they set the thickness of lines.
- TrueType fonts, on the other hand, are rendered so that their true-to-life stroke weight (thickness) is displayed in the Drawing Editor. Pen selections do not affect a TrueType font's thickness. For TrueType fonts, what you see in the Drawing Editor is what you will get on the printed drawing.
- Also, TrueType fonts are searchable in a PDF created using Home > Export > 2D > Export PDF Drawing or Drawing Editor > File > Print PDF . You cannot search for strings in a PDF that uses the ' SDS2 ' font.
- In Modeling , the ' SDS2 ' font is used for items such as member 'Piecemarks ', even if a different font is used for equivalent items in the Drawing Editor .
- " Font " and " Font style " can be found on the following Drawing Editor windows: Edit Label , Dimension Edit (primary and secondary labels can be set independently), Bevel Symbol , Weld Input , Hole Symbol Input , and Erection View Cleanup.
- Home > Project Settings > Fabricator > Detailing > Drawing Presentaton > " Fonts " tab options give you control over what fonts will be applied to various text entities during auto detailing .
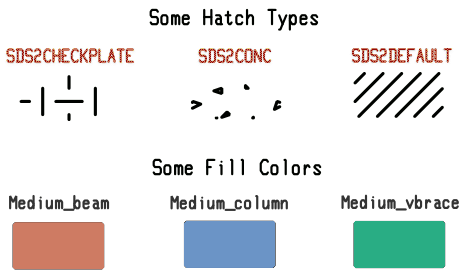
Hatches and fills , user-added. These are user-added hatch patterns. The hatch patterns that auto detailing may create are something different.
|
Two ways to add hatches or fills: Hatch Add Select Polygon and Hatch Add Define Polygon are two tools that you can use to add hatches or fills. Both open the Hatch Add window.
A polygon defined using Hatch Add Define Polygon can be adjusted as shown below:
With the selection filter set to '' Default : 
1 . The defined polygon shape is rectangular. 2 . Click a polygon side to add a new point. 3 . Drag the point in any direction to change the shape of the polygon. To delete hatches or fills, Hatch Erase and Hatch Erase All can be used. With the selection filter set to ' Hatches ', you can select a hatch (independent of its containing polygon) and press the Delete key. For hatches added using Hatch Add Define Polygon , deleting the hatch always deletes the defined polygon.
To edit hatches or fills or defined polygons, Hatch Edit and Hatch Edit All can be used to open the Hatch Edit window. Other methods such as double-click or select then right-click and choosing " Edit " can also be used. The defined polygons added using Hatch Add Define Polygon are actually polygon sides , which can be edited on the Polygon Side Edit window to, for example, adjust their line type (dash pattern) or pen number (plotted stroke weight).
Display Options: " Hatches/Fills "
Also see: Automatic detailing can generate hatch patterns. These are not the same as the user-added hatch patterns discussed here. Hatching Erase and Hatching Explode do not operate on user-added hatches. They only operate on hatches that were generated by auto detailing.
Holes (user-added and auto-detailed)

|
User-added and auto-detailed holes can be modified using the same tools. |
User-added versus auto-detailed holes: User-added holes are holes added using Hole Add in the Drawing Editor . Auto-detailed holes are generated from the 3D model during auto detailing of members or submaterials or erection view drawings.
Tools for user-added and auto-detailed holes: The display of " Holes " can be turned on/off on the Display Options window. Delete , Hole Add (see warning ), Hole Edit , Hole Erase , Hole Erase All and the ' Holes ' selection filter apply to all holes, regardless of how they were generated. Hole settings are shown on the Hole Edit window or on the " Holes " tab of the Multi Items Edit window. Holes are filled using pen number 0 . You can edit multiple holes and " Save " and " Load " archived files of hole settings. You can move holes by dragging them in Select Items mode, or by using Move/Stretch , but you cannot move auto-detailed holes if the setup option " Lock outline layer " is on, since auto-detailed holes are added to the outline layer of a member detail or submaterial detail. You can Explode holes into component lines .Holes are filled using the " Filled hole pen color " at Home > Project Settings > Fabricator > Detailing > Drawing Presentaton > the " Pens " tab.
Tools for auto-detailed holes: To review the 3D settings (from the 3D model) of an auto-detailed hole, you can use Review 2D Items , or you can double-click the hole with the selection filter set to ' Polygons ' -- either method will open a non-editable version of Modeling's Hole Edit window.
Please note: Modifying holes or bolts in the Drawing Editor does not in any way affect corresponding holes and bolts in Modeling . Holes added using Add Hole do not appear in the 3D model and cannot be CNC downloaded . See this warning .

|
Auto detailing can generate hole/slot symbols. You can also add them manually. |
Hole symbol tools: Hole Sym Add places a hole symbol. Hole Sym Combo adds a hole symbol in combination with optional pointers and leader lines. Material Callout reads a hole that you locate and lets you create an optional pointer to a hole symbol that summarizes the hole's properties. Hole Sym Edit lets you edit the hole symbols that you select. Hole Sym Erase lets you delete the hole symbols that you select. Hole Sym Erase All deletes all hole symbols that are on shown layers.
Also: Hole symbol settings are on the Hole Symbol Input window. You can drag a hole/slot symbol in Select Items mode. You can use Copy Objects to copy a hole symbol. A hole symbol has one exact point . The symbol has a " Symbol location " option which controls its side (' Left ' or ' Right ' or ' Top ' or ' Bottom ') with respect to its exact point.
Text setup for auto-detailed hole symbols: " Symbols font " and " Symbols font style " and " Labels character height " and " Labels width/height ratio " in Drawing Presentation set the text that is applied to hole/slot symbols during auto detailing of members and submaterials.
Other setup options for auto-detailed hole symbols: " Allow hole symbol to be drawn on material " " Show non-standard hole sizes on detail drawings " and " Call out non-standard holes with mixed bolt/hole units on details " and " Designation for non-standard holes on details " are options pertaining to member details that are found at Home > Project Settings > Fabricator > Detailing > Detailing Symbol Settings .
Images are GIF, PNG, JPEG or TIFF files. They can be placed in any type of drawing. They can be printed, or they can be used as temporary templates for tracing or orientation. To more accurately visualize how an image will look when printed, set your " Drawing Editor background color " to white.

Format (.ext) Applications Descriptions GIF (.gif) logos, line drawings, icons, screen shots GIF and PNG are similar, compressed formats. PNG is newer. Both allow transparency. PNG (.png) JPEG (.jpg, .jpeg) photographs The JPEG format can be used for photorealistic images. TIFF (.tif, .tiff) logos, line drawings A TIFF image converted into a GIF or PNG takes up less space. Image tools: Image Add can be used to place images. Image Edit lets you edit the images that you select. Image Edit All lets you edit all images that are on shown layers. Image Erase deletes images that you select. Image Erase All deletes all images that are on shown layers.
Display Options: " Images "
Also: Image settings are shown on the Edit Image window. To move an image, grab its center and drag it in Select Items mode. To re-size an image, grab its edge and drag it. " Keep display ratio " on the Edit Label window maintains the image's proportions when you re-size it. Copy Objects can be used to copy an image.
Images are embedded: Images added into a drawing are copies of the original image and are embedded in the drawing. If you delete or alter the original drawing file, the copied image in the drawing will remain unaltered.
When re-detailing details and erection view drawings: Selecting ' None ' for " Preserve drawing annotations " when you re-detail a member will remove all images from that detail. Similarly, if you select ' All ' for " Remove drawing annotations " when you re-detail a user-modified erection view drawing that has images on it, those images will be removed.
Labels are text blocks that you can add to or edit on drawings. Also see special labels .
|
|
The color green identifies labels in the above example. Labels should not be confused with the text that is a part of bevel symbols , dimensions or weld symbols . |


an empty label (a space character) Empty labels, which are labels made up of only space or carriage-return characters, have their perimeter boundaries marked with dots so that you can more easily find them and delete them.
Label tools: Labels Add lets you add labels. Label Combo lets you add a label in combination with optional leader lines and pointers. Label Edit lets you edit the labels that you select. Label Edit All edits all labels that are on shown layers. Label Erase deletes the labels that you select. Label Erase All deletes all labels that are on shown layers.
Also: Label settings are shown on the Label Edit window or on the " Labels " tab of the Multi Items Edit window. The ' Labels ' selection filter applies to labels. The display of " Labels " can be turned on/off on the Display Options window. To move a label, drag it in Select Items mode. You can edit multiple labels and " Save " and " Load " archived files of label settings. To edit all labels with the same text, you can right-click ( Menu ) while hovering any label with that same text, then choose " Edit Other " or " Select Other " on the context menu .
Setup: " Detailing label pen color " sets the default stroke thickness for labels that use the ' SDS2 ' font . It sets the Drawing Editor display color regardless of the font. " Labels character height " and " Labels width/height ratio " together set the character size of labels -- any font -- generated during auto detailing.
Note 1: The text that is a part of bevel symbols , dimensions , rebar items , and weld symbols are not labels. In other words, they cannot be edited, added or erased using label tools. You can change them only by using bevel symbol, dimension or weld symbol tools.
Note 2: The text of piecemarks , section sizes , camber annotations , ABM page-line and elevation offsets on erection view drawings are not labels. To edit these items, double-click on them or use Erection View Cleanup tools.
Special Labels. These labels can be placed using Label Add. They instruct substitution of appropriate information in place of the label at an appropriate time -- for example, when a sheet is plotted or when a member is detailed or, in the case of the X{Value} label, when the user makes an appropriate entry to the symbol's edit window.
| Special Labels for Plotting ( place on a sheet outline ) (string substitutions are made during plotting ) |
|||
| " Label text " | plot format | example | explanation |
| $TIME1 | hh:mm:ss | 14:12:05 | 24 hour time |
| $TIME2 | hh:mm:ss | 2:12:05 | 12 hour time |
| $DATE1 | dd mmm yyyy | 16 Jan 2004 | day month year |
| $DATE2 | mmm dd yyyy | Jan 16 2004 | month day year |
|
$DATE3
|
dd mm yy | 16 01 04 | day month year |
|
$DATE4
|
mm dd yy | 01 16 04 | month day year |
| $JOB | alpha-numeric | jobname | current Job |
| $FAB | alpha-numeric | fabname | current Fab |
| $USER | alpha-numeric | Joe | login name |
| $HOST | alpha-numeric | station_1 |
work station
printed from |
| $REV | alpha-numeric | 3 | current " Sheet revision " of a sheet |
| $NAME | ||
| " Label text " | output label | explanation |
| $NAME | sheet_x | For $NAME on a sheet outline , when the outline is used for a sheet, the label shows the name of the sheet. |
| Substitution is made immediately. $NAME can be used on any drawing type, not just sheets or sheet outlines . | ||
| Tip: To automatically get a label with the name of a new drawing or sheet outline created using Save Reuse , the new drawing must have the special label $NAME on it. | ||
|
|
|
| A lasso drawn clockwise. | 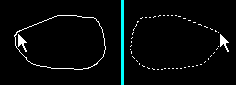
|
A lasso drawn counterclockwise. |
To draw a lasso: Hold down the left mouse button in Lasso Mode and drag your mouse pointer (
Selecting with a lasso versus an area box: Unlike selecting by area box, selecting by lasso lets you draw a lasso of any shape to select objects.
Direction matters: If User and Site Options > General > " Point selection by area box " is set to ' Directional ', then the direction you draw the lasso (clockwise versus counterclockwise) controls whether or not the entirety of an object needs to be inside the lasso for it to be selected.
An lasso can select or deselect: A lasso drawn using Select or Select + selects items. A lasso drawn using Select- deselects items that are already selected. A lasso drawn using Toggle inverts the selection state of items so that previously selected items are deselected and previously deselected items are selected.
Selectivity varies: A lasso can be used to select multiple lines, circles, end points or labels as a group. Set one or multiple selection filters to limit the type of objects you want to select within the area box (lines and/or circles and/or labels, etc.).
Also see: Area box
Lines are straight lines. Polygon sides are not lines.
|
The color green identifies lines in this example. Objects that look like lines, but are not, are dimension lines and construction lines and polygon sides (material lines). |
Line tools: Line Add lets you add lines by locating points. Line Edit lets you edit the lines that you select. Lines Edit All edits all lines on shown layers. Line Erase deletes the lines that you select. Line Erase All deletes all lines that are on shown layers. Shield erases a segment of a line. Trim (
Also: Settings for lines can be found on the Line Edit window or on the " Lines " tab of the Multi Items Edit window. To move a line in Select Items mode, grab its middle; to stretch a line, grab its end. The display of " Lines " can be turned on/off on the Display Options window. " Break material lines at label interference " affects how lines are drawn across labels. A line has two exact points . BSRL acts on lines and polygon sides. You can edit multiple lines and " Save " and " Load " archived files of line settings.
Markers for broken symbol links :


When a symbol (job symbol) is deleted by choosing the ' Symbol ' category in the Delete Project Items utility, a broken link to that symbol remains in each drawing in which the symbol was originally placed. This broken link is graphically represented with a visual marker, which is a close-dotted rendering of its file name. The marker is plotted.
If you create a new symbol file (job symbol) which happens to have the same index as the original file, then the new symbol will be substituted for the broken link marker.
To delete a marker to ensure that it never relinks, start up the Drawing Editor , open a drawing in which the symbol is placed, then Symbol Erase All .
Warning : Do not use the Delete Project Items utility to delete a ' Symbol ' that has already been placed on drawings. When you do so, the index of the deleted symbol will be applied to the next symbol that you create. This means that new symbol will replace the marker in all drawings in which the original, deleted symbol was placed.
Members are member lines. These items only appear on erection view drawings.
|
|
The color green is used as the display color for members in this 2D erection view. |
Member tools: Evu Cleanup by Location , Evu Cleanup by Piecemark , Evu Cleanup by Number open the Erection View Cleanup window. On the Display Options window, " Show hidden members " can be used to display members that were hidden during Detail Erection Views . Also on the Display Options window, " Member polygons " lets you hide the polygons of members that are drawn as ' Solid '. Mid Point can find the midpoint of a member on an erection view drawing. BSMB can be used to base a construction line off of a member line.
Member tools ( Select Items mode): Double-click a member to change its visibility or to hide/show its piecemark, section size, elevation, or etc. You can Edit > Explode members into lines and separate labels for piecemarks and section sizes .
To move a member's section size, piecemark, etc., drag it using the left mouse button ( Select ). Ctrl-drag to rotate a section size, piecemark, etc. around its origin.
Default locations for section sizes, piecemarks, etc. can be configured in Home > Project Settings > Fabricator > Detailing > Erection View Member Labels .
Pointers are straight or curved arrows.
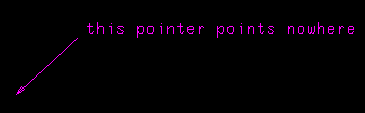
|
| A pointer and a label . |
Pointer tools: Pointer Add can be used to add pointers. You can also add pointers using Weld Combo , Label Combo or Hole Sym Combo . Pointer Edit lets you edit the pointers that you select. Pointer Edit All edits the pointers that are on shown comment layers. Pointer Erase deletes the pointers that you select. Pointer Erase All deletes all pointers that are on shown comment layers.
Also: Settings for pointers can be found on the Pointer Edit window or on the " Pointers " section of the Multi Items Edit window. To move a pointer in Select Items mode, grab its middle; to stretch a pointer, grab its end. Shift -drag the middle of a pointer in Select Items mode to change its " Pointer curve " to ' Straight ' or ' Clockwise ' or ' Counter-clockwise '. The display of " Pointers " can be turned on/off on the Display Options window. A pointer has two exact points . You can edit multiple pointers and " Save " and " Load " archived files of pointer settings. You can Explode pointers into separate lines for the shaft and the diagonals making up the arrow head .
Defaults for Pointer Add : The line type (dash pattern) for a pointer is always Type# 1 (a continuous, non-dashed line). The last-added or last-edited pointer sets the " Pointer curve " and " Face indicator " and " Pen color " for pointers laid out using Pointer Add .
Arrowheads on pointers are sized independently of a drawing's " Drawing scale ." Home > Project Settings > Fabricator > Detailing > Drawing Presentaton > the " Sizes " tab > " Size of pointer arrowheads " sets the size of arrowheads for all subsequently added pointers, including auto detailed pointers. Individual pointer arrowhead sizes can be changed using " Size of arrowhead " on the Pointer Edit window.
Setup: " Pointer pen color " and " Use curved pointers " apply to auto detailing of pointers on member details and submaterial details. " Designation for non-standard holes " also affects the application of pointers during auto detailing.
Polygons are faces of materials generated during auto detailing.
|
| The color green is used to display polygons in this example. |
Selecting polygons: To select material polygons, the selection filter must be set to ' Polygons ' or ' All '. Example: If you Save Standard Detail with the filter set to ' Default ' (which does not let you select polygons), the polygons are converted to lines in the job standard detail that is saved; however, if you set the filter to ' All ' then Save Standard Detail , the polygons are saved as polygons.
To move/stretch polygons: Use Move/Stretch or grab its end points in Select Items mode. To move a polygon, grab the end points of the entire polygon.
Other tools for polygons: Double-click a material in Select Items mode with the selection filer set to ' All ' or ' Polygons ' to review the material's 3D settings from Modeling (see Review 2D Items ). The Delete tool erases polygons. Cut and Copy can be used on polygons, and they will remain polygons when you Paste them (exception: see polygon sides ). Hatching Erase removes the hatch lines (/ / /) that are associated with certain material polygons; Hatching Explode turns the hatch lines (/ / /) into lines. You can Explode polygons into lines -- surface hatching in not affected.
Relationship with polygon sides: Material polygons are made up of polygon sides . You cannot edit a polygon. However, you can edit the polygon sides that make up the polygon.
Polygon sides are the edges of material polygons . In other words, material lines. Polygon sides are also created when you Hatch Add Define Polygon .
|
|
The color green is used to display polygon sides in this example. They are material lines. |
Polygon side tools: Double-click a polygon side to open the Polygon Side Edit window. There is also a " Polygon Sides " section of the Multi Items Edit window. BSRL acts on both polygon sides and lines. Mid Point can find the midpoint of a polygon side. The Delete tool can erase polygon sides and does not change the affected polygon to lines. Cut and Copy can be used on polygon sides, but the polygon sides are converted into lines when you Paste them. When you Edit > Move/Stretch a polygon side, the material polygon associated with that side is stretched. Operations such as Copy Objects and Copy & Paste convert the copies of the polygon sides into lines unless all sides of the complete polygon are copied. Add Drag Off Dimension (
Rebar Items are text blocks that are associated with reinforcing bar (rebar).
Rebar Item tools: Add A Rebar Item lets you add rebar items. Add A Rebar Item Combo lets you add a rebar item in combination with optional leader lines and pointers. Edit A Rebar Item lets you edit the rebar items that you select. Edit All Rebar Items edits all rebar items that are on shown layers. Erase A Rebar Item deletes the rebar items that you select. Erase All Rebar Items deletes all rebar items that are on shown layers.
Also: Rebar Item settings are shown on the Rebar Item Edit window or on the " Rebar Items " tab of the Multi Items Edit window. The ' Rebar Items ' selection filter applies to rebar items. The display of " Labels " can be turned on/off on the Display Options window, and this also turns on/off the display of rebar items. To move a rebar item, drag it in Select Items mode.
Display Options: " Rebar Items "
Setup: " Detailing label pen color " sets the default stroke thickness for rebar items that use the ' SDS2 ' font . It sets the Drawing Editor display color regardless of the font. " Rebar Items character height " and " Rebar Items width/height ratio " together set the character size of rebar items -- any font -- generated during auto detailing.
Rebar Runs show the length and span of reinforcing bar (rebar).
User added rebar runs: Add A Rebar Run lets you add rebar runs. Edit A Rebar Run lets you edit the rebar runs that you select. Edit All Rebar Runs edits all rebar runs that are on shown layers. Erase A Rebar Run deletes the rebar runs that you select. Erase All Rebar Runs deletes all rebar runs that are on shown layers.
Auto-detailed rebar runs: Using the Dowel Path , Rebar System , Rebar Area Layout , or Repeated Rebar custom components may cause a rebar run to be auto-detailed when you Detail Erection Views .
Also: Rebar Run settings are shown on the Rebar Run Edit window or on the " Rebar Runs " tab of the Multi Runs Edit window. The ' Rebar Runs ' selection filter applies to rebar runs. To move the rebar item text, drag it in Select Items mode.
Display Options: " Rebar Runs "
Reference drawings can be created using Drawing Conversion to convert a copy of a .dxf, .dxb, .dwg, .dgn or .pdf file. You can also create a reference drawing using the New Drawing command or by using Save As.
|
|
A reference drawing may look like any other Drawing Editor drawing. This reference drawing is a simple set of grid markers. Green crosses are drawn at intersections to provide locatable INRL points. |
Primary application: You can add a reference drawing that has been converted from a program such as AutoCAD as a reference drawing in Modeling , where it can provide locatable points (using REFD ) for the layout of members or grid lines or materials, or where it can serve as a check to confirm that the model layout matches the original drawing. You can also create reference drawings inside the Drawing Editor using the New Drawing command, but this may not be necessary since you can, instead, import a native Drawing Editor drawing type such as a detail , job standard detail or erection view drawing as a reference drawing into Modeling .
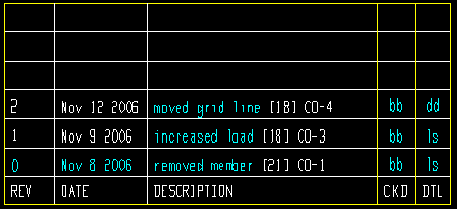
A revision chart tracks revisions made to detail sheets or gather sheets or erection sheets . Auto detailing can make entries to revision charts on detail sheets, to charts on gather sheets and to charts on erection sheets. If there is no revision chart on the sheet, auto detailing will still make an entry to the Sheet Revision Chart Editor .
The example below is a revision chart on a detail sheet.
|
This chart is from a detail sheet. White lettering was entered automatically during detailing of members on the sheet. Cyan lettering was entered using Sheet Revision Chart Editor or Increment Sheet Revisions . |
| " 0 " " 1 " and " 2 " in the " REV " column are sheet revisions. The " DATE " column records when the sheet was incremented. [21] and [18] are the member numbers of those members on the sheet that were revised (re-detailed) during a particular sheet revision. " CO-1 " " CO-3 " and " CO-4 " are the " Short revision description " that was set when the detail was updated on the sheet during Detail Members . | |
Setup and placement: Home > Project Settings > Fabricator > Sheet Revisions sets the revision chart's layout when it is initially placed, including the column headers and the widths of the columns that appear on a revision chart (" REV " " DATE " etc. in this example). Place Revision Chart can put one or more revision charts on a detail sheet, gather sheet, erection sheet or sheet outline. Home > Project Settings > Fabricator > Detailing > Drawing Presentaton > " Revision Chart " tab options let you set default fonts and other characteristics for newly placed revision charts.
The size of a revision chart is governed, in part, by choices made in Home > Project Settings > Fabricator > Sheet Revisions , which defines the columns that will be included in a chart and the number of characters that a column is wide. The " Number of lines " in a revision chart may be automatically increased, as needed, in order to expand the chart to accommodate new revision lines. Increasing or decreasing text size in a revision chart by changing the font " Character height " or " Character width/height ratio " results in a revision chart being resized.
To move a revision chart, simply drag the chart to a new location. Since each corner of a revision chart is an exact point , you can also move a revision chart using Edit > Move/Stretch .
Revising a revision chart's layout: Double-clicking a revision chart opens the new Sheet Revisions edit window, which lets you edit the layout of that chart, thus permitting multiple revision chart layouts within a project, or even on the same sheet.
To instruct auto detailing to make an entry to a revision chart, Revision Chart Edit (the sheet revision editor) needs to be set to "
" Detail with revisions " Detail Members " Detail with revisions " Detail Submaterial " Detail with revisions " Detail Erection Views For members only, Home > Project Settings > Job > Modeling > Member Revisions lists revisions that you can assign to a member. " Short revision description " in Member Status Review assigns a revision description to a member. The short revision descriptions in the example above are " CO-1 ," " CO-3 ," and " CO-4 ." Check the box for " Detail with revisions " during Detail Members to assign revisions to the sheet.
Manually editing a revision chart: Sheet Revision Chart Editor can be used to edit or add information to particular cells in the revision chart. Increment Sheet Revisions lets you edit charts on multiple detail sheets, gather sheets of erection sheets. The choices made in the revision editor also set whether the sheet revisions that are automatically entered to a particular revision chart on a sheet are alphabetical or numerical. In the example above, the sheet revisions are the numbers " 0 " " 1 " and " 2 " entered to the " REV " column on the chart.
Moving and deleting, etc: To delete a bill of material, simply select the revision chart, then choose Edit > Delete or hit the Delete key. To move a bill of material, simply drag it to a new location.
Revision can be tracked without a revision chart: A revision chart is not required to track the sheet revision level. The $REV special label can be placed onto a sheet to tell you the current " Sheet revision " regardless of whether or not a revision chart is on that sheet. Furthermore, you can use the Sheet Revision Chart Editor to make entries with or without a revision chart.
Section arrows indicate that a cross-sectional drawing has been made of the area pointed to.
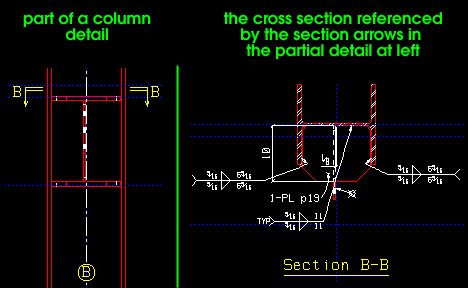
To add sections to a member detail in the Drawing Editor : Use the Section View tool. Views added in this way can also be viewed in Member Isolation . Sections should be taken looking to the left or down, toward the bottom of the drawing.
To add sections to a member detail from Modeling : 1 . Isolate the member in Modeling . 2 . Use " New " or " Preset " to create the view you want. 3 . Detail Members and select the piecemark of the affected member. 4 . When you open that member detail in the Drawing Editor , you will find the newly created view has been added to the detail.
Sheet items are linked images of member details , submaterial details , erection view drawings or job standard details that can be placed on sheets or drawings using Sheet Item Add . Only graphics that were added using Sheet Item Add are sheet items. A graphic added using Add Standard Detail is not linked to the original drawing, but is an embedded copy of the original drawing.
|
This detail sheet has four sheet items (member details). The bill data for the selected detail is highlighted in the bill. |
Key feature: Since a sheet item is an image linked to the original drawing and not an embedded copy of that drawing, the placed sheet item is automatically updated whenever its parent drawing is updated. This means, for example, that if you Detail Members and select a piecemark whose detail has already been placed on a sheet, the detail of that member will be automatically updated on the sheet. It also means that if you delete the original drawing file that a sheet item which is placed on a sheet or other drawing is linked to -- for example, if you delete a member from the model and thus cause its quantity to go to zero -- that sheet item is removed from all drawings on which it was placed.
Other features: Sheet items can be placed in multiple drawings, or in multiple locations on the same drawing. You can " Scale " and set the " Angle of rotation " of a sheet item independently, without affecting the original (parent) drawing. You can use a viewport to mask out all parts of a sheet item except the area you want to show.
For sheet outlines: You can update the original drawing to update all sheets that were originally created using the sheet outline on which the sheet item was first placed. However, a sheet item that has been placed on a sheet outline will be on a sheet that uses that sheet outline only if Sheet Item Add was done on that sheet outline before the sheet was created.
Tools for sheet items: Sheet Item Add places sheet items on drawings or sheets. Other ways to place sheet items include Detail Sheet Autoloading (to place member details on a detail sheet). Gather Sheet Autoloading (to place submaterial details on a gather sheet). Sheet Item Edit (double-click the drawing) can be used to rotate or change the scale of the sheet item or change its viewport . Sheet Item Erase or Sheet Item Erase All or generic Delete can be used to delete sheet items.
Also: You can edit sheet items on the " Sheet Items " tab of the Multi Items Edit window. To move a sheet item, simply drag it to a new location in Select Items mode. Save ( Ctrl + s ) after adding or deleting a sheet item clears the Undo history . You can Explode a sheet item, thus breaking its link to the original drawing and creating embedded copies of the lines and/or circles and/or etc. that are its individual graphic elements.
| Sheet items can be placed on more than just sheets. For example, they can be placed on sheet outlines, member details, submaterials and 2D erection views. |
| Can be added as a sheet item | IF your current drawing is one of these drawing types |
| submaterial detail | member detail, erection view, sheet outline or detail/erection/gather sheet. A special case: Unless you " Show All " on a member detail, you can only add submaterials that belong to that member. |
| member detail
(including " Sub-Members ") |
sheet outline or detail/erection/gather sheet. |
| erection view drawing | sheet outline or erection view drawing or detail/erection/gather sheet. A erection view drawing cannot be added as a sheet item to itself. |
| job standard detail | member detail, submaterial detail, erection view drawing, sheet outline or detail/erection/gather sheet. |
| Sheet items cannot be added to job/global standard details. | |
When re-detailing details and erection view drawings: Selecting ' None ' for " Preserve drawing annotations " when you re-detail a member will remove all sheet items from that detail. Similarly, if you select ' All ' for " Remove drawing annotations " when you re-detail a user-modified erection view drawing that has sheet items on it, those sheet items will be removed.
Sheet lines can be placed on a sheet outline to identify those areas on the sheet you do not want to place graphic objects or sheet items onto. For example, you can use them to identify the locations of logos and title blocks that are already printed on a preprinted sheet.
|
In this sheet outline, the white lines are sheet lines. Even the sheet edges, which are generated automatically, are sheet lines. |
Special characteristics: Sheet lines do not plot. Sheet lines do not generate points for point locators such as INCL or VTPT or etc.
Tools for sheet lines: Sheet Lines Add places sheet lines on a sheet outline. Sheet Line Erase deletes sheet lines that you select. Sheet Line Erase All deletes all sheet lines that are on shown layers.
A shorten limit line is a light blue (cyan) line that appears to the right of the main view on a member detail or a submaterial .
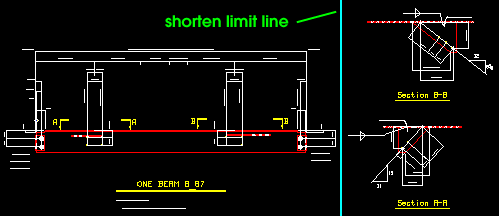
Not printed: Shorten limit lines only appear on screen. They are not Plotted .
Purpose: Shorten causes section views placed to the right of the shorten limit line to line up vertically with one another just to the right of the limit line. Where there is only one section view to the right of the limit line, Shorten places that view in horizontal alignment with the middle of the main view.
To create a limit line on a user-created member detail, use the option " Shorten limit line " when creating the drawing.
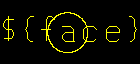
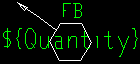
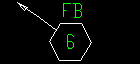
Symbols and global symbols are user-configurable graphics with editable "values" that are defined using special labels . The special labels in these examples are ${face} and ${Quantity} . The "values" in these examples are the letter A (face) and the number 6 (Quantity). Like sheet items , symbols are linked graphics. Adding a symbol does not create an embedded copy of that symbol -- see the warnings below.
| drawing before
Save as Symbol |
value entered | symbol as added |
|
|

|
|
|
|
Symbols (job symbols) are stored in your current Job, which means that when you Transfer a project to a different user, the symbols will be included. You can open a symbol with the Drawing List Panel. Symbols can be created from drawings such as standard details using Save as Symbol, from global symbols by using the Global Symbols: Copy to Job utility, using the New Drawing command, or by using Save As.
Global symbols are maintained in the data directory for your current version of SDS2. Inside the Drawing Editor, you can open a global symbol with the Drawing List Panel. However, you cannot Symbol Add and select a global symbol to add it to a drawing. You need to first use the Global Symbols: Copy to Job utility to copy that global symbol, then you can Symbol Add to add the copy of the global symbol.
Utilities for copying and converting: The Job Symbols: Copy to Global utility copies symbols that you select from your current Job into a global symbols repository that can be accessed by any Job which shares the data directory that is used by your current version of SDS2. The Global Symbols: Copy to Job utility copies symbols that you select from the global symbols repository into your current Job, where they can be added to drawings using Symbol Add .
Utilities for deleting symbols: The Delete Project Items utility has categories for Symbols and Global Symbols . See warning 2 .
Symbol tools: Symbols can be placed onto drawings using Symbol Add . During an Symbol Add operation, a preview image is shown, and may be adjusted on the Symbol Add window, before the symbol is placed.Double-click a symbol to open its X Edit window ( X = " Symbol name ") and change the "value" that was configured using a special label . You can also change a symbol's " Rotation " on its X Edit window. Symbol Edit All , Erase and Erase All tools are also available for symbols. You can Explode a symbol, thus breaking its link to the original symbol file and creating embedded copies of its individual graphic elements (lines, circles, labels, etc.). Copy Objects can be used to copy a symbol. " Preserve existing drawing annotations " considers symbols to be annotations. " Symbols " is an option in Display Options for turning on/off the display of symbols.
The insertion point: Verify Reference Point can be used to verify and change a symbol's insertion point. This applies to symbols whose files you open ( Ctrl + o ) and it also applies to whatever drawing type you are in before you do a Save as Symbol . Once a symbol has been placed, its insertion point is an exact point . See Warning 3 .
Before saving a drawing as a symbol using Save as Symbol , the File > Verify Reference Point can be used to ensure that the symbol's insertion point is where you want it. This is the insertion point that will be used when you Symbol Add . You can also open a symbol and change its insertion point using File > Verify Reference Point .
When re-detailing details and erection view drawings: Selecting ' None ' for " Preserve drawing annotations " when you re-detail a member will remove all symbols from that detail. Similarly, if you select ' All ' for " Remove drawing annotations " when you re-detail a user-modified erection view drawing that has symbols on it, those symbols will be removed.
Symbols are more than just linked graphics. They also exhibit behaviors that are consistent with embedded graphics. When a symbol is placed into a drawing, the user can, for example, type in label text to be applied to the symbol -- that user-added information is stored in the drawing to which the symbol is added.
VIDEO Watch this video closely when the reference point is changed in the original symbol file. The placed symbol changes positions on the drawing, as would be expected with a linked graphic. On the other hand, the edit window of the symbol is not updated with the changes to the original file -- a behavior that is consistent with an embedded graphic. A placed symbol is a hybrid of a linked graphic and an embedded graphic. Warning 1 : If you add a new symbol (e.g., a circle) that overwrites an old symbol file (e.g., a square), you will cause all symbols that have been placed in drawings using that old file to be redrawn per the new file (e.g., square symbols will become circles in all drawings in which the original symbol was placed).
Warning 2 : When a symbol file is deleted using the Delete Project Items utility, all links to that symbol are broken throughout your current Job (no other Jobs are affected). A broken link marker is placed in each affected drawing to mark the location where the deleted symbol was originally placed. The index of the deleted symbol will be applied to the next symbol that you create, and that new symbol will replace the marker in all drawings in which the original, deleted symbol was placed. For this reason, do not use the Delete Project Items utility to delete a ' Symbol ' that has already been placed on drawings.
Warning 3 : If, in your current Job , you File > Verify Reference Point to change the insertion point of a symbol that has been placed into drawings in that Job, that symbol's reference point location will remain the same in those drawings, but the symbol itself will shift its location with respect to that reference point. To be precise, the symbol's location in all of those drawings will shift the exact scaled distance (but the opposite direction) that you moved the reference point.
Tables can be added to any Drawing Editor drawing.
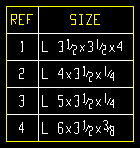
|
Tables can be made up of any number of columns and rows. Each corner of a table is an exact point . |
Tools: Table Add lets you add a table. Settings for tables can be found on the Table Edit window. Tables Erase or Table Erase All or Delete can be used to erase one or more tables. Explode transforms a table into its component lines and labels. To edit one or more tables, Table Edit or Table Edit All or double-click the table . You can turn on/off the display of " Tables " in Display Options .
Auto populating a table: The " CSV Report " option can auto-populate a table based on data maintained in a comma-delimited plain text file. The" Report Writer Report " (
Change Options: Unlock/Lock Sheet Tables lets you change the state of the check box for " Lock table " on each of the drawings you select to either checked ("
Default settings for tables are specified in Home > Project Settings > Fabricator > Detailing > Drawing Presentation > the " Tables " tab.
Drag and double-click: To edit a table (by opening the Table Edit window), double-click the table. Drag a cell's rightmost vertical line leftward to decrease the column width, rightward to increase the column width.
To move a table, simply drag the table to a new location. Dragging a label or the space inside a cell or the table's leftmost line repositions the entire table. Since each corner of a table is an exact point , you can also move a table using Move/Stretch .
Viewports are dashed lines around a sheet item or a section of a sheet item. The viewport masks the area of a sheet item that is outside its border, while displaying the area that is within its border. Only one viewport can be active at a time.
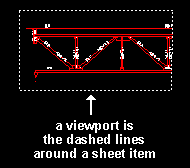
Extents, user-named and custom viewports: A sheet item can have multiple viewports, but only one viewport can be selected at a time (using " Viewport " on the Edit Sheet Item window). An extents viewport is the default viewport. A user-named viewport is placed -- and its clipping limits are initially defined -- using Viewport Add on the original drawing that the sheet item links to. Other tools for user-named viewports are Viewport Edit (to change the user-named viewport's name) and Viewport Erase (to delete the user-named viewport). A user-named viewport can be selected in Select Items mode on the original drawing with the ' Default ' or ' All ' or ' Viewports ' selection filters by drawing the area box from right to left . A custom viewport is created when you adjust an extents or user-named viewport ( re-size or reshape it) on the sheet item.
Applications: You might use viewports at different locations on a drawing if you are placing that drawing as a sheet item on more than one drawing or sheet. Or you can place the same drawing as a sheet item on the same sheet twice, then set custom viewports (or user viewports) so that only the left half of the drawing is shown on the one sheet item, while only the right half is shown for the other sheet item. Only the area inside of a viewport is plotted.
Only one viewport can be active on a sheet item at a time: You select the one you want using " Viewport " on the Edit Sheet Item window. Selecting ' Extents ' causes the entire drawing to be shown.
A custom viewport is created when you adjust an extents or user-named viewport: " Viewports " must be displayed (
Weld symbols specify how materials are to be welded together.
Weld tools: Weld Add places a weld symbol. Weld Combo places a weld symbol with optional pointers and leader lines, Weld Edit lets you edit the weld symbols that you select. Weld Erase lets you delete the weld symbols that you select. Weld Erase All deletes all weld symbols that are on shown comment layers. " Field welds " (
Also: Weld settings are shown on the Weld Edit window or on the " Welds " tab of the Multi Items Edit window. A weld symbol has one exact point . The display of " Welds " can be turned on/off on the Display Options window. Moving a weld symbol in Select Items mode also stretches an attached pointer or attached line unless you hold down the Shift key before grabbing the weld symbol. You can edit multiple weld symbols and " Save " and " Load " archived files of weld symbol settings. You can Explode weld symbols into lines and separate labels for weld size and tail text .
Printing of weld symbols: The drawing pen number applied during auto detailing of weld symbols is set in Drawing Presentation using the option " Weld pen color ." During printing, the weld symbol's pen number sets the plotted line thickness of the weld symbol. If you are using the ' SDS2 ' font for weld symbols, then the drawing pen number also sets the stroke weight of the weld's text. To change the line thickness that will be applied to graphic objects drawn with a particular drawing pen during printing and printing, see Line Weights .
Fabricator Setup: Drawing Presentation > Sizes > " Weld symbols character height ."
Job Setup: Show weld length on weld symbols ( Home > Project Settings > Job > Weld Design Settings > set default for auto detailing)
Workpoints ( o ) and their origin symbols ( ![]() ). A workpoint is the point that extension dimensions are measured from. A workpoint origin symbol identifies the position of a workpoint. Workpoints and their origin symbols can be found on member details and submaterial details that have been auto detailed . Other drawing types may also have workpoints -- if they have been placed there using Workpoint Add . On drawings that do not have a workpoint, extension dimensions are measured from the drawing's 0, 0 coordinate (see X, Y Z display ) or, for standard details, from the standard detail reference point .
). A workpoint is the point that extension dimensions are measured from. A workpoint origin symbol identifies the position of a workpoint. Workpoints and their origin symbols can be found on member details and submaterial details that have been auto detailed . Other drawing types may also have workpoints -- if they have been placed there using Workpoint Add . On drawings that do not have a workpoint, extension dimensions are measured from the drawing's 0, 0 coordinate (see X, Y Z display ) or, for standard details, from the standard detail reference point .
|
An origin symbol on the detail of a beam. |
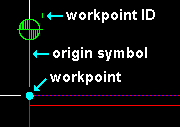
|
When the origin symbol is selected, the end point that identifies the actual workpoint is also selected. Move/Stretch can be used to relocate a workpoint and its origin symbol. |
Fabricator settings:
- During auto detailing, origin symbols are generated (or not generated) per Home > Project Settings > Fabricator > Detailing > Dimension Settings > " Extension dimensions on submaterial details " or " Show extension dimension origin " (beams) or " Show extension dimension origin " (columns) or " Show extension dimension origin " (horizontal braces) or " Show extension dimension origin " (vertical braces). Also on the Dimension Settings setup window are options that set whether the origin is on the left or the right.
Tools for workpoints and origin symbols:

