 Rotate Material Command
- Step-By-Step
- Tips and Tricks
- Related Tools
1 . Preselect a material to enable the Material contextual page and click the Rotate Material icon found in the Modify section. Skip step 2.
Alternative : Invoke Rotate Material using the Find Tool by searching the command name and clicking the Rotate Material icon, which is pictured above. Proceed to step 2.
Learn more about alternative methods for launching commands.
2 . Select (left-click) a material.
|
|
|
Select One Item bindings |
Alternative : You can press the Esc key, the Enter key, or right-click and choose "OK" or "Cancel" on the shortcut menu to end the command.
3 . The axes that you can rotate the material around (by default, " Member " axes) are drawn on screen through the material's origin reference point. The Rotate Material window opens.

3a : Select the " Coordinate system " that you want.
3b : Select the axis (
" X " or
3c : Enter a number (of degrees) to the " Increment " field, or use the default value.
3d : Press the " Rotate + " or " Rotate - " button to rotate the material.
3e : When the material is positioned the way you want it, press the " OK " button to close this window and end the command.
Alternative 1 : Instead of doing the above, you can enter a number (of degrees) to the " X " or " Y " or " Z " field, then press the Tab key to rotate the material around that axis.
Alternative 2 : Press the " Cancel " button to end the Rotate Material command and keep everything as it was.
- The origin reference point's location remains the same as the rotation proceeds.
- Press the " Reset " button on the Rotate Material window button to revert the material back to its original rotation.
- Rotating system connection material makes that connection graphical.
- Rotate Material cannot be performed when the member that the material is located on has the Model complete date set.
- Rotating member main material makes "Main material" user main material.
- The default value for the "Increment" field on the Rotate Material window can be changed in
User and Site Options > Modeling > Rotation increment. - Examples:
Example 1: The following example shows the changing of a material's rotation by selecting ' Member ' as the "Coordinate System", then changing the amount of rotation assigned to the " Z " field.

1 . Invoke Rotate Material . 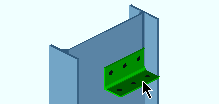
2 . Select the one material that you want to rotate. 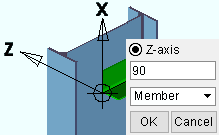
3 . On the Rotate Material window, change the degree of angle value in the X axis, Y axis or Z axis fields, then press Tab . In this example, " Member " axes are shown. 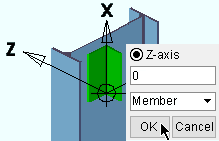
4 . The material rotates to a new position -- in this example, to ' 0 ' degrees around the " Z axis ." Press " OK " when the material is positioned where you want it to be. 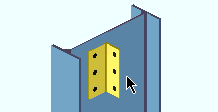
5 . The material is now rotated to a new position. Example 2: You can achieve the same results as shown in example 1 by selecting ' Member ' as the " Coordinate System " and " Z-axis " as the axis, then pressing the " Rotate - " button an appropriate number of times (as determined by the value in the " Increment " field).
Example 3: Another way to do the same rotation as in example 1 is to change the " Coordinate System " to ' Material ', enter '-90' to the " Z " field, then press Tab on your keyboard.
- Rotate Material (window opened with Rotate Material)
- Origin reference point (point on material that is rotated around)
- Rotate Multiple Material (rotates one or materials around an axis you select)
- Copy Material (material can be rotated when being copied)

