 Copy Material Command
- General Overview
- Step-By-Step
- Tips and Tricks
- Related Tools
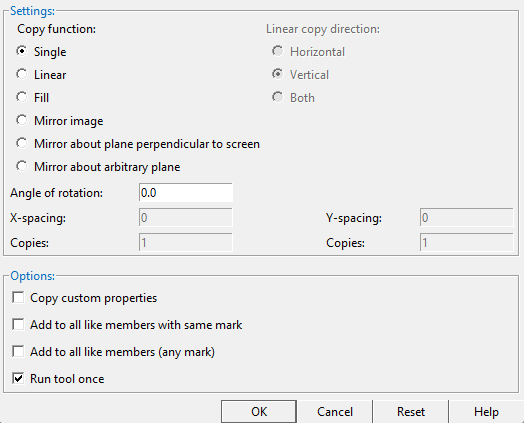
Copy function: 'Single' or 'Linear' or 'Fill' or 'Mirror image' or 'Mirror about plane perpendicular to screen' or 'Mirror about arbitrary plane'
'Single' generates a single copy of the selected materials, bolts or welds with the option to set an "Angle of rotation".
' Linear ' generates multiple " Copies " of the selected materials, bolts or welds in the " Linear copy direction " that you specify.
' Fill ' generates multiple copies of the selected materials to fill the " X-spacing ," X number of " Copies " and " Y-spacing " and Y number of " Copies ."
' Mirror image ' creates a material, bolt or weld that is a mirror image of each originally selected material, bolt or weld. When the " Angle of rotation " is ' 0 ', the copy is mirrored across a vertical plane that is perpendicular to the work plane of your view. The operation works just like a ' Single ' copy, except that each selected material, bolt or weld is mirrored.
' Mirror about plane perpendicular to screen ' creates a material, bolt or weld that is mirrored across any horizontal, vertical or diagonal plane that is perpendicular to the work plane of your view. The operation is similar to a ' Single ' copy, except that instead of locating a base point and a copy reference point, you locate two points to establish a mirror that is half way between the original material and the location where you want the mirrored copy to be placed.
' Mirror about arbitrary plane ' is similar to ' Mirror about plane perpendicular to screen ', but can be done in an isometric view .
Linear copy direction: Horizontal or Vertical or Both . This applies when ' Linear ' is the " Copy function ." The specified direction is with respect to screen axes .
' Horizontal ' copies horizontally based on the choices made to " X-spacing " and " Copies ."
' Vertical ' copies vertically based on the choices made to " Y-spacing " and " Copies ."
' Both ' copies diagonally based on the choices made to " X-spacing ," " Y-spacing " and " Copies ."
Angle of rotation: Any positive or negative (-) angle from 360 to -360 degrees. This applies when ' Single ' or ' Mirror image ' is the " Copy function ."
' 0 ' does not rotate the copied materials.
A ' positive number ' rotates the copied materials counterclockwise.
A ' negative number ' rotates the copied materials clockwise.
X-spacing: A positive or negative (-) distance that defines the spacing along the X screen axis . This applies only when ' Fill ' is the " Copy function " or ' Both ' or ' Horizontal ' are the " Linear copy direction .
A ' positive distance ' adds copies to the right of the base point.
A ' negative (-) distance ' adds copies to the left of the base point.
Copies: The number of copies ( 1 or 2 or ...) or the number of spaces ( 1 or 2 or ...) that you want in the horizontal ( " X-Spacing ") direction. Copy Material will not copy over the original material that is being copied, which may result in one fewer copy than you might expect.
Y-spacing: A positive or negative (-) distance that defines the spacing along the Y screen axis . This applies only when ' Fill ' is the " Copy function " or ' Both ' or ' Vertical ' is the " Linear copy direction ."
A ' positive distance ' adds copies above the base point.
A ' negative (-) distance ' adds copies below the base point.
Copies: The number of copies ( 1 or 2 or ...) or the number of spaces ( 1 or 2 or ...) that you want to be made in the horizontal (" Y-spacing ") direction or in the diagonal direction (" X-spacing " + " Y-spacing ").
If this box is checked (
), the custom properties that have been applied to materials that you are copying will be copied to each copy of those materials. This can be verified by doing a multi-edit of all of the materials and confirming that there are no mixed entries on the Edit Properties window that opens.
If the box is not checked (
), the new materials that are created by this Copy operation will use the default custom properties.
Add to all like members with same mark: ![]() or
or ![]() . This might be used, for example, if you are copying a material on one member and want the copied material to be added to other members with the same member piecemark .
. This might be used, for example, if you are copying a material on one member and want the copied material to be added to other members with the same member piecemark .
If this box is checked (
If the box is not checked (
Add to all like members (any mark): ![]() or
or ![]() .
.
If this box is checked (
If the box is not checked (
If this box is checked (
), the command ends after confirming the copied material on the selected member.
If the box is not checked (
"OK" (or the Enter key) closes the window and applies the settings on it to the to-be-performed copy operation.
"Cancel" (or the Esc key or the
button) closes this window and ends the Copy Material operation.
"Reset" undoes all changes made to this window since you first opened it. The window remains open.
1 . Preselect one or more materials to enable the Materials contextual page. At this point you have the option to select additional materials, bolts, or welds for copying. Click the Copy Material icon found in the Modify section. Skip step 2.
Alternative : Invoke Copy Material using the Find Tool by searching the command name and clicking the Copy Material icon, which is pictured above. Proceed to step 2.
Learn more about alternative methods for launching commands.
2 . Select one or more materials, bolts, or welds.
▸ Right-click and select "OK" from the shortcut menu.
▸ Press the Enter key.
Alternative : You can press the Esc key or right-click and choose "Cancel" on the shortcut menu to end the command.
3 . The Copy Material window opens. The name of this window tells you how many materials you selected and the number of members those materials were selected from. For example, the window's title might be "Copy 1 materials on 1 members."
3a: Choose the settings that you want, then press the " OK " button to continue.
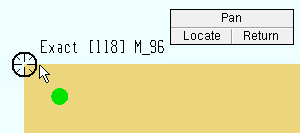
4 . The status line prompts, " Locate base point. " Locate- Pan -Return mouse bindings become active along with various Locate options. The choices you have in this step depend on the settings you selected in step 3a.
|
|
|
bindings |
Alternative 1 (for a ' Single ' or ' Linear ' or ' Fill ' copy) : Select the appropriate Locate icon (if it's not selected already). Place the mouse pointer (
) so the point location target (
) snaps to where you want the base point, then left-click ( Locate ). The materials will be copied relative to the base point later on in the command (step 6).
Alternative 2 (for a ' Single ' copy) : Right-click ( Return ) to cancel the Copy Material command and keep everything as it was before step 1. Do not continue.
Alternative 3 (for a ' Linear ' of ' Fill ' copy) : Right-click ( Return ) to cause the " X-spacing " and " Y-spacing " to be copied the designated number of times. Also, the member that is associated with the material being copied will automatically be selected as the member that the copied materials will attach to.
Skip steps 5 and 6. Go to step 7.
5 . The status line prompts, "Locate member to copy to." Select - Pan - Menu mouse bindings become active. Note that this step is skipped for a linear fill operation if you right-clicked ( Return ) in step 4.
|
|
|
bindings |
Alternative 1 : Place the mouse pointer (
Alternative 2 : Right-click ( Menu ) and choose " OK " or press the Enter key to copy the material to the same member(s) they were copied from.
Alternative 3 : Right-click ( Menu ) and choose " Cancel " or press the Escape key to end the command without copying material.
6 . The status line prompts, "Locate copy 1 reference point." Locate- Pan -Return mouse bindings become active along with various Locate options. A preview of the copied material is shown with the point location target ( ![]() ) located at the base point you selected in step 4. Note that this step is skipped for a linear of fill operation if you right-clicked ( Return ) in step 4.
) located at the base point you selected in step 4. Note that this step is skipped for a linear of fill operation if you right-clicked ( Return ) in step 4.
|
|
|
bindings |
Alternative 1 : Select the appropriate Locate icon. Place the mouse pointer (
Alternative 2 : If "Run tool once" is checked (
Alternative 3 : If "Run tool once" is not checked (
7 . The status line prompts, "Confirm (x) copies on (x) members", where (x) is the number of material copies and the number of members the material was copied to. Your computer screen redraws to show the placement of the copied material. Yes - No mouse bindings become active.
|
|
|
bindings |
Alternative 1 : Left-click ( Yes ) to accept the copy. If "Run tool once" is checked (
Alternative 2 : Left-click ( Yes ) to accept the copy. If "Run tool once" is not checked (
Alternative 3 : Right-click ( No ). If "Run tool once" is checked (
Alternative 4 : Right-click ( No ). If "Run tool once" is not checked (
- Copied materials are identified as " User created material " on the General Information window.
- Multiple materials from multiple different members can be selected and copied at the same time. The materials do not have to be located on the same member.
- Material cannot be copied to a member if the Model complete date has been set.
- Under User and Site Options > Site > the " Custom property items to copy " header, check the box for " Material " if you want to copy the custom property settings of the materials you are copying.
- You may want to place construction lines so that there are INCL points where you want to copy the materials to. If you are going to preselect material, you may want to set the selection filter to ' Material ' or, if you also plan to select welds and bolts, to ' Legacy Default '.
- Examples:
Copy function: Single
" Z filtering " is turned on in this example of the copying of a shear stud ('Single') on a rectangular plate. The work plane is the surface of the rectangular plate. Snap To Surface was used to go to that surface.
EXPT is used to locate a base point. Since " Z filtering " is on, that exact point is translated to the work plane elevation (the plate surface). Tip : Instead of turning on " Z filtering ," " Z=0 " could have been set in the Offset Controls . 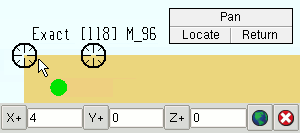
After selecting the member, Offset Controls set the copy reference point to be ' 4 ' inches from the base point. 
The results of the ' Single ' copy are shown. The newly copied shear stud is 4 inches away from the original shear stud it is a copy of. Alternatives: INCL could have been used in the above example if construction lines were laid out. VTPT could have been used instead of EXPT and would have located a point at the correct work plane elevation (the top of the surface) without having to use " Z filtering ." Instead of turning on " Z filtering ," " Z=0 " could have been set in the Offset Controls . Copy function: Linear
Here are three examples of the copying of a shear stud (' Linear ') on a rectangular plate. For all three examples, the work plane is the surface of the rectangular plate. Snap To Surface was used to go to that surface. The " Linear copy direction " was set to ' Horizontal ' with " X-spacing " set to ' 3 ' and " Copies " set to ' 2 '.
Example 1:
VTPT is used to left-click ( Locate ) a base point at the elevation of the surface that the shear stud is on.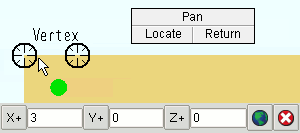
After selecting the member, Offset Controls set the copy reference point to be ' 3 ' inches from the base point. 
The results of the ' Linear ' copy are shown. The leftmost of the two copied shear studs is 3 inches away from the original shear stud. -------------------------------------------------------- Example 2:
The user makes the same choices on the edit window as in example 1 and also copies to the same member, but locates the same point for both the base point and the copy reference point.
The results of the ' Linear ' copy are shown. Even though " Copies " was set to ' 2 ', the tool does not copy a new shear stud over the original shear stud, and only one new shear stud is added -- a nice feature. -------------------------------------------------------- Example 3:
The user made the same choices on the edit window as in example 1, but did a right-click ( Return ) when prompted to "Locate base point.".The " X-spacing " of 3 inches is copied twice, as specified, resulting in a total of 2 shear stud copies. Copy function: Fill
For these three examples of copying a shear stud (' Fill ') on a rectangular plate, the work plane is the surface of the rectangular plate. Snap To Surface was used to go to that surface. The " X-spacing " is set to ' 3 ' and " Copies " set to ' 2 '. The " Y-spacing " is set to ' -2 ' with the " Copies " set to ' 2 '.Example 1:
VTPT is used o locate a base point at the elevation the surface the shear stud is on.After selecting the member, Offset Controls set the copy reference point to be 3 inches in a positive direction (to the right) from the base point. 
The results of the ' Fill ' copy are shown. The upper, left shear stud of the four copied shear studs is 3 inches to the right of the original shear stud it is a copy of. -------------------------------------------------------- Example 2:
The user makes the same choices on the edit window as in example 1 and also copies to the same member, but locates the same point as the base point and the copy reference point.
The results of the ' Fill ' copy are shown. Though the X " Copies " and Y " Copies " are both set to ' 2 ', the tool does not copy a new shear stud over the original shear stud. Only three new shear studs are added -- a nice feature.
-------------------------------------------------------- Example 3:
The user makes the same choices on the edit window as in example 1, but right-clicks ( Return ).
The results of the ' Fill ' copy are shown. The X " Copies " and Y " Copies " are both set to ' 2 '. In the results shown, 2 is the number of spaces in the X direction and 2 is the number of spaces in the Y direction. Copy function: Mirror image 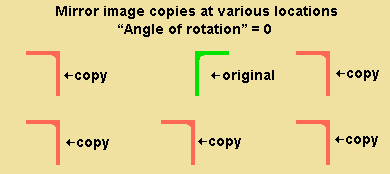
When the " Angle of rotation " is ' 0 ' degrees, ' Mirror image ' mirrors each copy of the material horizontally. 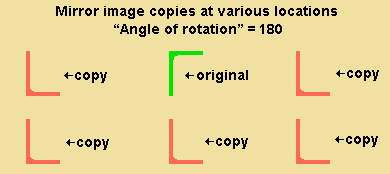
When the " Angle of rotation " is ' 180 ' degrees, ' Mirror image ' mirrors each copy of the material vertically. Copy function: Mirror about plane perpendicular to screen 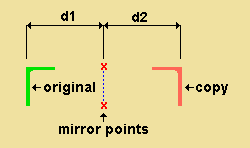
Since the mirror plane in this example is vertical, the copy of the angle section is mirrored to the same orientation it would be mirrored to if ' Mirror image ' were the " Copy function ." Note that d1 and d2 are equal. 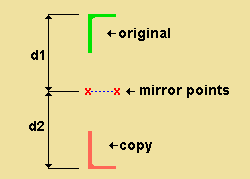
The mirror plane in this example is horizontal. Since d1 and d2 are measured perpendicular to that mirror plane, they are vertical dimensions. The distances d1 and d2 are equal. You can get this same result with ' Mirror image ' and an " Angle of rotation " of ' 180 ' degrees. 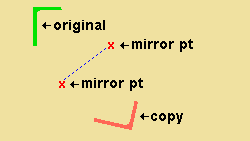
The mirror plane in this example is diagonal. The distance from an arbitrary point on the original angle to the mirror plane is exactly the same as the distance from that same point on the mirror plane to the equivalent point on the copied angle. Copy function: Mirror about arbitrary plane.
This example is probably not something you would want to do in a real Job, but it neatly illustrates how this function works.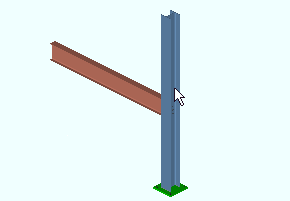
1 . After ' Mirror around arbitrary plane ' is selected as the " Copy function " and " OK " is pressed to close the Copy ... window, the status line prompts, " Select a member to copy to, " and the column is selected as the member to mirror copy the selected material to. The to-be-copied material in this example is the column's base plate. 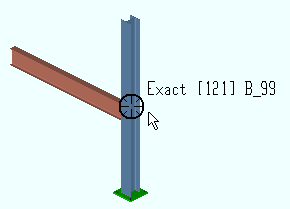
2 . The status line prompts, " Locate point 1 on mirror plane " and the user locates a point that is on the plane across which the selected material will be mirrored when it is copied. The beam's exact point that the user locates in this example happens to be half-way up the column. 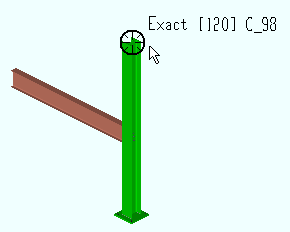
3 . The status line prompts, " Locate direction perpendicular to mirror plane " and the user locates the exact point that is the top of the column.
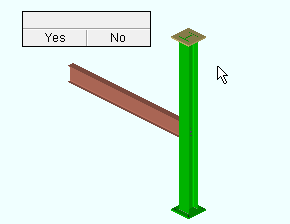
4 . The status line prompts, "Confirm copy ...." The computer screen redraws to show the placement of the copied material. Yes - No mouse bindings become active. Linear copy direction: Horizontal 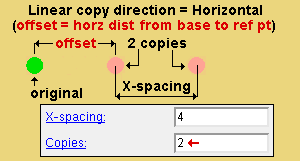
Example 1: No construction lines were used for this example. Offset Controls were used to set the copy reference point. An " X+ " value of ' 4 ' (inches) was entered to the Offset Controls. 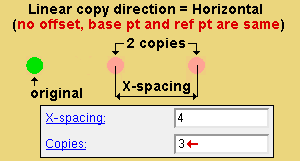
Example 2: The user located the base point and copy reference point at exactly the same point. Since the original shear stud is not copied over, only two copies are made, even though ' 3 ' is the value entered to " Copies ."
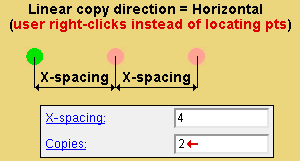
Example 3: The user right-clicked ( Return ) when prompted to "Locate base point." The "X-spacing" is copied twice.
Linear copy direction: Vertical 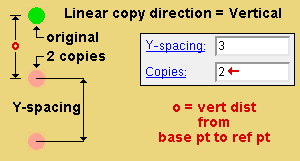
Example 1: No construction lines were used for this example. Offset Controls were used to set the copy reference point. A " Y+ " value of ' -3 ' (negative inches) was entered to the Offset Controls. 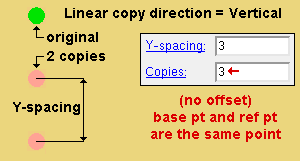
Example 2: The user located the base point and copy reference point at exactly the same point. Since Copy Material does not copy over the original shear stud, only two copies result, even though ' 3 ' is the value entered to " Copies ." 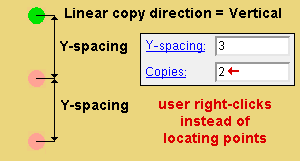
Example 3: The user right-clicked ( Return ) when prompted to "Locate base point." The "Y-spacing" is copied twice. Linear copy direction: Both 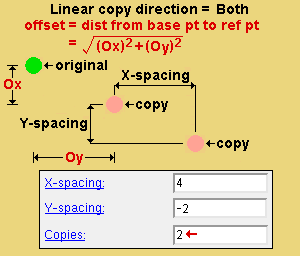
Example 1: No construction lines were used for this example. Offset Controls were used to set the copy reference point. An " X+ " value of ' 3 ' (inches) and a " Y+ " value of ' -2 ' (negative inches) was entered to the Offset Controls. 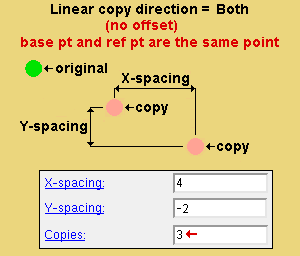
Example 2: The user located the base point and copy reference point at exactly the same point. Since Copy Material does not generate a copy over the original shear stud, only two copies result, even though ' 3 ' is the value entered to " Copies ." 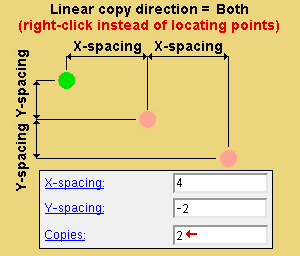
Example 3: The user right-clicked ( Return ) when prompted to "Locate base point.". The " X-spacing " and " Y-spacing " are each copied twice. Angle of rotation 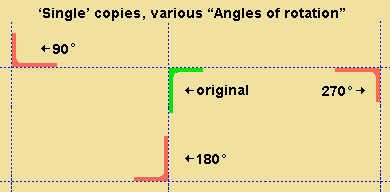
' Single ' copies of an angle material rotated 90 , 180 and 270 degrees. Each single copy was located with INCL . 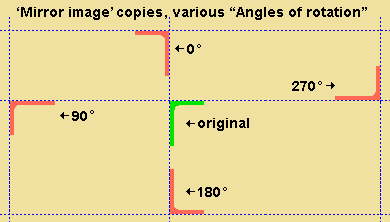
' Mirror image ' copies of an angle material rotated 90 , 180 and 270 degrees. Each mirror copy was located with INCL . Copies 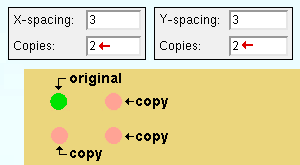
The number of copies that you might expect to be generated in this example is four since 2 x 2 = 4. However, only three copies are generated because the same point was located when prompted to "Locate base point" and when prompted to "Locate copy reference point". Copy Material will not copy over the original, selected-to-be-copied material (shear stud in this example).
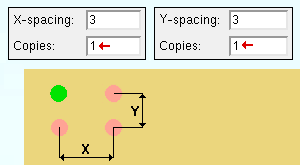
"Copies" controls the number of spaces when you right-click when prompted to "Locate base point". For this example , 'Fill ' is the "Copy function," and the user did a right-click when prompted to "Locate base point". The "Copies" are the number of spaces, not the number of items.
- Screen coordinates ( Copy Material functions with respect to)
- Offset Controls (alternative method for offsetting copies of material)
- Bolts (may be copied along with material)
- Welds (may be copied along with material)
- User and Site Options > General > Point selection by area box (affects Copy Material )
- Add Assembly (another way to copy material, bolts and welds)
- Existing material (to add copies of material)
- User and Site Options > Site > Custom property items to copy > Material

