 Hand Rail Add
See on another page: Hand Rail edit window.
- Step-By-Step
- Tips and Tricks
- Quick Add Tools
- Related Tools
1. Click the Hand Rail icon, which is pictured above. The icon can be found on the Members page > Stair / Handrail section.
Alternative: Invoke Hand Rail using the Find Tool by searching the command name and clicking the icon, which is pictured above.
Learn more about alternative methods for launching commands.
2. The status line prompts, "Locate TOS for Left End". Locate - Pan - Return mouse bindings become active. Select the appropriate Locate option.
2a. Left-click (Locate) to place the 1st point where the point location target (
) is at. The 1st point sets the bottom reference point at the left end of the hand rail.
2b. The status line prompts "Locate TOS for Right End". Left-click (Locate) a second point. The 2nd point sets the bottom reference point at the right end of the hand rail.
2c. The status line prompts "Locate TOS for Left Return End". Left-click (Locate) a third point. The 3rd point sets the end of the hand rail left return.
Alternative: Right-click (Return) if you do not have a return on the left end. This tells the hand rail member there is no return on the left end of this member.
2d. The status line prompts "Locate TOS for Right Return End". Left-click (Locate) a fourth point. The 4th point sets the end of the hand rail right return.
Alternative: Right-click (Return) if you do not have a return on the right end. This tells the hand rail member there is no return on the right end of this member.
3. The Hand Rail Member window opens. When you are done changing or reviewing settings, press the "OK" button.
Alternative: Press the "Cancel" button to end the Add Hand Rail operation. This stops the hand rail member from being added to the model.
4. The hand rail is generated in the model. Locate - Repeat - Return mouse bindings become active. The status line prompts you to repeat step 2 and add another anchor hand rail member.
Alternative: Right-click (Return) if you are done adding hand rail.
|
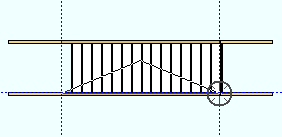
1 . Invoke Section View and locate two points along the gage line of the channel stair stringer to obtain the section view shown in step 2, whose work plane includes those two points. |
|
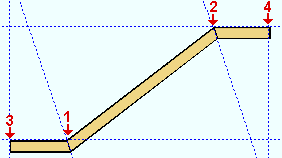
2 . Add construction lines for work point location. Invoke Add Hand Rail . Locate the main section work points ( 1 and 2 ). Then locate the work points for the left return ( 3 ) and right return ( 4 ). |
|
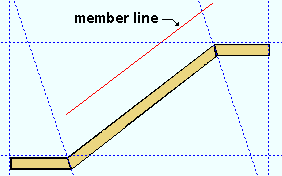
3 . Make entries to the Hand Rail window, then press " OK ." The handrail's member line is placed above the main section, per the settings for " Member line " " Finished floor distance " and " Floor thickness ." Right-click ( Return ) unless you want to add another hand rail. |
|
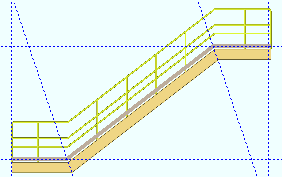
4 . If User and Site Options > Modeling > " Automatically process after modeling operation " is set to ' Process and create solids , ' the new handrail will have automatically undergone all phases of Process and Create Solids . You can now display the handrail in a solid form . |
- Returns are optional . Only two work points are required to set the alignment of a hand rail. After locating these two points, right-click ( Return ) if you don't want a left-end return, then right-click ( Return ) again if you don't want a right-end return.
- To get the connections as expected your work points must be aligned with the top flange of the beam or stair.
- The placement of many hand rail components is defined by setting the " Finished floor distance " which that component is above the " Floor thickness ." The top rail " Reference line " sets the member line.
- Setting the " Walk side " positions the grab bar and toe plate. For angle handrails, it orients the angle posts and angle rails so that they point toward or away from the work line .
- When adding a handrail, the first two work points are used to position either the first and last posts of the main section, the center of a p-end's vertical, or the exact end of a spliced rail.
-
Posts, Rails and Work Points pipe (shown) or tube 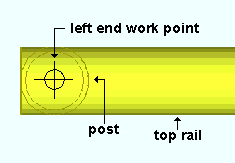
angle 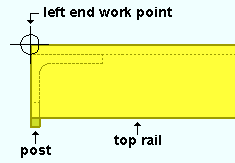
- Add Flat HandRail (another way to add handrail)
- Add HandRail to Stringer (another way to add handrail)
- Continue Flat HandRail (another way to add handrail)
- Adjust HandRail Posts
- Adjust HandRail Return
- Adjust HandRail Splice
- Splice HandRail
- Move HandRail Post
- Whole HandRail Post Spacing
- Hand Rail (window this tool opens)
- Custom members (topic)
- Hand Rail Setup (sets defauts for first newly added handrail in a Modeling session)
- Automatically process after modeling operation ( User and Site Options > Modeling > )
- Detail Members (hand rail is detailed in position)
- Show linear measure for handrail in shop bill (setup option)
- Show submaterial mark for posts on handrail member details (setup option)
- Show submaterial mark for rails on handrail member details (setup option)
- Elevation noted at top rail from (setup option)
- Elevation noted at bottom of post (setup option)

