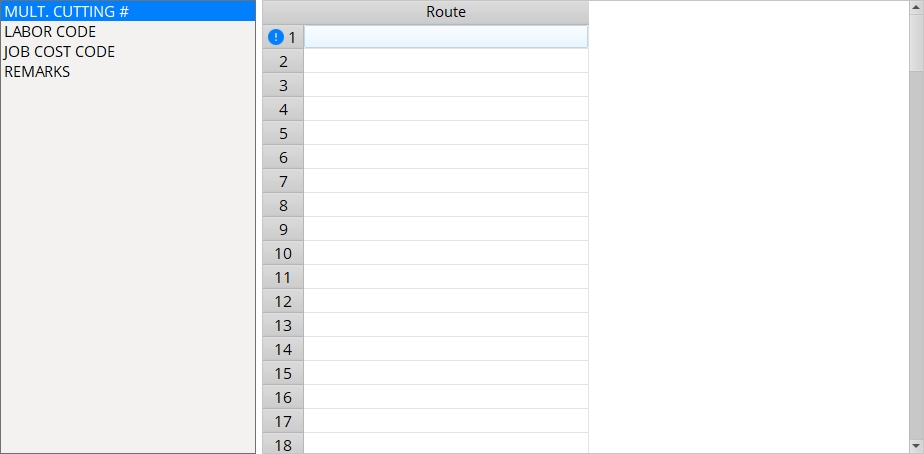
The User Routing Settings window ( Fabricator Settings )

Also see :

page 1 | contents | home > project settings > fabricator > | classic | top


   To assign a definition to different members or materials :

For members : Enter the routing definition to the appropriate " Member route . . . " field on the Member Status Review window. You can optionally apply this same routing definition to all members with the same piecemark after you press " OK " to exit the member edit window.

For materials : Enter the routing definition to the appropriate " Material route . . . " cell on the General Information window. You can optionally apply the routing definition to all like material or all like material on members with the same mark after you press " OK " to exit the material edit window.

Both members & materials : Use Update Attributes to apply routing definitions to groups of members or materials.

page 1 | contents | home > project settings > fabricator > | classic | top


   To review which members or materials have been assigned which definition :

Method 1 : Open a member detail in the Drawing Editor . Do an Edit Bill and look at the information compiled in the columns that are by default named " Mult. Cutting # ," " Labor Code ," " Job Cost Code " and " Remarks ."

Method 2 : Set Model > Status Display > Member status > Member route . . . " to display colors for members that have been assigned particular routing definitions.

Method 3 : Set Set Model > Status Display > Material status > Material route . . . to display colors for materials that have been assigned particular routing definitions.

Method 4 : The Sheet Loading Report can be configured to sort members by user routing configuration.

Method 5 : The Bill Interchange Format (BIF) will generate a download of bill of material information that includes any definitions applied to member main material.

page 1 | contents | home > project settings > fabricator > | classic | top


   Step-by-step instructions :

1 . To open the User Routing Settings window, use any one (1) of the following methods:

Method 1 : Home > Project Settings > Fabricator > User Routing Settings .

Methods 1, 2 & 3 : In Modeling or the Drawing Editor , choose Settings > Fabricator Settings > User Routing Settings (classic), or use a keyboard shortcut , or click the icon.

2 . The User Routing Settings window opens. The window has four different sets of definitions (routing configurations), each of which has a different title (configuration name). Each configuration consists of user-defined strings of characters (definitions) which may be assigned to members or materials in your current Job . Definitions from different configurations are entered (during auto detailing ) to a different column in the bill of material (as described in the Note below).

default configuration names
' Mult Cutting # ' (configuration 1 )
' Labor Code ' (configuration 2 )
' Job Cost Code ' (configuration 3 )
' Remarks ' (configuration 4 )

Users can change the names of configurations, but their numbers are permanent. For this reason, help often refers to a configuration by its number ( 1 or 2 or 3 or 4 ). The tabs (configurations) on this window are the Home > Project Settings > Fabricator > Bill of Material Layout " Header . . ." strings for " Mult. Cutting # " (configuration 1 ), " Labor Code " (configuration 2 ), " Job Cost Code " (configuration 3 ), and " Remarks " (configuration 4 ).

2a : Click the tab that corresponds to the routing configuration that you want, then go to step 3.

3 . Optionally add/edit/erase definitions. Use the up/down arrow keys, the Tab key or Shift + Tab to move from one cell to another. Cut ( Ctrl + x ), copy ( Ctrl + c ) and paste ( Ctrl + v ) are available as keyboard shortcuts for individual cells on this table. You can also right-click a cell to get a menu with the options " Cut " " Copy " and " Paste ."

3a (optional) : To add a definition to the User Routing Settings window, click the 1st empty cell so that a text insertion bar appears in the cell. Type in a definition (for example, ' galvanized ' or ' two coat '), then press the Tab key. Line 1 you may want to leave blank or type something like ' Default ' or ' Not Set ' or ' None '. The entry to line 1 is assigned by default to all members.

3b (optional) : To edit a definition already on the User Routing Settings window, double-click in the cell whose contents you want to change so that the previously entered definition is selected. Type in the revised definition (e.g., ' beam line '). Remember: line 1 is assigned by default to all members.

3c (optional) : To erase a definition from the User Routing Settings window, double click in the cell whose contents you want to change so that the previously entered definition is selected. Press Backspace to erase the previous entry.

4 . When you are done making changes to the User Routing Settings window, use the buttons on the bottom of the window to close the window or undo your changes.

"OK" (or the Enter key) closes User Routing Settings (this window) and saves any changes you have made to it.

"Cancel" (or the Esc key) closes the window without saving any changes made to it.

"Reset" undoes all changes made to this window since you first opened it. The window remains open.

page 1 | contents | home > project settings > fabricator > | classic | top