 Extend Member to Member and Adjust Elevation
This tool must be downloaded from SDS2 Toolbox and installed in order to use it.
- Step-By-Step
- Tips and Tricks
- Related Tools
|
|
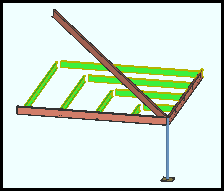
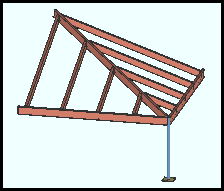
| Before the tool is used, the selected roof beams meet at the ridge beam's X and Y -- but not the Z --location. | After the tool is used, the selected beams' elevations have been adjusted. The beams now meet the ridge beam at the proper slope. |
1 . Click the Extend Member to Member and Adjust Elevation icon, which is pictured above. The icon can be found on the Toolbox page.
Alternative: Invoke Extend Member to Member and Adjust Elevation using the Find Tool by searching the command name and clicking the icon, which is pictured above.
Learn more about alternative methods for launching commands.
2 . Select Item(s) mouse bindings become active, and the status line prompts you to " Locate member(s) to extend to ". Press the Enter key or right-click and choose " OK " on the context menu when you are done selecting.
Alternative: Press Esc to end the command.
3 . Status line propts you to " Locate members to extend ". Press the Enter key or right-click and choose " OK " on the context menu when you are done selecting.
Alternative: Press Esc to end the command.
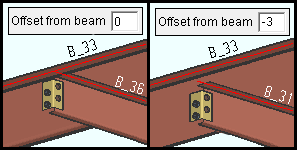
4 . The Extend Adjust Height window opens. If you want the elevation of the ends of the beams that you extend to be offset from the member line of the member that you are extending to, enter a positive or negative distance in the " Offset from beam " field. If the distance is set to 0, the beam end elevation matches the supporting beam's member line elevation. Press the " OK " button to apply the " Offset from beam " to the model.
|
When the " Offset from Beam " is negative, the extended beam end elevation is lowered relative to the member that it is extended to. |
Alternative : Press " Cancel " to exit the command. No members will be extended.
5 . The Keep end window opens. Select the end you want to remain in place and choose " OK ".
Note : The end that is not selected on this window is the end that will move.
Alternative : Press " Cancel " to exit the command. No members will be extended.
6 . The beam members are processed and their member ends are moved. A dialog will ask you whether you want to keep the changes and if you want to "Add Member Pins" .
Note : If " Add Member Pins " is checked (
) when you select the " Yes " button, the " Offset from member line " member pin is applied to the beam end that was moved
Alternative 1 : Press the " Yes " button to accept the changes.
Alternative 2 : Press the " No " button to undo the changes.
- Extend Member to Member (a similar tool)
- Extend All to Column (extends members to columns)
- Extend All Selected (allows multiple selection of beams and columns)
- Member Line Extend Setup

