 Concrete Beam ( Modeling > F2 >
  Concrete > select " Concrete Beam ")
Tool summary :
|
Also see :
|
- Modeling (where a concrete beam can be added or edited)
- Concrete beam (definition)
- Concrete Setup > Beam Templates (lists available concrete beam templates)
- Beam Template Editor (setup window with settings for adding/editing/reviewing an individual template)
- Tie Zone (may be added to a concrete beam)
To add a concrete beam :
Before adding a concrete beam , you should confirm that the " Template " that you want to use for the beam has been properly set up in Concrete Setup > Beam Templates . The template sets, for example, whether the profile of the beam is rectangular or an irregular shape.
A concrete beam can be added in Modeling by pressing F2 to open the Member Type Selection window, then double-clicking " Concrete Beam ."
Two work points are required to add a beam. The order in which you locate these points does not matter since the work point that is closest to the global axes 0, 0, 0 point is recorded as the " Left end " work point. This is exactly the same way that the left end is determined for steel beams. Click here for more information on the topic of how a member's left end relates to global coordinates.
Concrete beams can be sloping or non-sloping. The member line of a concrete beam will adjust to a change in that member's " End elevation ."
For more information related to locating the work points for a concrete beam member, familiarize yourself with the following help topics: Offset Controls for point location , Locators , Locate menu, point location target (
), status line , X-Y-Z display , global coordinate system .
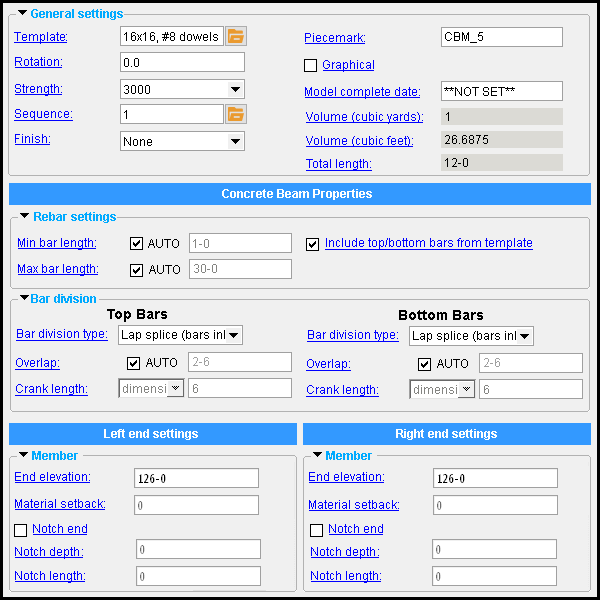
| Concrete beam properties |
------  Rebar settings ------
Include top/bottom bars from template: ![]() or
or ![]() . This applies to concrete beams when dowels have been defined in the selected " Template ." These are the reinforcing bars that run along the length of the concrete beam.
. This applies to concrete beams when dowels have been defined in the selected " Template ." These are the reinforcing bars that run along the length of the concrete beam.
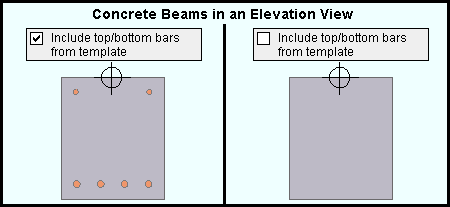
If this box is checked (
If the box is not checked (
), the rebar defined in the beam template ( Beam Templates ) is not included in the beam. If you so choose, you can add a system of longitudinal reinforcing bars using a Rebar Area Layout .
Max bar length: ![]() AUTO or
AUTO or ![]() AUTO . This applies when the option to "
AUTO . This applies when the option to " ![]() Include dowels from template " is checked.
Include dowels from template " is checked.
'
'
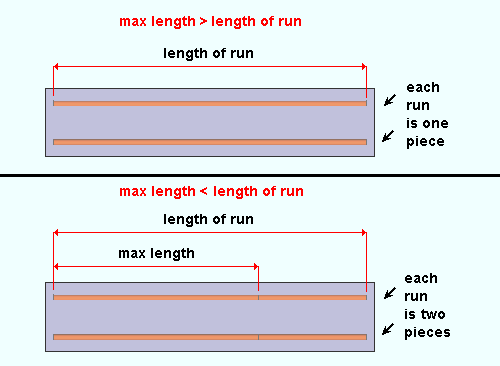
Max length >= length of run: If the " Max bar length " that is entered is greater than or equal to the length of the rebar run, the rebar run will consist of a single rebar that is the required length. Assuming that there is no " Material setback ," that required length is the distance between the left- and right-end work points minus two times the " End cover " distance that is defined in the Concrete Beam Template Editor .
Max length < length of run: If the " Max bar length " that is entered is less than the length of run that is required and the concrete beam program does not override your entry due to " Min bar length " being set to '
Example: " Max bar length " results in each rebar run in the concrete beam being divided into three rebar segments. The first two segments are the " Max bar length ." The third segment is the length that is required to complete the run.
Note: A " Max bar length " that is less than the " Min bar length " is an invalid entry. You need to change that setting, or you will not be able to close the Concrete Beam Edit window using " OK ".
Min bar length: ![]() AUTO or
AUTO or ![]() AUTO . This applies when the option to "
AUTO . This applies when the option to " ![]() Include dowels from template " is checked.
Include dowels from template " is checked.
'
'
------ Bar division ------
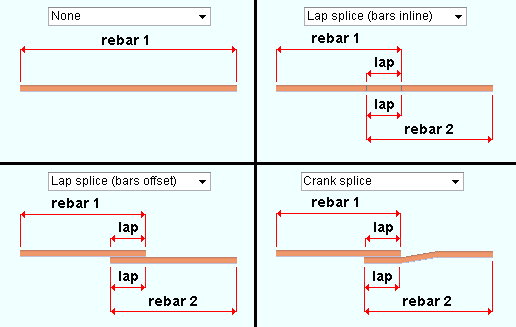
Bar division: None or Lap splice (bars inline) or Lap splice (bars offset) or Crank splice . These options determine if or how bars are spliced.
|
| Bar division options affect the length of rebar shape material. |
' None ' prevents splices from being modeled. The rebar is modeled as a single length.
' Lap splice (bars inline) ' models splices that accommodate the " Max bar length " and the " Overlap "; however, the splices are within the same rebar run and are modeled as clashing material.
' Lap splice (bars offset) ' models splices that accommodate the " Max bar length " and the " Overlap ". The bars are offset so that their material does not clash.
' Crank splice ' models splices that accommodate the " Max bar length " and the " Overlap ". The bars are within the same rebar run, but cranks are provided that conform to the " Crank length " options to prevent the bars from clashing.
Overlap: ![]() AUTO or
AUTO or ![]() AUTO . This applies when the runs of horizontal rebar have been divided into multiple rebar lengths to accommodate the " Max bar length ." A lap splice is a common way of splicing two reinforcing bars. Lap splices that are within the same rebar run are modeled as a material clash between the two lengths of rebar that are being spliced. The length that the rebar clashes in the model is the " Overlap " that has been entered.
AUTO . This applies when the runs of horizontal rebar have been divided into multiple rebar lengths to accommodate the " Max bar length ." A lap splice is a common way of splicing two reinforcing bars. Lap splices that are within the same rebar run are modeled as a material clash between the two lengths of rebar that are being spliced. The length that the rebar clashes in the model is the " Overlap " that has been entered.
'
'
|
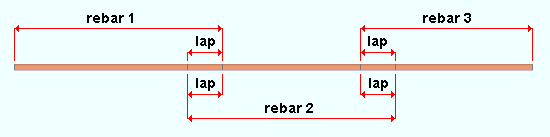
| Entering an appropriate " Overlap " ensures that sufficient lengths of rebar are ordered to achieve a lap splice. As shown in this diagram, a lap splice that is within the same rebar run is modeled as a material clash. |
Crank length: ratio or dimension . This option applies when " Bar division type " is ' Crank splice '.
' ratio ' specifies the ratio (expressed as a decimal number) of the crank length to bar size; that is, the crank length divided by the bar size. It follows that if you multiply the ratio by the bar size, you can calculate the resulting crank length:
Example using imperial units :
ratio = ' 6.0 '
bar size = #6 (i.e. 3/4", or 0.75 )
crank length = CC ÷ 0.75 = 6.0
C = 6.0 × 0.75
C = 4.5 , or 4 1/2"Example using metric units :
ratio = ' 6.0 '
bar size = #19 (i.e. 19 mm)
crank length = CC ÷ 19 = 6.0
C = 6.0 × 19
C = 114 mm' dimension ' specifies the crank length as a distance in the primary dimension " Units " or other units . This option allows the crank length to be entered directly.
|
|
|
------ Member ------
End elevation: The elevation (in the primary dimension " Units " or other units ) of the work point at the top of this end of the concrete beam. For a non-sloping concrete beam, both the left and right end elevations will be the same.
|
|
| A concrete beam has two exact points , whose elevation you can change by changing the member's left- and/or right-end " End elevation ." |

To determine the end elevation on a concrete beam in the 3D model, use Construction Line Add or a similar tool, select EXPT as the Locate option, then snap the point location target to the work point at the end of the beam. The Z coordinate reported in the X-Y-Z display tells you the elevation at the snapped-to exact point.
Material setback: ![]() AUTO or
AUTO or ![]() AUTO .
AUTO .
'
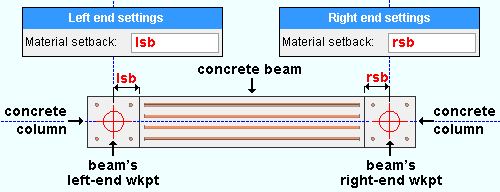
In the above example, the concrete beam's left-end " Material setback " ( lsb ) and the right-end " Material setback " ( rsb ) is the half-depth of the concrete column.
The " Material setback " adjusts the length of the concrete beam. It also affects the " Volume (yards) " and " Total length " that is reported for the concrete beam.
'
Notch end: ![]() or
or ![]() . The example shown below depicts the left end of a concrete beam. " Notch end " under " Right end settings " works in a similar way.
. The example shown below depicts the left end of a concrete beam. " Notch end " under " Right end settings " works in a similar way.
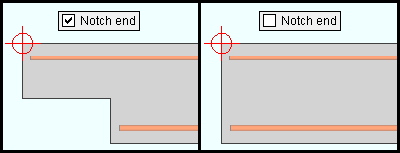
If this box is checked (
If the box is not checked (
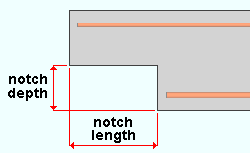
Notch depth: The distance (in the primary dimension " Units " or other units ) from the bottom of the concrete beam to the top of the notch. This distance is measured parallel with the depth of the concrete beam.
|
For a left-end notch like that which is shown, " Notch depth " is measured from the bottom, left end edge of the member. For a right-end notch, its measured from the bottom, right end edge. |
Notch length: The distance (in the primary dimension " Units " or other units ) from the end of the concrete beam to the interior of the notch. This distance is measured parallel with the length of the concrete beam.
|
|
For a left-end notch like that which is shown, " Notch length " is measured from the left end of the member. For a right-end notch, it is measured from the right end. |

