Drawing Presentation (per-drawing setup overrides)
Also see :
- Home > Project Settings > Fabricator > Detailing > Drawing Presentaton (setup window that this window can override)
page 1 | contents | settings > drawing settings | top
To open setup overrides for Drawing Presentation :
Method 1 : In the Drawing Editor , with a ' Detail ' (system-generated) or ' Submaterial ' as your current drawing, choose Settings > Drawing Settings > Drawing Presentation.
page 1 | contents | settings > drawing settings | top
| Sizes | Fonts | Pens | Primary
Dimensions |
Secondary
Dimensions |
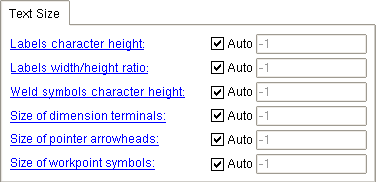
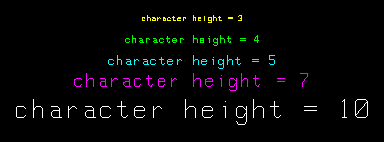
Labels character height: ![]() Auto or a height . The choice made here applies only to your current drawing (if that drawing is a member detail or a submaterial detail). For a member detail, it applies if you Detail Current Piecemark with templates. It also applies if, after exiting the drawing, you select that drawing for Detail Members with templates . For a submaterial detail, it applies to your current drawing if, after exiting the drawing, you select that drawing for Detail Submaterial with templates .
Auto or a height . The choice made here applies only to your current drawing (if that drawing is a member detail or a submaterial detail). For a member detail, it applies if you Detail Current Piecemark with templates. It also applies if, after exiting the drawing, you select that drawing for Detail Members with templates . For a submaterial detail, it applies to your current drawing if, after exiting the drawing, you select that drawing for Detail Submaterial with templates .
|
'
Auto (checked) ' instructs automatic detailing with templates to apply the setup choice made to " Labels character height " when you next auto detail your current drawing.
'
Auto (not checked) ' lets you enter the height (in millimeters) of the characters that make up labels and the text in hole symbols . This value is independent of the " Drawing scale " of a drawing. Assuming that the sheet a drawing is placed on has a scale of 1:1 and you do not re-scale the labels and the printer does not adjust the scale, this will be the actual height of characters on the plotted sheet.
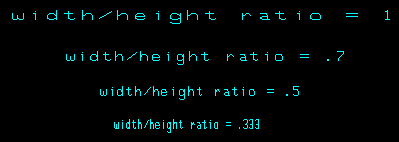
Labels width/height ratio: ![]() Auto or a width-to-height ratio . The choice made here applies only to your current drawing (if that drawing is a member detail or a submaterial detail). For a member detail, it applies if you Detail Current Piecemark with templates. It also applies if, after exiting the drawing, you select that drawing for Detail Members with templates . For a submaterial detail, it applies to your current drawing if, after exiting the drawing, you select that drawing for Detail Submaterial with templates .
Auto or a width-to-height ratio . The choice made here applies only to your current drawing (if that drawing is a member detail or a submaterial detail). For a member detail, it applies if you Detail Current Piecemark with templates. It also applies if, after exiting the drawing, you select that drawing for Detail Members with templates . For a submaterial detail, it applies to your current drawing if, after exiting the drawing, you select that drawing for Detail Submaterial with templates .
|
'
Auto (checked) ' instructs automatic detailing with templates to apply the setup choice made to " Labels width/height ratio " when you next auto detail your current drawing.
'
Auto (not checked) ' lets you enter the width-to-height ratio to be applied to labels and to text in hole symbols . All characters in the above example have the same character height, but each line has a different character width/height ratio. An entry of ' .5 ' designates characters 1/2 as wide as they are tall.
Font dependencies: For a TrueType font, a ratio of ' 0.6 ' renders that font at its native width. A ratio larger than ' 0.6 ' stretches the font. A ratio less than ' 0.6 ' compacts the font. For the ' SDS2 ' font, use the ratio that you think looks best -- ' 0.4 ' is the default.
Weld symbols character height: ![]() Auto or a character height . The choice made here applies to your current drawing if that drawing is a member detail, and if you Detail Current Piecemark with templates. It also applies if, after exiting the drawing, you select that drawing for Detail Members with templates .
Auto or a character height . The choice made here applies to your current drawing if that drawing is a member detail, and if you Detail Current Piecemark with templates. It also applies if, after exiting the drawing, you select that drawing for Detail Members with templates .
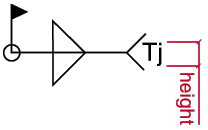
'
Auto (checked) ' instructs automatic detailing with templates to apply the setup choice made to " Weld symbols character height " when you next auto detail your current drawing.
'
Auto (not checked) ' lets you enter the weld symbol character height (in millimeters).
Size of dimension terminals: a number less than 1 or 1 or a number greater than 1 . The choice made here applies to your current drawing if that drawing is a member detail, and if you Detail Current Piecemark with templates. It also applies if, after exiting the drawing, you select that drawing for Detail Members with templates .
|
||||||||||||||
'
Auto (checked) ' instructs automatic detailing with templates to apply the setup choice made to " Size of dimension terminals " when you next auto detail your current drawing.
'
Auto (not checked) ' lets you enter the dimension terminal size number (in millimeters).
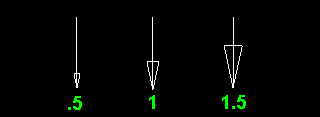
Size of pointer arrowheads: a number less than 1 or 1 or a number greater than 1 . The choice made here applies to your current drawing if that drawing is a member detail, and if you Detail Current Piecemark with templates. It also applies if, after exiting the drawing, you select that drawing for Detail Members with templates .
|
'
Auto (checked) ' instructs automatic detailing with templates to apply the setup choice made to " Size of pointer arrowheads " when you next auto detail your current drawing.
'
Auto (not checked) ' lets you enter the pointer arrowhead size number (in millimeters).
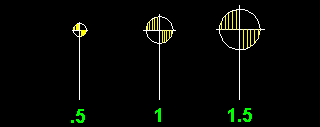
Size of workpoint symbols: a number less than 1 or 1 or a number greater than 1 . The choice made here applies to your current drawing if that drawing is a member detail, and if you Detail Current Piecemark with templates. It also applies if, after exiting the drawing, you select that drawing for Detail Members with templates .
|
'
Auto (checked) ' instructs automatic detailing with templates to apply the setup choice made to " Size of workpoint symbols " when you next auto detail your current drawing.
'
Auto (not checked) ' lets you enter the work point symbol size number (in millimeters).
page 1 | contents | settings > drawing settings | top
| Sizes | Fonts | Pens | Primary
Dimensions |
Secondary
Dimensions |
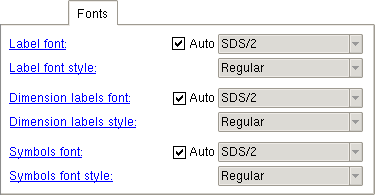
Label font: ![]() Auto or a font . The choice made here applies only to your current drawing (if that drawing is a member detail or a submaterial detail). For a member detail, it applies if you Detail Current Piecemark with templates. It also applies if, after exiting the drawing, you select that drawing for Detail Members with templates . For a submaterial detail, it applies to your current drawing if, after exiting the drawing, you select that drawing for Detail Submaterial with templates .
Auto or a font . The choice made here applies only to your current drawing (if that drawing is a member detail or a submaterial detail). For a member detail, it applies if you Detail Current Piecemark with templates. It also applies if, after exiting the drawing, you select that drawing for Detail Members with templates . For a submaterial detail, it applies to your current drawing if, after exiting the drawing, you select that drawing for Detail Submaterial with templates .
|
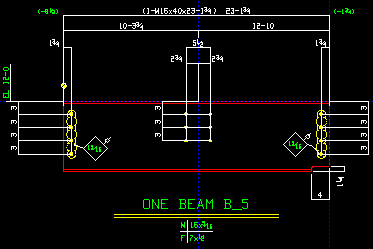
The color green identifies labels in the above example. Labels should not be confused with the text that is a part of bevel symbols , dimensions or weld symbols . |
'
Auto (checked) ' instructs automatic detailing with templates to apply the setup choices made to " Label font " and " Label font style " when you next auto detail your current drawing.
'
Auto (not checked) ' lets you select any font that is listed to be applied to labels . Be sure to also choose the " Label font style " that you want.
Label font style: The style (' Bold ' or ' Bold Italic ' or ' Italic ' or ' Regular ') of the selected " Label font " when " ![]() Auto " is not checked.
Auto " is not checked.
Dimension labels font: ![]() Auto or a font . The choice made here applies only to your current drawing (if that drawing is a member detail or a submaterial detail). For a member detail, it applies if you Detail Current Piecemark with templates. It also applies if, after exiting the drawing, you select that drawing for Detail Members with templates . For a submaterial detail, it applies to your current drawing if, after exiting the drawing, you select that drawing for Detail Submaterial with templates .
Auto or a font . The choice made here applies only to your current drawing (if that drawing is a member detail or a submaterial detail). For a member detail, it applies if you Detail Current Piecemark with templates. It also applies if, after exiting the drawing, you select that drawing for Detail Members with templates . For a submaterial detail, it applies to your current drawing if, after exiting the drawing, you select that drawing for Detail Submaterial with templates .
|
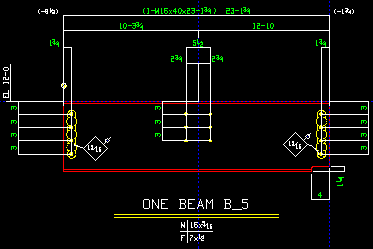
The color green identifies dimension labels in the above example. |
'
Auto (checked) ' instructs automatic detailing with templates to apply the setup choices made to " Dimension labels font " and " Dimension labels style " when you next auto detail your current drawing.
'
Auto (not checked) ' lets you apply any font that is listed to dimension labels. Be sure to also choose the " Dimension labels font style " that you want.
Dimension labels style: The style (' Bold ' or ' Bold Italic ' or ' Italic ' or ' Regular ') of the selected " Dimension label font " when ' ![]() Auto' is not checked.
Auto' is not checked.
Symbols font: ![]() Auto or a font . The choice made here applies only to your current drawing (if that drawing is a member detail or a submaterial detail). For a member detail, it applies if you Detail Current Piecemark with templates. It also applies if, after exiting the drawing, you select that drawing for Detail Members with templates . For a submaterial detail, it applies to your current drawing if, after exiting the drawing, you select that drawing for Detail Submaterial with templates . Note: You do not get weld symbols on submaterials, but you can get bevel symbols.
Auto or a font . The choice made here applies only to your current drawing (if that drawing is a member detail or a submaterial detail). For a member detail, it applies if you Detail Current Piecemark with templates. It also applies if, after exiting the drawing, you select that drawing for Detail Members with templates . For a submaterial detail, it applies to your current drawing if, after exiting the drawing, you select that drawing for Detail Submaterial with templates . Note: You do not get weld symbols on submaterials, but you can get bevel symbols.
|
|||||
|
'
Auto (checked) ' instructs automatic detailing with templates to apply the setup choice made to " Symbols font " and " Symbols font style " when you next auto detail your current drawing.
'
Auto (not checked) ' lets you apply any font that is listed to be used for the text in bevel symbols and weld symbols . Be sure to also choose the " Symbols font style " that you want.
Symbols font style: The style (' Bold ' or ' Bold Italic ' or ' Italic ' or ' Regular ') of the selected " Symbols font " when " ![]() Auto " is not checked.
Auto " is not checked.
page 1 | contents | settings > drawing settings | top
| Sizes | Fonts | Pens | Primary
Dimensions |
Secondary
Dimensions |
| Note: Line Weights defaults set detail sheets to be printed using black lines of various widths. For example, pen 1 (white) draws a very narrow black line. Pen number settings under this tab should be selected before automatic detailing . |
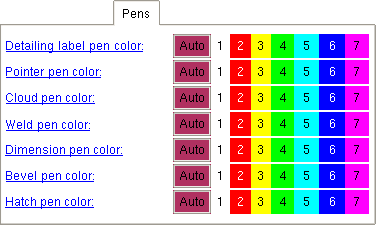
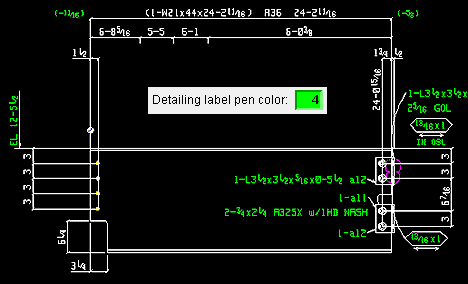
Detailing label pen color: Auto or 1 or 2 or 3 or 4 or 5 or 6 or 7 . The choice made here applies only to your current drawing (if that drawing is a member detail or a submaterial detail). For a member detail, it applies if you Detail Current Piecemark with templates. It also applies if, after exiting the drawing, you select that drawing for Detail Members with templates . For a submaterial detail, it applies to your current drawing if, after exiting the drawing, you select that drawing for Detail Submaterial with templates .
|
' Auto ' instructs automatic detailing with templates to apply the setup choice made to " Detailing label pen color " when you next auto detail your current drawing.
1 or 2 or 3 or 4 or 5 or 6 or 7 sets the on-screen display color of detailing labels and, if you are using the 'SDS2 ' font , it affects the printed thickness (though not the displayed thickness) of that font.
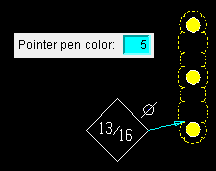
Pointer pen color: Auto or 1 or 2 or 3 or 4 or 5 or 6 or 7 (see note ). The choice made here applies only to your current drawing (if that drawing is a member detail or a submaterial detail). For a member detail, it applies if you Detail Current Piecemark with templates. It also applies if, after exiting the drawing, you select that drawing for Detail Members with templates . For a submaterial detail, it applies to your current drawing if, after exiting the drawing, you select that drawing for Detail Submaterial with templates .
|
' Auto ' instructs automatic detailing with templates to apply the setup choice made to " Pointer pen color " when you next auto detail your current drawing.
1 or 2 or 3 or 4 or 5 or 6 or 7 sets the pen number that will be applied to pointers in your current drawing when you next auto detail that drawing with templates. The pen number sets the Drawing Editor display color. For Home > Export > 2D > Plotting or output using Home > Export > 2D > Export PDF Drawing , the pen number sets the thickness of the pointers.
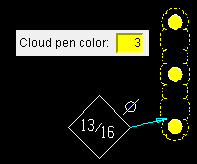
Cloud pen color: 1 or 2 or 3 or 4 or 5 or 6 or 7 (see note ). The choice made here applies only to your current drawing (if that drawing is a member detail or a submaterial detail). For a member detail, it applies if you Detail Current Piecemark with templates. It also applies if, after exiting the drawing, you select that drawing for Detail Members with templates . For a submaterial detail, it applies to your current drawing if, after exiting the drawing, you select that drawing for Detail Submaterial with templates .
|
' Auto ' instructs automatic detailing with templates to apply the setup choice made to " Cloud pen color " when you next auto detail your current drawing.
1 or 2 or 3 or 4 or 5 or 6 or 7 sets the pen number that will be applied to clouds in your current drawing when you next auto detail that drawing with templates. The pen number sets the Drawing Editor display color. For Home > Export > 2D > Plotting or output using Home > Export > 2D > Export PDF Drawing , the pen number sets the thickness of the clouds.
Weld pen color: Auto or 1 or 2 or 3 or 4 or 5 or 6 or 7 (see note ). The choice made here applies to your current drawing if that drawing is a member detail, and if you Detail Current Piecemark with templates. It also applies if, after exiting the drawing, you select that drawing for Detail Members with templates .
|
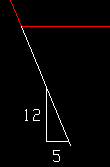
This weld symbol is drawn with pen number ' 1 ' (white). |
' Auto ' instructs member detailing with templates to apply the setup choice made to " Weld pen color " when you next auto detail your current drawing.
1 or 2 or 3 or 4 or 5 or 6 or 7 sets the pen number that will be applied to weld symbols in your current drawing when you next auto detail that drawing with templates. The pen number sets the Drawing Editor display color. For Home > Export > 2D > Plotting or output using Home > Export > 2D > Export PDF Drawing , the pen number sets the thickness of the weld symbols.
Dimension pen color: 1 or 2 or 3 or 4 or 5 or 6 or 7 (see note ). The choice made here applies only to your current drawing (if that drawing is a member detail or a submaterial detail). For a member detail, it applies if you Detail Current Piecemark with templates. It also applies if, after exiting the drawing, you select that drawing for Detail Members with templates . For a submaterial detail, it applies to your current drawing if, after exiting the drawing, you select that drawing for Detail Submaterial with templates .
' Auto ' instructs member detailing with templates to apply the setup choice made to " Dimension pen color " when you next auto detail your current drawing.
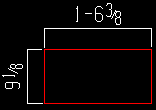
1 or 2 or 3 or 4 or 5 or 6 or 7 sets the pen number that will be applied to dimension lines and legs drawn in your current drawing when you next auto detail that drawing with templates. The pen number sets the Drawing Editor display color. For Home > Export > 2D > Plotting or output using Home > Export > 2D > Export PDF Drawing , the pen number sets the thickness of the dimension lines and legs.
Bevel pen color: Auto or 1 or 2 or 3 or 4 or 5 or 6 or 7 (see note ). The choice made here applies only to your current drawing (if that drawing is a member detail or a submaterial detail). For a member detail, it applies if you Detail Current Piecemark with templates. It also applies if, after exiting the drawing, you select that drawing for Detail Members with templates . For a submaterial detail, it applies to your current drawing if, after exiting the drawing, you select that drawing for Detail Submaterial with templates .
|
This bevel symbol that is drawn with pen number ' 1 ' (white). |
' Auto ' instructs member detailing with templates to apply the setup choice made to " Bevel pen color " when you next auto detail your current drawing.
1 or 2 or 3 or 4 or 5 or 6 or 7 sets the pen number that will be applied to bevel symbols in your current drawing when you next auto detail that drawing with templates. The pen number sets the Drawing Editor display color. For Home > Export > 2D > Plotting or output using Home > Export > 2D > Export PDF Drawing , the pen number sets the thickness of the bevel symbols.
Hatch pen color: 1 or 2 or 3 or 4 or 5 or 6 or 7 (see note ). The choice made here applies only to your current drawing (if that drawing is a member detail or a submaterial detail). For a member detail, it applies if you Detail Current Piecemark with templates. It also applies if, after exiting the drawing, you select that drawing for Detail Members with templates . For a submaterial detail, it applies to your current drawing if, after exiting the drawing, you select that drawing for Detail Submaterial with templates .
' Auto ' instructs member detailing with templates to apply the setup choice made to " Hatch pen color " when you next auto detail your current drawing.
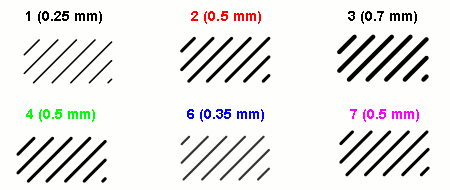
1 or 2 or 3 or 4 or 5 or 6 or 7 sets the pen number that will be applied to hatches in your current drawing when you next auto detail that drawing with templates. The pen number sets the Drawing Editor display color. For Home > Export > 2D > Plotting or output using Home > Export > 2D > Export PDF Drawing , the pen number sets the thickness of the lines that make up the hatch pattern.
The choice made to " Hatch pen color " (in the Drawing Editor ) sets the thickness of the lines that make up the hatch pattern. It also sets the hatch's on-screen display color. The actual color of the hatch pattern, when printed, is defined in Line Weights . By default, all drawing pens are defined to be the color black.
|
|||
| Same hatch pattern, six different pen numbers . The pen width (mm) for each pen number is written in parentheses. The pen widths are assigned to pen numbers in Line Weights . |
Note: " Hatch pen color " does not apply to most auto detailed hatches; for example, it doesn't apply to cut surface hatching .
page 1 | contents | settings > drawing settings | top
| Sizes | Fonts | Pens |
Primary
Dimensions |
Secondary
Dimensions |
|
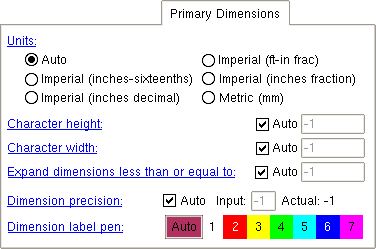
Units: Auto or Imperial (feet-in frac) or Imperial (inches-sixteenths) or Imperial (inches fraction) or Imperial (inches decimal) or Metric (mm) . The choice made here applies only to your current drawing (if that drawing is a member detail or a submaterial detail). For a member detail, it applies if you Detail Current Piecemark with templates. It also applies if, after exiting the drawing, you select that drawing for Detail Members with templates . For a submaterial detail, it applies to your current drawing if, after exiting the drawing, you select that drawing for Detail Submaterial with templates ..
|
|
' Auto ' instructs automatic detailing with templates to apply the setup choice made to " Units " when you next auto detail your current drawing.
' Imperial (ft-in frac) ' expresses distance measurements (in your current drawing, when it is re-detailed) in feet and inches (e.g., ' 2-2 1/2 ' signifies two feet, two-and-a-half inches).
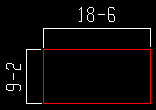
' Imperial (inches-sixteenths) ' sets distance measurements to be expressed in inches and fractions of an inch with a dash separating the units (e.g., two feet and one-half inch is ' 24-8 ').
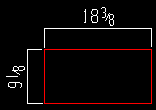
' Imperial (inches fraction) ' sets distance measurements to be expressed in inches and fractions of an inch (e.g., two feet and one-half inch is ' 24 1/2 ').
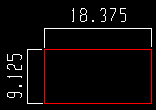
' Imperial (inches decimals) ' sets distance measurements to be expressed in decimal inches (e.g., two feet and one-half inch is ' 24.5 ').
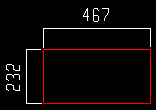
' Metric ' expresses distance measurements in millimeters.
Character height: ![]() Auto or a character height . The choice made here applies only to your current drawing (if that drawing is a member detail or a submaterial detail). For a member detail, it applies if you Detail Current Piecemark with templates. It also applies if, after exiting the drawing, you select that drawing for Detail Members with templates . For a submaterial detail, it applies to your current drawing if, after exiting the drawing, you select that drawing for Detail Submaterial with templates .
Auto or a character height . The choice made here applies only to your current drawing (if that drawing is a member detail or a submaterial detail). For a member detail, it applies if you Detail Current Piecemark with templates. It also applies if, after exiting the drawing, you select that drawing for Detail Members with templates . For a submaterial detail, it applies to your current drawing if, after exiting the drawing, you select that drawing for Detail Submaterial with templates .
|
'
Auto (checked) ' instructs automatic detailing with templates to apply the setup choice made to " Character height " when you next auto detail your current drawing.
'
Auto (not checked) ' lets you enter the character height (in millimeters) to the primary dimension labels (upper label on a dual dimension, only label on a mono dimension). This value is independent of the " Drawing scale " of a drawing. Assuming that the sheet a drawing is placed on has a scale of 1:1 and you do not re-scale the labels and the printer does not adjust the scale, this will be the actual height of characters on the plotted sheet.
Character width: ![]() Auto or a width/height ratio . The choice made here applies only to your current drawing (if that drawing is a member detail or a submaterial detail). For a member detail, it applies if you Detail Current Piecemark with templates. It also applies if, after exiting the drawing, you select that drawing for Detail Members with templates . For a submaterial detail, it applies to your current drawing if, after exiting the drawing, you select that drawing for Detail Submaterial with templates .
Auto or a width/height ratio . The choice made here applies only to your current drawing (if that drawing is a member detail or a submaterial detail). For a member detail, it applies if you Detail Current Piecemark with templates. It also applies if, after exiting the drawing, you select that drawing for Detail Members with templates . For a submaterial detail, it applies to your current drawing if, after exiting the drawing, you select that drawing for Detail Submaterial with templates .
|
'
Auto (checked) ' instructs automatic detailing with templates to apply the setup choice made to " Character width " when you next auto detail your current drawing.
'
Auto (not checked) ' lets you enter the width/height ratio of characters of the primary dimension labels (upper label on a dual dimension, only label on a mono dimension).
Font dependencies: For a TrueType font, a ratio of ' 0.6 ' renders that font at its native width. A ratio larger than ' 0.6 ' stretches the font. A ratio less than ' 0.6 ' compacts the font. For the ' SDS2 ' font, ' 0.4 ' is the default choice.
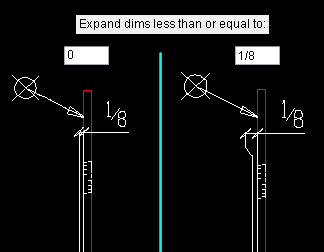
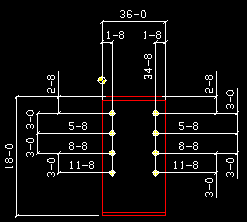
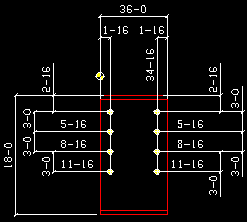
Expand dimensions less than or equal to: ![]() Auto or a distance . The choice made here applies only to your current drawing (if that drawing is a member detail or a submaterial detail). For a member detail, it applies if you Detail Current Piecemark with templates. It also applies if, after exiting the drawing, you select that drawing for Detail Members with templates . For a submaterial detail, it applies to your current drawing if, after exiting the drawing, you select that drawing for Detail Submaterial with templates .
Auto or a distance . The choice made here applies only to your current drawing (if that drawing is a member detail or a submaterial detail). For a member detail, it applies if you Detail Current Piecemark with templates. It also applies if, after exiting the drawing, you select that drawing for Detail Members with templates . For a submaterial detail, it applies to your current drawing if, after exiting the drawing, you select that drawing for Detail Submaterial with templates .
|
'
Auto (checked) ' instructs automatic detailing with templates to apply the setup choice made to " Expand dimensions less than or equal to " when you next auto detail your current drawing.
'
Auto (not checked) ' lets you enter a distance ( 0 to 1 inch imperial ; 0 to 25 mm metric ), which causes dimensions of that distance or smaller to be expanded if expanding does not interfere with reading of the drawing.
Dimension precision: ![]() Auto or a precision . The choice made here applies only to your current drawing (if that drawing is a member detail or a submaterial detail). For a member detail, it applies if you Detail Current Piecemark with templates. It also applies if, after exiting the drawing, you select that drawing for Detail Members with templates . For a submaterial detail, it applies to your current drawing if, after exiting the drawing, you select that drawing for Detail Submaterial with templates .
Auto or a precision . The choice made here applies only to your current drawing (if that drawing is a member detail or a submaterial detail). For a member detail, it applies if you Detail Current Piecemark with templates. It also applies if, after exiting the drawing, you select that drawing for Detail Members with templates . For a submaterial detail, it applies to your current drawing if, after exiting the drawing, you select that drawing for Detail Submaterial with templates .
|
|||||
'
Auto (checked) ' instructs automatic detailing with templates to apply the setup choice made to " Dimension precision " when you next auto detail your current drawing.
'
Auto (not checked) ' lets you enter a precision (to 1/32 inch imperial ; to 0.1 mm metric ) that you want automatic detailing with templates to apply to dimensions on drawings.
Note: This does not affect " Bolt diameter " or the " Material thickness " of a rectangular plate , round plate , bent plate , rolled plate , flat plate layout , bent plate layout and flat bar . Also, a plate may be the specified gage (GA), regardless of the dimension precision.
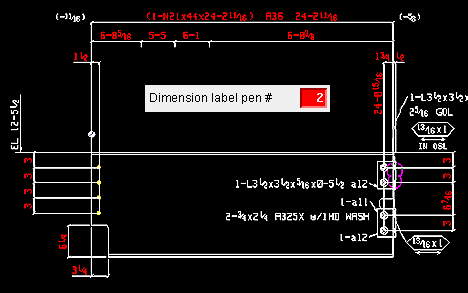
Dimension label pen color: Auto or 1 or 2 or 3 or 4 or 5 or 6 or 7 (see note ). The dimension label is the label (usually specifying a distance) which appears on a dimension or arc dimension . The choice made here applies only to your current drawing (if that drawing is a member detail or a submaterial detail). For a member detail, it applies if you Detail Current Piecemark with templates. It also applies if, after exiting the drawing, you select that drawing for Detail Members with templates . For a submaterial detail, it applies to your current drawing if, after exiting the drawing, you select that drawing for Detail Submaterial with templates .
|
' Auto ' instructs automatic detailing with templates to apply the setup choice made to " Dimension label pen color " when you next auto detail your current drawing.
1 or 2 or 3 or 4 or 5 or 6 or 7 sets the on-screen display color of dimension labels and, if you are using the 'SDS2 ' font , it affects the printed thickness (though not the displayed thickness) of that font.
page 1 | contents | settings > drawing settings | top
| Sizes | Fonts | Pens | Primary
Dimensions |
Secondary
Dimensions |
|
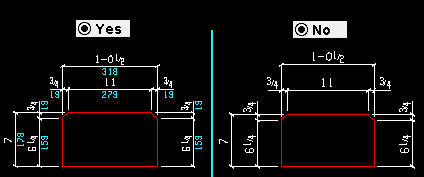
Show secondary dimensions: Auto or Yes or No . The choice made here applies only to your current drawing (if that drawing is a member detail or a submaterial detail). For a member detail, it applies if you Detail Current Piecemark with templates. It also applies if, after exiting the drawing, you select that drawing for Detail Members with templates . For a submaterial detail, it applies to your current drawing if, after exiting the drawing, you select that drawing for Detail Submaterial with templates .
|
The primary dimension is placed above the dimension line. The secondary dimension is below it. |
If this box is checked (
), secondary dimension labels will be generated along with primary dimension labels. For example, the box might be checked so that imperial and metric distances can be dimensioned simultaneously.
If the box is not checked (
), only primary dimension labels will be generated when dimensions are created.
Units: Same as the primary dimension " Units ," except that this applies to secondary dimension labels .
Tip: If you selected imperial dimensioning as the primary dimension " Units ," you may want to select ' Metric ' here. If you selected ' Metric ' as the primary dimension " Units ," you may want to select ' Imperial (feet-in frac) ' here.
Character height: Same as the primary dimension " Character height ," except that this applies to secondary dimension labels .
Character width/height ratio: Same as the primary dimension " Character width/height ratio ," except that this applies to secondary dimension labels .
Pen: Same as the primary dimension " Dimension label pen ," except that this applies to secondary dimension labels .
page 1 | contents | settings > drawing settings | top
To close Drawing Presentation :
"OK" (or the Enter key) closes the Drawing Presentation window and saves the overrides on it with your current drawing, presumably so that the next time that drawing undergoes member detailing or submaterial detailing, those override settings are applied to the detail.
To permanently save your override changes, you need to save your current drawing. If you close your current drawing without saving changes made to it, any changes to override settings that you have applied to that drawing will be forgotten. On the other hand, a Drawing Overrides List will show active overrides (non-auto settings) that have been applied to your current drawing even if that drawing has not yet been saved.
"Cancel" (or the Esc key or the ![]() button) closes this window without saving any changes made to it.
button) closes this window without saving any changes made to it.
"Reset" undoes all changes made to this window since you first opened it. The window remains open.
page 1 | contents | settings > drawing settings | top
