The Parametric Clevis Material window
| Quick Notes |
Options :
Also see :
- Parametric Point Maps
- Objects, Attributes, Methods and Functions
- Clevis Material (similar window - Modeling )
Warning : If your startup code specifies imperial Units("...") , make entries to distance fields on this window in decimal inches, not fractions. Also, do not use hyphens (-). If you enter a fraction using integers, Python truncates the results of the division operation to an integer (examples: 1/8 = 0 ; 5/4 = 1 ). If you enter fractions with decimal points, Python calculates the precise decimal value (examples: 1.0/8.0 = .125 ; 5.0/4.0 = 1.25 ). If you enter a hyphen, Python interprets the hyphen as a minus sign (examples: 1-2 = -1 ; 3-2 = 1 ). See numbers (floating point numbers and integers).
To enter a dimension string and convert it to a floating point distance that is properly factored based on the startup code Units("...") , you can use the dim("...") function. See the warning above for an explanation of why the dim() function is needed.

|
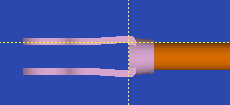
Here's what the clevis generated in the following script looks like . The end of the clevis sticks out 7.0 inches to the left of the left end of the round bar . |
| For the parametric script that follows to give results like those shown above, the round bar must have been modeled so that the member's left end matches the material's left end. This means that, when the round bar was added as a miscellaneous member, the first point located must have been closer to the 0, 0, 0 global coordinate than the second point located. Also, the round bar needs to have a bar diameter " Section size " of 2.5 inch and have its " Depth reference point " set to ' Center '. A clevis named "CV5" must exist in your local shape file and be similar to the "CV5" that is shown above. | |
# Adds a clevis designed for a 2 1/2 inch round bar.
# The clevis is added to the left end of the round bar.
from clevis import *
from param import Units, ClearSelection
from member import MemberLocate
Units("feet")
ClearSelection()
# clevis begin
cv1 = Clevis()
cv1.member = MemberLocate("Locate member")
cv1.pt1 = cv1.member.left_location + cv1.member.translate(-7.0, -1.25, 0)
cv1.pt2 = cv1.pt1 + cv1.member.translate(24, -1.25, 0)
cv1.section_size = "CV5"     # "CV5" must reside in your local shape file
cv1.grip = 2
cv1.pin_hole_dia = 1.5
cv1.rod_hole_dia = 2.5          # equals the round bar diameter
cv1.thread_type = "Left handed"
cv1.mtrl_type = "Clevis"
cv1.finish = "Red oxide"
cv1.color = (160,123,153)
cv1.ref_pt_offset = (0, 0, 0)
cv1.add()
cv1.rotate(cv1.member, (-90.000000, 0.000000, 0.000000))
# clevis end
ClearSelection()
Note: -7.0 in the expression cv1.member.translate(-7.0, -1.25, 0) specifies a distance of 7 inches to the left of the left end of the round bar. The value 1.25 is half of the bar's diameter. As mentioned above, the round bar must be modeled properly for this parametric to work properly.
------ General settings ------
Section size ( obj . SectionSize or obj.section_size ): Any clevis section that is listed in the local shape file . If the box for " String " is checked ( ![]() ), validation requires an entry of a section size that is in the local shape file. If the box for " String " is not checked (
), validation requires an entry of a section size that is in the local shape file. If the box for " String " is not checked ( ![]() ), you can enter a variable or expression that will return a string from the local shape file.
), you can enter a variable or expression that will return a string from the local shape file.
To enter a section size : With " String " checked (
), you can type in the section size that you want, or press the "file cabinet" browse button (
) and double-click any section that is on the list of available materials in the local shape file . For example, if you enter C1 , the resulting line of parametric code reads: obj.SectionSize = "C1" (where obj is the " Object name "). Note from this example that you do not have to put the section size string in quotes.
To enter a variable : With " String " not checked (
), you can enter a variable or expression that will return a string that is the section size of a clevis. For example, if you previously added a clevis with the " Object name " of cv1 and this clevis is cv2 and you want this clevis to be assigned the same section size as cv1 , you could change the entry to this field to cv1.SectionSize . The resulting line of parametric code would read: cv2.SectionSize = cv1.SectionSize . Note from this example that cv1.SectionSize is not in quotes, since cv1.SectionSize itself is not a string, though it returns a string.
Piecemark: You can add a line of code such as obj.MinorMark = "xxx" or obj.Piecemark = "xxx" in a text editor.
For submaterials ( obj . MinorMark or obj.mark ):
If you Run a script that does not include obj.MinorMark , SDS2 piecemarking looks for materials in the current Job that are physically identical to this material and assigns to this material the same submaterial mark assigned to those materials. If no matching materials are found, piecemarking assigns this material a submaterial mark using the appropriate piecemark prefix listed in Home > Project Settings > Fabricator > Member and Material Piecemarking > the " Prefixes " tab .
If you Run a script with obj.MinorMark = "xxx" , SDS2 piecemarking applies that submaterial mark ( xxx ) to the parametrically added material if no other material has yet been assigned that mark. It also applies that mark ( xxx ) if other materials that have that mark ( xxx ) are exactly like the parametrically added material. If the model contains materials with a different submaterial mark ( yyy ) that are exactly like the parametrically added material, the submaterial mark of those materials ( yyy ) is re-named to that of the parametrically added material ( xxx ). If the model contains materials with the same submaterial mark that the script designates to be assigned to the parametrically added material ( xxx ) and those materials are different than the parametrically added material, the submaterial mark in the script is not applied -- instead you get a warning and the parametrically added material is assigned a different submaterial mark using the appropriate piecemark prefix listed in Home > Project Settings > Fabricator > Member and Material Piecemarking > the " Prefixes " tab .
For miscellaneous members ( obj . Piecemark or obj.piecemark ):
If you Run a script that does not include an obj.Piecemark , the SDS2 progam that the script is run in assigns a system piecemark to the parametrically added member,
If you Run a script with an obj.Piecemark , be careful. You are responsible for ensuring that members that have been assigned the same user piecemark are physically the same. SDS2 will not do this for you.
Tip 1: A Python script can read the submaterial mark of a material as shown in the following example.
# Prints the piecemark of the material the user selects.
from mtrl_list import MtrlLocate
mtrl1 = MtrlLocate("Select material", "Single")
print("The material piecemark is: ", mtrl1.MinorMark)
Tip 2: A script can also read member piecemarks (user or system).
# Prints the piecemark of the member that the user selects.
from member import MemberLocate
from param import ClearSelection
mem1 = MemberLocate("Select a member")
print("The piecemark is: ", mem1.Piecemark)
ClearSelection()
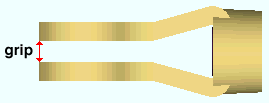
Grip ( obj . Grip or obj.grip ): The distance between the prongs of the clevis. A distance is a floating point number in mm or inches, depending on the startup code Units(' ... ') .

Example: Entering a specific distance results in the grip of the material being that set value when this script is Run. If you enter 2.0 , the result would be a line of parametric code that reads: obj.Grip = 2.0 (where obj is the " Object name ").
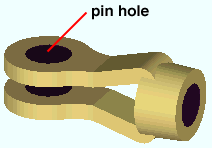
Pin hole diameter ( obj . PinDiameter or obj.pin_hole_dia ): The diameter of each of the two holes in the prongs of the clevis. A diameter is a floating point number in mm or inches, depending on the startup code Units(' ... ') . If you enter a diameter that is greater than the " Maximum pin diameter " set in the local shape file for the currently selected " Section size ," the resulting pin hole is the diameter in the local shape file.

Example 1: Entering a specific distance results in the diameter of the two pin holes being that set value when this script is Run. If you enter 0.75 , the resulting line of parametric code reads: obj.PinDiameter = 0.75 (where obj is the " Object name ").
Example 2: You could set the diameter of these holes to match the pin (a round bar) previously defined in the code. For example, if you were to enter pin.BarDiameter , the resulting line of parametric code would read: obj.PinDiameter = pin.BarDiameter (where obj is the " Object name ").
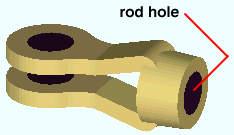
Rod hole diameter ( obj . RodDiameter or obj.rod_hole_dia ): The diameter of the hole for inserting the rod. A diameter is a floating point number in mm or inches, depending on the startup code Units(' ... ') . If you enter a diameter that is greater than the " Maximum tap diameter " set in the local shape file for the currently selected " Section size ," the resulting rod hole is the diameter in the local shape file.

Example: If you were to enter 0.75 , the resulting line of parametric code would read: obj.RodDiameter = 0.75 (where obj is the " Object name ").
Thread type ( obj . ThreadType or obj.thread_type ): "None" or "Left handed" or "Right handed" . Other than in the Report Writer and in the Clevis Material window, this information is not referenced SDS2. In the parametric code, the choice you make is designated with a string ( "None" or "Left handed" or "Right handed" ).
Example: Selecting Left handed results in a line of parametric code that reads: cv1.ThreadType = "Left handed" (where obj is the " Object name ").
Surface finish ( obj . SurfaceFinis h or obj.finish ): "None" or "Sand Blasted" or "Red Oxide" or "Yellow Zinc" or "Gray Oxide" or "Blued Steel" or "Galvanized" can be selected on the list box ( ![]() ) for this field. The choice you make here assigns the selected string as the SurfaceFinish attribute for this " Object name " in the parametric code.
) for this field. The choice you make here assigns the selected string as the SurfaceFinish attribute for this " Object name " in the parametric code.
|
||||||
| The colors of materials on Drawing Editor erection views in ' Solid ' are based on their surface finish. |
Example: Selecting Yellow Zinc results in a line of parametric code that reads: obj.SurfaceFinish = "Yellow Zinc" (where obj is the " Object name ").
Also note: When you export a KISS file using Model as the " Data source ," surface finish data on materials are compiled into the P lines in the KISS download. Surface finish data can also be output to a fabtrol_assembly_parts_list.XSR file.
Color ( obj . MaterialColor3d or obj.color ): A "named_color" or a custom color . The choice you make here assigns three values (RGB values) from 0 to 255, which define the color of the clevis when it is displayed in one of the three solid forms .
The "named_colors" are set up on the Predefined Colors window. The color swatch next to the list box (
) displays the color that is selected. Example: Selecting Medium_beam results in a line of parametric code that reads: obj.MaterialColor3d = "Medium_beam" (where obj is the " Object name ").
Select Custom Color (last option on the menu) to launch your operating system's color picker and define any color you like. Example: Selecting a custom color results in a line of parametric code that reads: obj.MaterialColor3d = (r, g, b) where r or g or b is an integer value from 0 to 255 and obj is the " Object name ".
![]()
![]()
![]()
![]()
" General Information " opens the Parametric General Information window so that you can assign a " Description " or " Material usage description " or " Material routing " to this material.
"OK" (or the Enter key) closes this window and saves your changes to RAM.
"Cancel" (or the Esc key) closes this window without saving any changes.
"Reset" undoes all changes made to this window since you first opened it. The window remains open.


