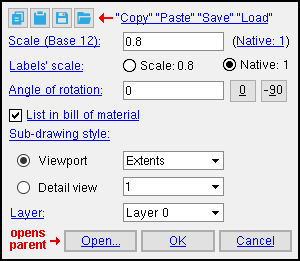
The Edit Sheet Item window

You can rotate or re-scale or change the viewport on a sheet item without affecting the original drawing (job standard detail, member detail, or etc.) that it is linked to. This means that changing a sheet item's " Scale " does not affect the " Drawing scale " of the parent drawing.
Sheet items are not just for sheets. You can also place them on sheet outlines, erection views and member detail. Click here for more information.
Also see :
- Sheet item (topic)
- Viewport (topic)
- Sheet Item Add (also lets you change scale & rotation)
- Placing details onto detail sheets (topic)
- Placing submaterials on gather sheets (topic)
- From erection views to sheets (topic)
- Explode (tool that stops a sheet item from being a sheet item)
- Multi Items Edit (related window)
page 1 | contents | objects > sheet items > edit | top
To open the Edit Sheet Items window :
Method 1 : While in Select Items mode on any drawing or sheet that has a sheet item on it, double-click that sheet item.
Methods 2, 3 & 4 : Select a group of one or more sheet item(s), then right-click and choose " Edit " on the context menu . Instead of using the context menu, you can use a keyboard shortcut , or choose Objects > Sheet Items > Edit . Multiple sheet items are edited if multiple sheet items are selected.
Note: If you select items in addition to sheet items then right-click and choose " Edit " on the context menu , the Multi Items Edit window opens.
page 1 | contents | objects > sheet items > edit | top
 " Copy " " Paste " " Save " " Load " buttons :
page 1 | contents | objects > sheet items > edit | top
------ Settings ------
Scale (Base 10 or Base 12) : The sheet scale of the sheet item that is currently selected.
(Base 12) means imperial dimensioning is being used. Enter the number of inches on the selected sheet item that you want to represent 1 foot in the shop or construction site.
(Base 10) means metric dimensioning is being used. Enter the number of millimeters on the selected sheet item that you want to represent 10 mm on the actual materials.
(Native: xxx) tells you the " Drawing scale " of the parent drawing that this sheet item is linked to. If, for example, you have scaled labels (see below ) and don't like the results, first reset the sheet item back to the " Native " scale, then rescale the sheet item again.
Note: Changing a sheet item's scale does not affect the " Drawing scale " in the Drawing Data Panel. It only affects that sheet item's scale on the sheet or drawing it is placed on. Multiple sheet items that are linked to the same original drawing can be placed on the same sheet at different scales, for example, so that one drawing shows a zoomed-in view. A different " Viewport " can be used for different sheet items linked to the same original drawing, and you can set " List in bill of material " so that bill information is compiled only once for multiple member details on the same sheet.
Also not affected by " Scale ": The sizes of labels , piecemarks , section sizes , pointer arrowhead , dimension terminals (
) and workpoint symbols are independent of the " Scale ." The sizes of labels and dimension labels can be changed using "
Labels' scale " (below) or on their edit windows. Other objects that are independent of scaling can also be resized using their edit windows.
Labels' scale: ![]() Scale or
Scale or ![]() Native . This applies if you have changed the " Scale " of the sheet item. If you have not changed the " Scale ," both ' Scale ' and ' Native ' are the same scale, and it therefore would make no difference which one you choose.
Native . This applies if you have changed the " Scale " of the sheet item. If you have not changed the " Scale ," both ' Scale ' and ' Native ' are the same scale, and it therefore would make no difference which one you choose.
'
Scale ' changes labels and dimension labels to the " Scale " that is entered. Tip: See (Native: xxx) if you don't like the way that labels look as a result of your doing this.
'
Native ' keeps labels and dimension label text on this sheet item at the " Native " scale -- the same size they were before the " Scale " was changed. You might want to keep labels the same size while changing the scale of the rest of the drawing in order to maintain uniformity in the sizes of labels on different sheet items that appear on this same sheet.
Angle of rotation: The positive or negative angle between -360 and 360 degrees that the selected sheet item has been rotated.
' 0 ' degrees means the sheet item is not rotated. If you rotate the sheet item and later want to unrotate it, just open this window and enter ' 0 ' (zero).
Negative degrees rotates the sheet item clockwise.
Positive degrees rotate the sheet item counterclockwise.
List in bill of material: ![]() or
or ![]() . This applies when the sheet item is a member detail on a detail sheet that has a bill of material on it.
. This applies when the sheet item is a member detail on a detail sheet that has a bill of material on it.
If this box is checked (
), any bill data associated with this member detail is shown in the bill of material on this sheet and will be printed when this sheet is plotted. The bill data will also be included in export files and reports and in calculations for the total weight line .
If the box is not checked (
), the bill of material information associated with the bill of material will not appear in the bill of material on this sheet and will not be inculded in the calculation for the total weight line . Also, bill information will not be included in the export file that is generated when you Fabtrol Export or KISS Export with output set to ' BOM ' and select by sheets (
Detail sheets ). This also turns off the output of bill information for the following types of reports: Bill of Material Plot Order by Sheet , Bill of Material Report 1 by Sheet , Bill of Material Report 2 by Sheet , Bill of Material Report 3 by Sheet , Field Bolts For Members by Seq., Select by Sheet , Field Bolts For Members by Zone, Select by Sheet , EJE Export , Field Bolts Point To Point by Sheet , Field Bolt Listing From Sheet BOM , Field Bolt Summary From Sheet BOM , Material Summary, Select by Sheet , Material Summary by Sequence, Select by Sheet , Material Summary by Zone, Select by Sheet , Shop Bolt Listing From Sheet BOM , Shop Bolt Summary From Sheet BOM ,
Applications : You might use this option, for example, if you have placed half of a detail on one sheet, the other half on another, and you want bill data only on the second sheet. You should also use this option to prevent double listings in the bill when you have placed the same detail on the same sheet twice. You might, for example, place the same detail on the same sheet twice to show each half of the detail separately.
Sub-drawing style: ![]() Viewport or
Viewport or ![]() Detail view .
Detail view .
'
Viewport ' lets you set a " Viewport " to mask the area of a sheet item that is outside its border. This applies to any sheet item that has been placed on a sheet or other type of drawing using Sheet Item Add . A viewport masks the area of a sheet item that is outside its border, while displaying the area that is within its border. The viewport that you select here becomes the active viewport on the sheet item when you press " OK " to close this window.
Extents 

Choose ' Extents ' or ' Custom ' or ' User-named '
'Extents'

'Custom'

' Extents ' is the default viewport that is automatically created for each sheet item. It shows the entire sheet item. Choosing ' Extents ' results in the entire sheet item being shown when you press " OK ."
' Custom ' indicates that an ' Extents ' or ' User-named ' viewport has been adjusted manually by the user. When an ' Extents ' or ' User-named ' viewport is re-sized or re-shaped , a copy of the original viewport is made, and that copy is the ' Custom ' viewport.
' User-named ' can be any viewport (with any name) that has been created on the original drawing using Viewport Add .
To create a ' Custom ' viewport from an ' Extents ' or ' User-named ' viewport: Select ' Extents ' or ' User-named ' as the active viewport, then press " OK ." Re-size or re-shape the viewport. As soon as you start to re-size or re-shape the viewport, a different viewport -- named ' Custom ' -- is selected as the " Viewport ." The original viewport (' Extents ' or ' User-named ') is unaffected and will be its original size and shape if you select it as the active " Viewport " again.
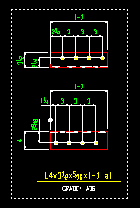
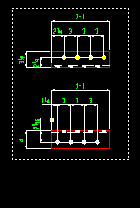
Applications: You might use viewports at different locations on a drawing if you are placing that drawing as a sheet item on more than one drawing or sheet. Or you can place the same drawing as a sheet item on the same drawing or sheet twice, then set custom viewports (or user-named viewports) so that only the left half of the drawing is shown on the one sheet item, while only the right half is shown for the other sheet item. Only the area inside of a viewport is plotted.
'
Detail view ' applies when the sheet item you are editing is a detail view drawing or the original creating parent drawing . It lets you select from a list box the name of the detail view that you want to be shown on your current drawing. The name shown in the list box matches the " Annotation " that was entered when the detail view was created.
a 

Select ' a '
The list box for " Detail view " is populated with the names of detail views associated with the sheet item. In the above example, the detail view is named a .
Layer: The layer of your current drawing that this sheet item is on.
On a sheet or sheet outline : Unless you have added a layer using Layer Add or the Layer Panel, there will be only one layer listed (' Layer 0 '). Consequently, all graphics will be on that one layer.
On a member detail or erection view : The default selected layer is the " User annotation " layer. The selected layer is the layer that subsequently added graphics -- including sheet items -- are added to.
page 1 | contents | objects > sheet items > edit | top
To close this window, etc .
![]()
![]()
![]()
"Open..." starts up another session of the Drawing Editor and automatically opens the original drawing that this sheet item is linked to. Full Drawing Editor functionality is available to you for editing that drawing (or even other drawings), without restrictions.
To update the sheet item: Choose File > Save or File > Exit while in the drawing that you opened (by pressing " Open ... ") from this window. Then press " OK " on this window.
"OK" (or the Enter key) closes this window and applies your changes to the sheet item (drawing on a sheet or another drawing) that you just edited. Note: You must Save changes made to the affected sheet item using this window in order to make your changes permanent. You can Undo before or after you Save.
If you set " Viewport " to ' Extents ', the clipping boundary of the sheet item will revert back to its default size and shape after this window closes.
If you pressed " Open ... " to start another Drawing Editor session and made changes and did a File > Save on the drawing that the sheet item is linked to, the sheet item is updated when you press " OK ."
"Cancel" (or the Esc key or the ![]() button) closes this window without changing the sheet item .
button) closes this window without changing the sheet item .
Note: " Cancel " has no effect on changes made to drawings using " Open ... "
page 1 | contents | objects > sheet items > edit | top


