 Load S3D Neutral File ( Modeling )
Tool summary :
Also see :
- Modeling (where Load S3D Neutral File is a tool)
- Save S3D Neutral File (to save an S3D neutral file)
- Importing items to a project (index)
![]() Example :
Example :
| Load S3D Neutral File requires the purchase of an SDS2 S3D license. |
|
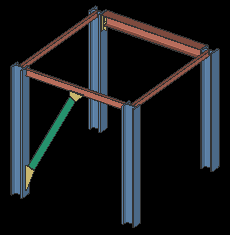
1 . The 3D model in your current SDS2 job . Modeling is still in progress by an offsite modeler. The other modeler could be using Smart 3D (S3D), or SDS2. |
|
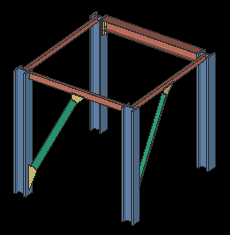
2 . Later , you receive a S3D neutral file from the offsite modeler. That neutral file adds a vertical brace. |
|
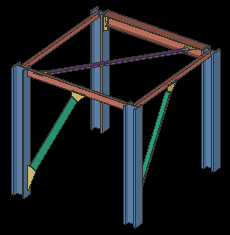
3 . Finally , you receive an even more recent neutral file from the offsite modeler. This third model has the extra vertical brace from the second model, but has an added horizontal brace as well. |

When you " Load S3D Neutral File ," the changes from the neutral file that are available to your model can be limited by the import type that you choose.
|
4 . When you import the final neutral file into your 3D model using ' Import as is ', all of the changes from the third model can be made to your model. This includes both the new vertical and the horizontal brace. You can use the Roundtrip window to exclude elements and further limit the changes that are made to your model from the neutral file. |
|
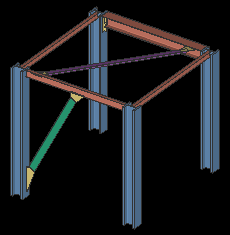
5 . When you import the final neutral file using ' Import changes since ' , using as a comparison file the previous neutral file you received, only the change made since the creation of the second file -- the new horizontal brace -- can be made to your model. |
![]() Step-by-step instructions for importing an S3D neutral file :
Step-by-step instructions for importing an S3D neutral file :
| Load S3D Neutral File requires the purchase of an SDS2 S3D license. |
1 . While in Modeling , open the Load neutral model window using one (1) of the following methods:
▸ Click the Load S3D Neutral File icon. The icon can be taken from the group named ' Model ' and placed on the ribbon.
▸ Load S3D Neutral File can also be configured to be invoked using a keyboard shortcut , the context menu , or a mode . For the lightning interface, this configuration is done using Customize Interface .
2 . On the Load neutral model window, do the following:
2a : Browse to the file folder (
) and select the neutral file (.ntl) that you want to import.
2a : Choose from one of the following alternatives:
Alternative 1 : Press Enter or press " OK" at the bottom of the Load... window to close it. Go to step 3.
Alternative 2 : Press " Cancel" at the bottom of the Load neutral model window to close the window without importing a file. Do not continue.
3 . On the Import window, do the following:
3a : Select one (1) of the following import types:
' Import as is ' or
' Import as is ' will import all differences between the model you are importing and the model in your current Job .
' Import changes since ' will let you import the changes made since the 3D model in the file you choose here, for this import type, was exported. By pressing the "file cabinet" browse button (
) , you can chose your last saved neutral file, or the last neutral file you received from another SDS2 user or from an Smart 3D user. The model in this file will become your comparison model.
3b (when applicable) : If you chose the ' Import changes since ' import type, you must press the "file cabinet" browse button (
3c : Choose from one of the following alternatives:
Alternative 1 : Press " OK" at the bottom of the Import window to close it, or press Enter . The Roundtrip window opens.
Note: If you chose the ' Import changes since ' import type but did not perform step 3b, you will receive an alert informing you that you must choose a base neutral file.
Alternative 2 : Press " Cancel" at the bottom of the Select... window to close it without importing a file or retaining the choice that you might have made on the window. You will not be able to continue to step 4.
4 . From the Roundtrip window, do the following:
4a : Choose the elements from the neutral model that you want to import. Where there are differences between entities in your current Job and the analogs to those entities in the neutral file, they will appear in the Elements list. You may choose any or all of these elements and add them to the Import Items list. If the neutral file contains elements which exactly match elements in your current Job, those elements will be excluded from the Elements list, and you will not be given the option to import them. If you chose the ' Import changes since ' import type, the Elements list will be further limited to the differences between the neutral file chosen in step 2, and the comparison file chosen in step 3b.
4b : Choose from one of the following alternatives:
Alternative 1 : Press " OK" at the bottom of the Roundtrip window to close it, or press Enter .
Alternative 2 : Press " Cancel" at the bottom of the Roundtrip window to close it without importing any elements or retaining any choices that you might have made on the window. You will not be able to continue to step 5.
5 . An Importing neutral file progress bar appears on screen as the elements selected in step 4 are imported. When the operation is done, press the " OK " button at the bottom of the window.
6 . Members in your model which have been changed due to information imported from the neutral file will be displayed in stick form. To see the results of this import in solids form, you will need to Process and Create Solids .
As a result of an import, new members ( beams , columns , vertical brace , horizontal braces, joists only) may be added or modified in your current Job .
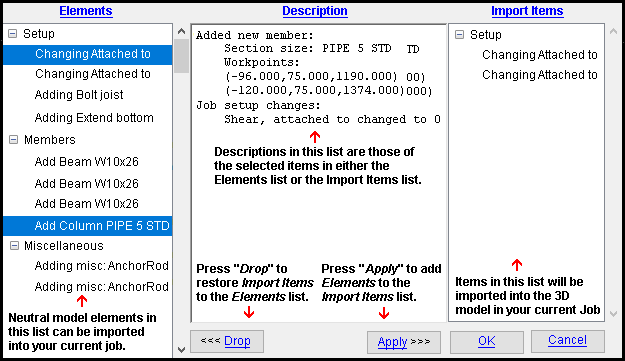
The Elements and Import Items lists:
These are the elements that you can import into your current Job from the neutral model. Elements are listed in either list provided that they are different from entities in your current Job, and different from entities in the comparison model if you specified one. Each neutral model element or import items is shown as an indented item on one of the lists. Only when you select one or more of the Elements and " Apply " them to the Import items list will they be imported into your current Job.
Tip 1: Click a minus symbol [-] to hide indented items. Click a plus symbol [+] to show indented items. Indented items are subclasses of the class they are indented under.
Tip 2: To select multiple indented items, click and hold down Ctrl to select them, or click and hold down Shift to select a group of items.
Tip 3: Select a class to select all the indented items under the class. You may select multiple classes, just as you can select multiple indented items.
To import elements from the neutral model: Select the desired indented items in the Elements list and press " Apply ." All the selected elements will be added to the Import items list.
To import all of the elements, simply select all the classes in the Elements list and press " Apply ." All the elements will be added to the Import items list.
To remove elements from the Import items list: Select the items in the Import Items list and press " Drop ." All the selected elements will be returned to the Elements list.
When one or more elements are selected in either the Elements list or the Import Items list, a description for each selected item is displayed in the Description field.
Exception: Indented items in the Miscellaneous class have no description.
"Apply" removes any elements selected in the Elements list and adds them to the Import items list.
"Drop" removes any elements selected in the Import items list and adds them to the Elements list.
"OK" imports entities in the Import Items list into your current Job from the neutral file.
"Cancel" closes the Roundtrip window without importing any elements or retaining any choices that you might have made on the window.

