 Shorten Drawing ( Drawing Editor > s d )
Tool summary :
Also see :
- Area Move/Stretch (a bad alternative)
- Automatic detailing ( Shortens automatically)
- Detail frozen (disables Shorten and Unshorten )
- Unshorten Drawing (undoes all Shortening )
- Undo (undoes Shorten or Unshorten )
- Shorten limit line ( Shorten lines up views to right of)
- Always ask to unshorten drawings before adding objects ( User and Site Options , > Drawings > )
Example :
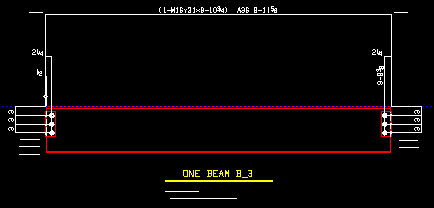
| An unshortened member detail : | |||
|
|||
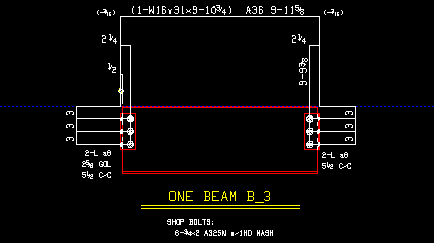
| Same detail after Shorten Drawing : | |||
|
Step-by-step instructions :
Begin this operation in a submaterial or member detail or erection view or job standard detail or global standard detail.
1 . Invoke Shorten Drawing using any one (1) of the following methods:
▸ Click the Shorten Drawing icon. The icon can be taken from the group named ' Tools ' and placed on the ribbon.
▸ Shorten Drawing can also be invoked using a keyboard shortcut ( s d ), the context menu , or a mode . For the ' Lightning ' layout style, configuration of the interface is done using Customize Interface .
2 . The Drawing Compression window opens.
|
||||||||||
Alternative 1 : Enter the scaled distance from the most left point of the drawing, across the shorten limit line, to the most right point of the drawing, then press the " OK " button. Go to step 3.
Alternative 2 : Press the " Cancel " button to keep the drawing unshortened along the X axis. Go to step 3.
3 . Another version of the Drawing Compression window opens, this time with the entry field, " Enter drawing compression size Y axis. "
|
||||||||||
Alternative 1 : Enter the scaled distance from the lowest point of the drawing to the highest point of the drawing, then press the " OK " button. Go to step 4.
Alternative 2 : Press the " Cancel " button to keep the drawing unshortened along the Y axis. Go to step 4.
4 . If you specified shortening in the previous two steps, a shortened view of the member main material or submaterial is now displayed on screen. Please note the following:
All dimension labels report the same distance that they reported before shortening.
The relative positions of one hole to another within a hole group remains the same.
On a member detail, all submaterials except the member main material remain the same size.
Cross sectional views remain the same size.
Cross sectional views placed higher or lower than one another and to the right of the shorten limit line are aligned with one another.

