 P2 Export
Tool summary :
Also see :
- Home > Project Settings > Job > P2 Setup (setup window)
- Estimating/Production ( User Opitons > the " Output " tab > )
- Fabtrol Export (outputs a similar fabtrol_assembly_parts_list.XSR file)
- Exporting from your current Job (index)
Example of the top part of a P2 Export file :
| Note: The P2 export file is a variation on the fabtrol_assembly_parts_list.XSR file format. |
| # SDS2 FabTrol ASSEMBLY PARTS LIST VERSION 1.6 |
| # model;project_number;project_name;date;time; dld_7.204;dld_7.204;dld_7.20;08/20/2009;10:30:32 |
| # ASSEMBLY:assembly mark ;database id ;main part ;name ;phase ;lot number ;GUID |
|
# PART: part mark;database id;prelim_mark;name;main_part;profile;
grade;finish;length;length_gross;net_weight;end1_skew;end1_code; end1_angle_Y;end1_angle_Z;end2_skew;end2_code;end2_angle_Y; end2_angle_Z ;user_define1 ;user_define2 ;user_define3 ;GUID |
| ASSEMBLY:B_3 ;1 ;w4 ;BEAM ;1 ;0 ; 50975cc8-2a34-4d8b-8479-952b691d337c |
| PART:w4 ;2 ; ;BEAM ;1 ;W21x44 ;A992 ;Red oxide;26'-7"; ;1169.254999; ; ; ; ; ; ; ; ; ; ; ;dedc65cf-4bff-4539-8829-4e0e9d3e7346 |
| PART:a1 ; 3 ; ; Clip Angle ; 0 ; L4x3-1/2x5/16 ; A36 ;Red oxide;1'-1" ; ; 7.974106 ; ; ; ; ; ; ; ; ;mult cut # ;labor code ;job cost code ; 37677c0c-beb3-4eb1-928d-51747e361332 |
| ASSEMBLY: assembly mark (B_3) ; database id ( 1 ); main part (w4) ; name (BEAM) ; phase (1) ; lot (0); GUID ( 50975cc8-2a34-4d8b-8479-952b691d337c ) |
| PART: part mark (a1) ; database id (3) ; prelim mark; name (Clip Angle) ; main part (0) ; profile (L4x3 1/2x5/16) ; grade (A36) ; finish (Red oxide) ; length (1'-1") ; length_gross; net_weight ( 7.974106 ) ; end1_skew; end1_code; end1_angle_Y; end1_angle_Z; end2_skew; end2_code; end2_angle_Y; end2_angle_Z ; user_define1 (mult cut #) ; user_define2 (labor code) ; user_define3 (job cost code) ; GUID ( 37677c0c-beb3-4eb1-928d-51747e361332 ) |
|
Note: Except for the GUID and net_weight , this format is the same as the fabtrol_assembly_parts_list.XSR file format. |
Step-by-step instructions :
1a : Home > Project Settings > Job > P2 Setup so that data is exported in the correct format and so that it includes the information you want.
1b : Confirm that your current Job is up-to-date and complete. Process and Create Solids .
1c : If the " Data source " is ' BOM ', you also need to Detail Members and confirm that the bills of material of all members that you want data on are correct.
1d : You can optionally place details onto sheets if you want to select member data by sheet in step 4c and/or if you want to output detail sheets to the
Fabrication folder. The selection you make in step 4c affects the P2 export file .
1e : Confirm that the default output configuration entered for User and Site Options > Output > " Estimating/Production " is set for the directory (folder) where you want the data to be output. The " Line ends " must be set to ' Windows '.
2 . Begin the P2 Export using any one (1) of the following methods.
▸ Home > Export > P2 Export .
▸ If you are in Modeling or the Drawing Editor use a keyboard shortcut , or click the icon. The command group for P2 Export is Interface.
3 . The P2 Export window opens.
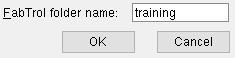
P2 folder: The name (up to 30 characters) of the folder into which you want the P2 export file to be placed. The default entry to this field is the name of your current Job . The characters " or / or \ or . or $ or ; or [ or ] or { or } cannot be used to name the folder.
Alternative 1 : Press the " OK " button to continue.
Alternative 2 : Press the " Cancel " button to end this operation and keep everything as it was before step 2.
4 . A selection dialog opens. The items you select on this window determine the scope of information compiled to the P2 export file .
|
Optional : Press the button under " Destination " to redirect the report's output destination. In this example, " File " indicates that output is to a particular file name. " Hide ... " lets you, for example, use the ' Detail required ' option to hide details that are not up to date. |
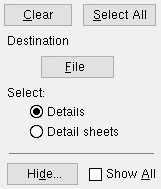
4a (optional) : '
Details ' lists all details , including user created details , regardless of whether or not they are up to date. '
4b : Select the particular items you want to be included in the to-be-generated P2 export file , then press the " OK " button to cause the data file to be output to the destination that you selected.
5 . The P2 export file is created and placed in the folder that you named in step 3 . The name of this file is fabtrol_assembly_parts_list.XSR. The location where the folder is placed is the destination set for User Opitons > the " Ouput " tab > " Estimating/Production "(unless you changed this in step 4b).
5a : The P2 export file can now be used for generating bar codes for members or materials using the P2 Program's Steel Tracking System.

