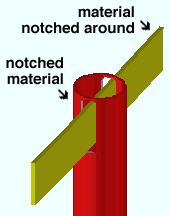
 Fit Notch Command
- Step-By-Step
- Undo
- Tips and Tricks
- Related Tools
1 . Preselect a material you want to notch. This enables the Materials contextual page. Click the Material Fit Notch icon found in the Operations section. Skip step 2.
Alternative: Invoke Material Fit Notch using the Find Tool by searching the command name and clicking the Material Fit Notch icon, which is pictured above. Proceed to step 2.
Learn more about alternative methods for launching commands.
2 . Select the material you want the notch added to, then press Enter .
3 . Select one or more material(s) you want the material selected in step 1 or 2 to be fit around, then press Enter .
4 . Set the clearance distance (clearance between the edge of the notch and the material that is being cut around), then press " OK " . Selecting " Cancel " cancels the operation.
5 . The status line prompts "Verify material cut. "Yes - No" mouse bindings become active.
5a . Left-click ( Yes ) to confirm the cope and proceed to step 6.
5b . Right-click ( No ) to cancel the command.
6 . The Change All Options window opens. On it is a " Warnings " list. Material change " Options " become active along with the Warnings if the 3D model contains other pieces of material with the same submaterial piecemark as the material you performed this operation on. Selecting " OK " cuts the material.
Method 1 :
1 . Open the notched material's edit window (e.g., double-click the material, or hover the material and right-click ( Menu ) and choose " Edit Other " on the context menu ).
1a : Press the " Material Operations " button at the bottom of the material edit window.
2 . A dialog opens showing each of the fit or cut layout operations that appear on this material.
2a : Check the " Delete " check box next to the fit operation you wish to delete. If you want to delete multiple, you can select more than one. If you wish to remove all operations, select the " Delete All " check box.
2b : Press the " Close " button at the bottom of the material operations window.
2c : Press the " OK " button at the bottom of the material edit window.
3 . The Change All Options window opens. On it is a " Warnings " list and " Options ."
3a : Optionally select the " Options " you want, then press the " OK " button.
4 . The material is regenerated per the settings on its edit window. In other words, the Fit Notch operation with the delete check box checked disappears.
Note: If other pieces with the same submaterial piecemark exist in the 3D model and you selected the appropriate " Options ," then other materials are also regenerated as specified on the edit window.
Method 2 :
1 . In the view in which you want to remove the Fit Notch operation, display in solid form all members that you want to edit.
Alternative 1 :View > Solid Opaque to display in solid form the members that you want to edit.
Alternative 2 :View > Change All to Solid to display in solid form all members that are in the view.
2 . Select the fit notch operation by doing the following:
Alternative 1 : Run the Show Material Operations tool if they are not shown. Once the material operation is shown, select the Fit Notch.
Alternative 2 : Using the Model Tree, expand the member and material subclasses, and select the fit notch operation.
3 . Once the fit notch operation is selected, do the following to delete the operation:
Alternative 1 : Select The Delete key on the keyboard.
Alternative 2 : Select the Delete
icon.
- The Material Operations window (to edit or delete a Fit Notch )
- Primary selection ( User and Site Options > Modeling > selection color for the material that is cut)
- Secondary selection (selection color for materials cut around)
- Model completed (you can Notch around a model complete member, but not through one)


