 Member Move/Stretch Include Material
- Step-By-Step
- Tips and Tricks
- Examples
- Related Tools
1 . Preselect one or more Member Ends to enable the Member Ends contextual page and click the Member Move/Stretch Include Material icon found in the Modify section.
Alternative: Invoke Member Move/Stretch Include Material using the Find Tool by searching the command name and clicking the icon, which is pictured above.
Learn more about alternative methods for launching commands.
2 . The status line prompts, "Locate a reference point". Locate - Pan - Return mouse bindings become active along with Locate options. Select the Locate icon you want and left-click (Locate) where you want the reference point.
Alternative 1: If you did not preselect a member end, the status line prompts you to "Select members". Left-click (Select) one or more members, or member ends, and press Enter or right-click (Menu) and select OK. Then follow step 2 above.
Alternative 2: If Z-filter is checked (
), a Yes-No dialog opens. On it is the message, "Temporarily turn off Z-filtering?" Press Yes if you do not want Z-filtering to apply to this operation. Z-filtering will be turned back on after you complete or cancel the command. Press No if you do want Z-filtering to apply to member copies generated during this operation.
Alternative 3: Press Esc or right-click (Return) to end the command.
3 . The status line prompts, "Locate a second point". Left-click (Locate) where you want to move the member(s) or stretch the member end(s) with respect to the reference point located in step 2.
Alternative: Press Esc or right-click (Return) to end the command.
4 . The status line prompts, "Confirm move", and Yes - No mouse bindings become active. Left-click (Yes) to move the member(s) or stretch the member end(s).
Alternative 1: If the moved member(s) overlap another member line, an alert window appears with the message, "WARNING: This move will destroy members! Member(s) overlap". Click OK and follow step 4 above with consideration to this warning.
Alternative 2: Right-click (No) to end the command without moving/stretching member(s).
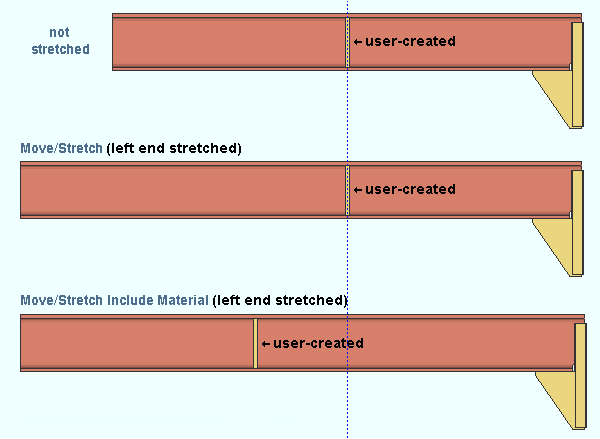
- Both Member Move/Stretch Include Material (this tool) and Member Move/Stretch behave in exactly the same way with respect to moving members. However, when you stretch a member end (
 ), the two tools behave in different ways.
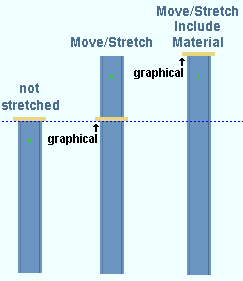
- A member's end is identified with a cube ( ). When only one end of a member is selected, the member is stretched, skewed or compacted. When both ends are selected (or the entire member is selected), the entire member is moved.
- In an elevation view, you can use Member Move/Stretch to raise or lower the elevation of an entire floor. In a plan view, you can use Member Move/Stretch to move a wall. If you properly set depth checking and use DXDY, you can also raise or lower the elevation of a floor in a plan view.
- If you are stretching one end of a member and do not want to also move graphical material attached to that end, then use Member Move/Stretch. If you want the material to not move with the member end, then use this tool.
| Member Move/Stretch Include Material | Member Move/Stretch | |
| Graphical connection material, bolts, welds |
Graphical connections move when the member end ( |
Graphical connections do not move when a member end is stretched. |
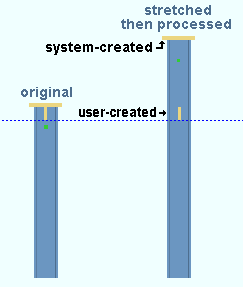
| User-created materials | User-added materials move when the member's left end is stretched. They do not move when the member's right end is stretched. | User-added materials do not move when a member's left end (or right end) is stretched. |
| Custom components |
Both tools produce the same result. That "same result" depends on the type of component, the component's settings and, for some components, which end ( |
|
| System connections | Both tools give the same result. The connection material associated with the end that is stretched moves with the end that is stretched. | |
| Member main material |
Main material stretches when either end ( |
Main material stretches when either end ( |
Example 1: Stretching a member with graphical connection material:
|
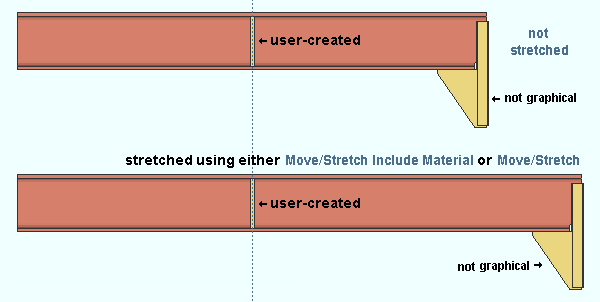
These three columns were exact copies of one another before the middle and right columns were stretched. The user cap plate on all three columns is |

|
|
Here's a similar example with beams. The clip angle on all three members is |
Example 2: Stretching a member's right end ( ![]() ), effect on system-created connection material and user-created material:
), effect on system-created connection material and user-created material:
|
These two columns were exact copies of one another before the top end of the column on the right was stretched. The stiffener was not moved because it is user-created material. Both Member Move/Stretch and Member Move/Stretch Include Material would produce exactly the same results since it is the right end (top end) of the column that is stretched. If the left end of the member had been stretched, Member Move/Stretch Include Material would have moved the stiffener. |
|
| Here's an example of two beams, both with a system-generated clip angle connection. Neither connection is graphical. After the bottom beam was stretched using either Member Move Stretch or Member Move/Stretch Include Material, the system connection was regenerated as shown. The position of the user-created stiffener at the middle of the beam is not affected by the stretch operation since it is the right end of the member that is stretched. Compare this with example 3, in which the left end of the member is stretched. |
Example 3: Stretching a member's left end (a vertical column's bottom end), effect on user-created material:
|
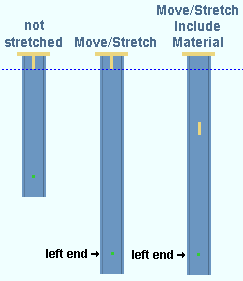
These three perfectly vertical columns were exact copies of each other before the bottom ends of the middle and right columns were stretched. The three column plates are user base/cap plates. The stiffener under each of these cap plates is user-created material . That stiffener is not moved in the middle example because Move/Stretch was used to perform the operation. |
|
Note: The left end of a perfectly vertical column is its bottom end. User-created material is placed along a member at specific distances from that member's left end. |
|
| These three beams were exact copies of each other before the left ends of the middle and bottom beams were stretched. The three right-end system connections are welded clip angles with web extension plates. It makes no difference in this example whether the connections are graphical or not since they are right-end connections and it is the left end that is stretched. The stiffener near the center of each of these beams is user-created material. That stiffener is not moved in the middle example because Member Move/Stretch was used to perform the left-end stretch operation. |
Example 4: Stretching a beam's end ( ![]() ), effect on custom components:
), effect on custom components:
|
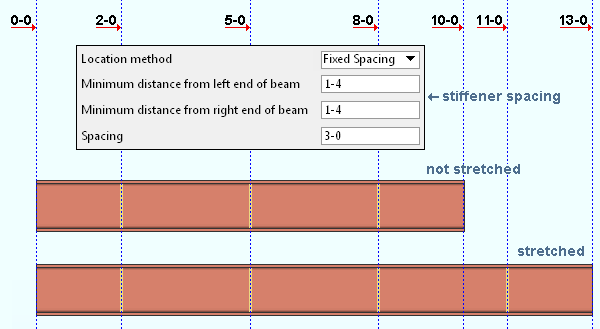
| These two beams were exact copies of one another before the right end of the bottom beam was stretched. The custom component Beam Stiffeners - Beam was used to generate the stiffeners. Either Member Move Stretch or Member Move Stretch Include Material could be used to produce the result shown in this example. The Location method of Fixed Spacing specifies that stiffener spacing be based on the overall length of the beam. |
|
|
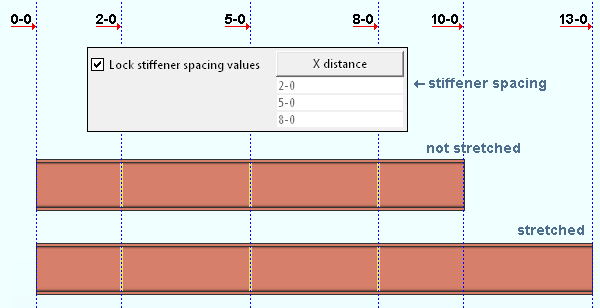
These two beams were exact copies of one another before the right end of the bottom beam was stretched. The custom component Beam Stiffeners - Beam was used to generate the stiffeners. Either Member Move/ Stretch or Member Move/Stretch Include Material could have been used to perform the stretch operation shown in this example. |
Note: Since custom components are created by different developers for different purposes, you will find that different custom components behave in different ways when their members are stretched. However, it should make no difference whether the custom component's member is stretched using Member Move/ Stretch or Member Move/Stretch Include Material.
- Member Move/Stretch (an alternative to Member Move/Stretch Include Material)
- Reference model member (can be moved with Member Move/Stretch Include Material)
- Depth checking (set limits prior to Member Move/Stretch Include Material)
- Sloped column (affects Member Move/Stretch Include Material)
- Member ends (selecting one or both ends sets what the operation does)
- DXDY (sometimes useful with Member Move/Stretch Include Material)
- INCM (sometimes useful with Member Move/Stretch Include Material)
- Graphical Connections
- Material Classes

