The Auto Standard Connections window
| Options on this window are read-only . They tell you how this window has been set up for this Job in a full-featured SDS2 program . |
About this window :
- Advantages of Auto Standard Connections
- Step-by-step instructions for review:
- Step 1: Open the window
- Step 2: Select general framing condition
- Step 3: Choose specific framing condition
- Step 4: Review connection type
- Step 5: Review bolt diameter
- Step 6: Review field clearance (of beams)
- Step 7: Close the window
Also see :
- System connection types (most can be auto standard)
- Ways to get connections (topic)
- Standard Fabricator Connections (setup of clip angles, etc.)
- Default non-moment bolt diameter and type (setup)
- Washer Settings Setup window (setup)
- Weld Design Settings Setup window (setup of welds on connections)
- Base / Cap Plate Schedule (setup of auto standard user base/cap plates)
home > project settings > job > connections > | classic | top
Advantages of Auto Standard Connections :
Advantage 1 : Auto standard connections save time:
- Auto standard connections are applied automatically, per each member end's framing condition, thus saving the user of a full-featured SDS2 program the hassle of having to define connections on each end of a member independently.
Advantage 2 : Auto standard connections ensure design consistency:
Advantage 3 : Auto standard connections are system connections that are designed based on the Home > Project Settings > Job > Design Settings > " Connection design method ."
home > project settings > job > connections > | classic | top
1 . Open the Auto Standard Connections window using any one of the following methods:
Method 1 : Home > Project Settings > Job > Connections > Auto Standard Connections .
Methods 2, 3 & 4 : In Modeling or the Drawing Editor , choose Settings > Job Settings > Auto Standard Connections (classic), or use a keyboard shortcut (if one has been set up), or click the icon pictured above .
2 . The Auto Standard Connections window opens.
|
|
||||||
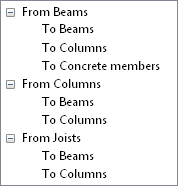
2a : Select the leaf for the general framing condition that you want. Under a heading named " Framing condition ," you will find a list of specific framing conditions that are assigned to the selected framing condition.
VIDEO 
In a full-featured SDS2 program, an auto standard beam-to-concrete connection is examined in the model. Then the setup for that connection is shown on the Auto Standard Connections window. (Recorded in SDS2 Detailing , v2018.)
3 . Double-click a specific framing condition to open the Auto Standard Connections window discussed in step 4.
Examples of specific framing conditions:
" PGrd Beam to BoxS Beam Web perp " selects the specific framing condition of a welded plate wide flange ( PGrd ) beam framing perpendicular to the web of a wide flange box ( BoxS ) beam.
Note: The first member ( PGrd Beam ) is the supported beam. The second member ( BoxS Beam ) is the supporting beam. The connections that you assign when you double-click this framing condition are for the supported beam. However, you cannot get connections when the supported beam is a wide flange box ( BoxS ) beam.
" SFlg Beam to Chan Beam Web perp " selects the specific framing condition of an S shape ( SFlg ) beam framing perpendicular to the web of a channel beam.
Note: The first member ( SFlg Beam ) is the supported beam. The connections that you assign when you double-click this framing condition are for this beam.
" WFlg Beam to Wflg Col Web perp " selects the specific framing condition of a wide flange ( WFlg ) beam framing perpendicular ( perp ) to the web of a wide flange column.
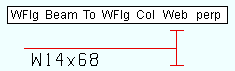
|
The beam and column are in a plan view. |
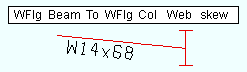
" WFlg Beam to Wflg Col Web skew " selects the specific framing condition of a wide flange ( WFlg ) beam framing skewed ( skew ) to the web of a wide flange column.
| The beam and column are in a plan view. |
|
" Chan Beam to Chan Beam splc " selects the specific framing condition of two channel ( Chan ) beams spliced together end to end.
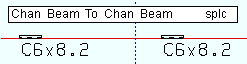
|
Members are in a plan view. Clip angles or end plates or splice plates can be used to splice two beams. |
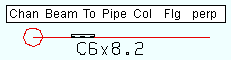
" Chan Beam to Pipe Col Flg perp " selects the specific framing condition of a channel beam framing perpendicular ( perp ) to the flange (Flg) of an HSS round (pipe) column.
| Members are in a plan view. Pipe columns are treated as having flanges. |
|
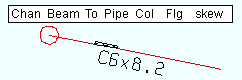
" Chan Beam to Pipe Col Flg skew " selects the specific framing condition of a channel beam framing skewed ( skew ) to the flange (Flg) of a HSS round (pipe) column.
|
Members are in a plan view. |
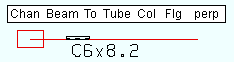
" Chan Beam to Tube Col Flg perp " selects the specific framing condition of a channel beam framing perpendicular ( perp ) to the flange of an HSS rectangular (tube) column.
| Members are in a plan view. |
|
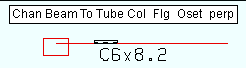
" Chan Beam to Tube Col Flg Oset perp " selects the specific framing condition of a channel beam framing offset ( Oset ) and perpendicular ( perp ) to the flange of a tube column.
|
Members are in a plan view. |
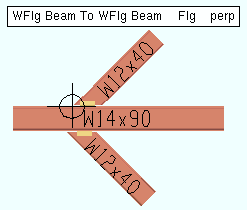
" WFlg Beam to WFlg Beam perp " selects the framing condition of a wide flange ( WFlg ) beam to the flange of a wide flange ( WFlg ) beam. Only " perp " conditions are supported -- skewed conditions are not supported.
To get a connection (clip angle or shear plate) on a beam to the bottom flange of the supporting beam, the work point of the supported beam needs to go to the supporting beam's workline (its top flange).
4 . The Auto Standard Connections window opens. On it is specific information about the connection applied to selected framing condition.
|
Connection
Specifications |
General Framing Condition | Comments |
| User defined | beam to beam or to column, column to beam or to column | create per the " User defined connection " file name that is specified. |
| Plain end | beam to beam or to column, column to beam or to column | used when an SDS2 designed connection is not wanted. All welded plate box beams should be ' Plain end '. |
| Clip angle |
beam to beam,
beam to column |
can be applied on sloping or non-sloping beams; must be welded to a tube column; cannot be designed on beams to pipe columns. |
|
beam to embed plate
|
requires an " Embed schedule entry ." | |
| Bent plate |
beam to beam,
beam to column |
may be used in skewed and sloped framing conditions; must be welded to a tube column; cannot be designed on beams to pipe columns. |
| End Plate |
beam to beam,
beam to column |
may be used in skewed and sloped framing conditions; cannot be designed on beams to pipe columns. |
| Shear |
beam to beam,
beam to column |
may be used in skewed and sloped framing conditions; thru plates must frame to a tube or pipe column; shear tees must be welded to a tube column. |
|
beam to embed plate
|
requires an " Embed schedule entry ." | |
| Seated beam | beam to column | may frame to wide flange or tube but not pipe columns. |
| beam to embed | requires an " Embed schedule entry ." | |
| Bearing
(beam) ( |
beam to concrete | requires an " Embed schedule entry " of a plate, channel or angle embed. |
| Splice plate (beam) | beam to beam | before v2018, splices had to be clip angles or end plates. |
|
Splice plate
(column) |
column to column | bolted splice plate on columns may be different sizes. |
| Auto base/cap plate | column to beam | connection design creates
the connection. |
| User base/cap plate | column to beam | created per the Base / Cap Plate Schedule. |
| Clip angle hanger connection | column to beam |
fails with " Hangar connections not supported " message. ' |
| Shear hanger connection | ||
| Bearing
(joist) |
joist to beam | joists can bolt to the flange of the beam |
|
joist to concrete wall
|
an end pocket is created for the end of the joist to bear on a plate, angle or channel | |
| Flush framed shear
& Flush framed clip |
joist to beam,
joist to column |
Fail messages: • Flush framed joist connection only valid for Vulcraft joists • Flush framed joist elevation not at supporting beam top of steel |
| Joist seats | joist to column | can be designed for various sloped and skewed framing conditions to a column web or flange. |
|
joist to embed plate
|
requires an top chord " Schedule entry ." | |
| Joist bottom chord stabilizer | joist bottom chord to column |
" |
| joist bottom chord to embed plate | requires a bottom chord " Schedule entry " |
User defined connection: The name of a user defined connection . Such an entry can be applied to a particular framing condition when ' User defined ' is selected as the " Input connection type ."
Embed schedule entry: A standard piecemark name from the " Piecemark " column in the Embed Schedule . The entry made here applies when the " General framing condition " is ' Beam to concrete ' and, in the model, the beam frames to a concrete wall . The " Input connection type " must be ' Shear ' or ' Clip angle ' or ' Bent plate ' or ' Seated ' or ' Plain end '.

|
For a beam to concrete, an " Input connection type " of ' Shear ' or ' Clip angle ' or ' Seated ' or ' Bent plate ' creates a connection that field welds to the " Embed schedule entry ." |
|
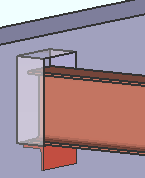
When ' Bearing ' is the " Input connection type " for a beam to concrete, a bearing angle (shown) or bearing plate or bearing channel can be created along with a pocket into the concrete wall. The angle, plate or channel embed is selected as the " Embed schedule entry ." Click here for some examples from the Connection Guide. |
Also see: Similar auto standard connections options are available for a joist's top chord and bottom chord. These are the top chord embed " Schedule entry " and the bottom chord " Schedule entry ."
5 . The non-moment bolt type and diameter can also be reviewed on this window:
NM Bolt Type: A325N or A325SC or A325X , etc. NM stands for "non-moment." This is the type of non-moment bolt to be used for attaching the connection to the structural member. The types of bolts that are available for selection here are set up using the User Defined Bolt Specifications .
NM Bolt Diameter: Any diameter from the Available Bolts list in Bolt Settings under Job Options. This is the diameter of the shank of the bolt specified above.
Note: In certain situations during the design of a non-moment auto standard connection, connection design may adjust the diameter entered here upwards so that the connection withstands the stress of heavy loading.
6 . Skip this step if you selected ' Column to beam ' or ' Column to column ' as the framing condition in step 2. For ' Beam to beam ' or ' Beam to column ' framing conditions, the user can enter left and right end field clearances.
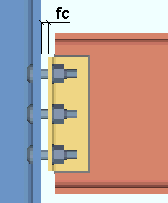
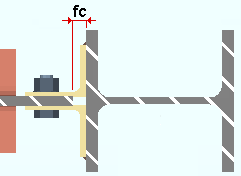
Left: The field clearance for the connection on the left end of the beam. How field clearance is measured depends on the connection type.
|
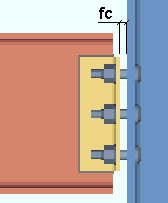
fc = field clearance. For a clip angle (except as noted below) or a bent plate or end plate connection, the field clearance is the distance from the face of the connection to the face of the member being framed to. |
|
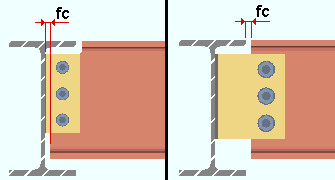
fc = field clearance. For clip angles that shop weld to the supporting member (knife connections), the field clearance is measured from the face of the supporting member to the web of the beam that the clip angles field bolt to. |
|
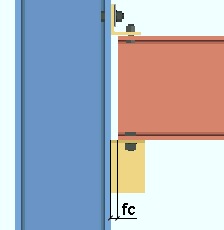
fc = field clearance. For seated beam connections , the field clearance is the distance from the face of the beam to the flange of the column being framed to. |
|
fc = field clearance. For shear plates , fc is the distance between the end of the beam to the face of the supporting member or, for a plate extended past the supporting beam's flange, the distance between the beams. |
Right: Same as " Left ," except that this is the field clearance for the right end of the beam.
 fc = field clearance
Related setup options: Field Clearances .
7 . When you are done reviewing the connection specifications associated with the framing condition you selected, press the " OK " button (or the Enter key) to close the window.
home > project settings > job > connections > | classic | top