 CNC Download Members by Location ( Modeling )
Tool summary :
Also see :
- CNC - Material by Location (CNC material downloads from the model)
- Download (button for downloading from the Computer Numerically Controlled window)
- User and Site Options > Output > CNC (sets the output method or location for downloads)
- Use CNC piece quantity in ( CNC Setup , for designating quantity in the download file)
- Include attached submaterial in member download ( CNC Setup )
page 1 | contents | model > member > | cnc tools in modeling
![]() Step-by-step instructions :
Step-by-step instructions :
The following instructions assume that you are using a 3-button mouse. You must do either step 1d (preselection) or step 3 (in-tool selection) to perform this operation.
1a : Make sure that User and Site Options > Output > " CNC " is set to the directory (file folder) you want the CNC files to be downloaded to.
1b : Set " CNC configuration " and " CNC type " on the Computer Numerically Controlled window to generate a download file format that is appropriate for the CNC machine that you plan to download to.
1c : On the CNC Setup window, the option " Use CNC piece quantity in " can be set to ' Job ' or ' Selection '. Set it to ' Job ' if you want the quantity reported in a file to be a count of all members under the particular member piecemark that you selected. Set it to ' Selection ' if you want the quantity in the download file to exactly match the quantity of members (with that same mark) that you selected.
1d : Also on the CNC Setup window, the option " Include attached submaterial in member download " affects, when you select a member, whether you get download files for all submaterials associated with that member or only a single download file for that member's main material.


Select Items bindings (step 1e) 1e : (optional) : In Select Items mode with the selection filter set to ' Default ' or ' Legacy Default ' or ' Beams ' or etc., use Select or Select + (or draw an area box ) to select the member(s) that you want to download. Use Select- if you want to deselect members. When selected, the members will be displayed in the User and Site Options > Modeling > " Primary selection color ," which by default is green.
2 . Invoke CNC - Members by Location using any one (1) of the following methods:
Methods 1, 2 & 3 : Click the icon, or use a keyboard shortcut, or use the context menu. A CNC - Member by Location icon can be added to your toolbar (classic) or ribbon (lightning). The icon, keyboard shortcut or context menu command can be found in the group named ' Model -- Member '. For lightning, Customize Interface is used to configure ribbons, keyboards, the context menu and modes.
Method 4 : If " Modeling layout style " is ' Classic ', you can use the menu system to choose Model > Member > CNC - Download by Location .
3 . Skip this step if you already selected member(s) in step 1e.
|
|
|
Select Item(s) bindings. |
3a (if you didn't preselect) : CNC - Download by Location prompts you to use Select Item(s) mouse bindings to Select or Select + one or more members. You can also select members by drawing an area box or using the Model Tree . Press the Enter key or right-click ( Menu ) and choose " OK " on the context menu to signal to CNC - Download by Location that you are done selecting members.
4 . CNC - Download by Location downloads member main materials (and, if applicable, submaterials). Errors are handled per the CNC setup options " Download holes outside diameter range as " and " Download holes too close to edge, web, flange, bend and hole as ." Or if " Disable error checking " is on (checked), you get a download without correcting the problem. For each download file that is generated for a member, member edit > press " Status " > " ![]() Downloaded to CNC " is checked on the Member Status Review window. For each download file that is generated for a material, " CNC Downloaded " on the General Information window is set to ' Yes '. The download files are named after member piecemarks (upper case) or submaterial marks (lower case).
Downloaded to CNC " is checked on the Member Status Review window. For each download file that is generated for a material, " CNC Downloaded " on the General Information window is set to ' Yes '. The download files are named after member piecemarks (upper case) or submaterial marks (lower case).

|
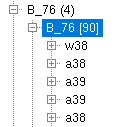
Scenario 1: You select one member ( B_76 ). Since the CNC setup option " Include attached submaterial " is not checked ( |

|
Scenario 2: Same as above, but " Include attached submaterial " is checked ( |

|
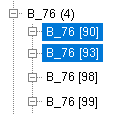
Scenario 3: Same as above, but two of the B_76 members are selected. " Include attached submaterial " is checked ( |
| In general, if " Use CNC piece quantity in " is set to ' Selection ' and " Include attached submaterial in member download " is checked ( |
page 1 | contents | model > member > | cnc tools in modeling | top


