 Add Reduced Beam Section ( Modeling )
Tool summary :
|
|
Also see :
- Modeling (where custom components can be added)
- Custom components (topic)
- Copy Component (to copy the component to another beam) **
- Move Component (to move the component to another beam) **
- Explode Component ( cannot be done on the Reduced Beam Section custom component)
- Component Selection Tool (to search for custom components of a selected type)
- Model Tree (to find custom components and select them for deletion, editing, etc.)
** For Copy Component and Move Component operations on a Reduced Beam Section , preselection in the Model Tree is required. You cannot select the Reduced Beam Section in the model.
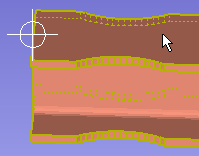
![]() To edit or delete the Reduced Beam Section custom component :
To edit or delete the Reduced Beam Section custom component :
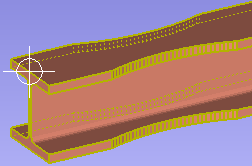
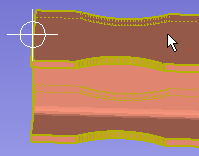
Reduced Beam Section custom component settings :
![]() Settings ----------------------------------------------------------------------------
Settings ----------------------------------------------------------------------------
Which end of beam: Left End or Right End or Both Ends . You can, if you choose to, add two different reduced beam section custom components to the same beam, one for the left end and the other for the right end. Doing this permits you to specify a different cut pattern on each of the two ends. If you want the same cut pattern on both ends, then choose ' Both Ends '.
' Left End ' results in the cuts being generated the specified " Distance from end of material ... " from the left end of the wide flange beam. On the Beam Edit window, the " Component " settings will appear as left-end settings in a section named [ Reduced Beam Section ] .
' Right End ' results in the cuts being generated the specified " Distance from end of material ... " from the right end of the wide flange beam. On the Beam Edit window, the " Component " settings will appear as right-end settings in a section named [ Reduced Beam Section ] .
' Both Ends ' results in the reduced beam section cuts being generated on both ends of the beam. The cuts will be the same on each end. On the Beam Edit window, the " Component " settings for both ends will appear as left-end settings in a section named [ Reduced Beam Section ] .
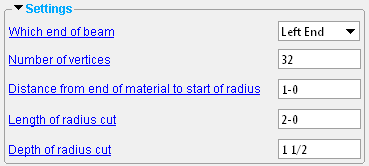
Number of vertices: The number of segments that each circular cut will be divided into.
|
|
|
| ' 8 ' vertices | ' 16 ' vertices | ' 32 ' vertices |
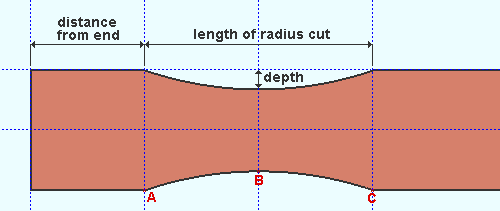
Distance from end of material to start of radius: A distance (in the primary dimension " Units " or other units ). The distance is measured from the end of the material (not from the beam work point). The distance is measured parallel with the beam along one of the edges of one of the beam's flanges. The end of the material that the start of the radius is measured from is the left end or right end or both ends, depending on the choice made to " Which end of beam ."
|
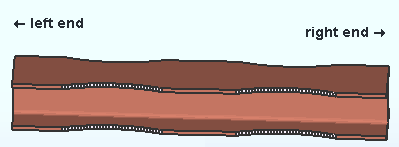
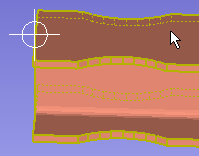
| The " Distance from end of material to start of radius " is labeled distance from end in the diagram above. This distance defines point A in the diagram. The three points marked A , B and C in the diagram are circumscribed by a circle that defines the perimeter of the cut. All together, the cut pattern that is shown in this example consists of four radius cuts -- two radius cuts on the top flange and two matching radius cuts on the bottom flange. |
Length of radius cut: A distance (in the primary dimension " Units " or other units ). The distance is measured along the edge of the flange, from a point that is defined by the " Distance from end of material to start of radius ." The distance is measured parallel with the beam.
|
|
| The " Length of radius cut " is labeled as such in the diagram above. This distance defines point C in the diagram. The three points marked A , B and C in the diagram are circumscribed by a circle that defines the perimeter of the cut. |
Depth of radius cut: A distance (in the primary dimension " Units " or other units ). This distance is measured perpendicular to the beam's workline from the edge of the beam's flange toward the beam's web. It represents the maximum depth of the cut.
|
|
| The " Depth of radius cut " is labeled depth in the diagram above. This distance defines point B in the diagram as described in the note below. The three points marked A , B and C in the diagram are circumscribed by a circle that defines the perimeter of the cut. |
Note: The precise point on the edge of the pre-cut flange where the maximum depth of the cut will be at after the cut is made is the " Distance from end of material ... " plus half of the " Length of radius cut ." This point plus the " Depth of radius cut " defines the position of point B shown in the diagram above.

