 Generic Delete ( Modeling > press Delete )
Tool summary :
- Erases the items that you have selected. For example, members, materials, welds, bolts and holes.
- If you are deleting members, they can be displayed in stick. However, to delete individual submaterials, the members they are associated with must displayed in one of the three solid forms .
- Group members cannot be deleted. Also, to delete a submember of a group member, the submember must first be Removed from the group.
- Warning : Do not select a member main material when you want to delete a member. When you delete member main material, the member continues to exist, and its main material will be regenerated the next time it undergoes Process and Create Solids . To remove a member from the 3D model, you need to select a member.
- Use Erase Holes or Erase Bolts or Erase Material instead of Delete if you want options to apply your deletions to like members with the same mark or with different marks.
- See (on this page):
Also see :
- Select Items Mode (used to select items for Delete )
- A solid form (to delete material, holes, bolts)
- Stick form (members in can be deleted)
- Automatically process after modeling operation ( User and Site Options > Modeling > )
- Model completed (no part of a member can be deleted if this date is set)
- Erase Member (alternative)
- Erase Material (alternative -- has options for erasing similar materials)
- Erase Holes (alternative -- has options for erasing similar holes)
- Member ends ( Delete removes pin information from)
- Delete (a similar tool in the Drawing Editor )
- Member Undelete (resurrects selected members that have been deleted)
- Visual Undelete (another way to bring back an deleted members)
- Quick Undelete (undoes Delete of members)
- Delete Drawings
![]() Step-by-step instructions :
Step-by-step instructions :
The following instructions assume that you are using a 3-button mouse, that the User and Site Options > Modeling > " Primary selection color " is green, and that you use mouse bindings similar to those shown in these illustrations. See notes 1, 2, 3 & 4 and the warning at the top of this help page before proceeding.
|
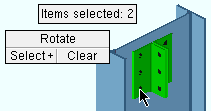
1 . Select one or more items to delete. In this example, the Shift key is held down so that a second clip angle can be selected with a left-click ( Select+ ). The selection count of ' 2 ' confirms that both angles are selected. |

|
2 . Invoke Delete . |

|
3 . Delete lists how many items of each type are selected for deletion. Press the " Yes " button to delete the items that are listed. Or press the " No " button (or the Esc key) to cancel this operation. If you selected grid lines in step 1, you will also be prompted in a yes-n o dialog for each grid line you selected. |
|
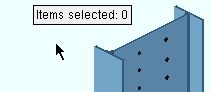
4 . The selected items are now deleted, and the selection count drops to zero (0). |
Note 1: Step 1 of this procedure is optional. If there is no preselection when you invoke Delete (step 2), you are given Select Item(s) mouse bindings and are prompted to make a selection. Press the Enter key or right-click ( Menu ) and choose " OK " on the context menu to signal to Delete that you are done selecting.

Select Item(s) bindings ▸ Click the Delete icon, which is pictured above. The icon can be taken from the group named ' Selection ' and placed on the ribbon.
▸ Clear Selection can also be configured to be invoked using a keyboard shortcut , the context menu , or a mode . For the lightning interface, this configuration is done using Customize Interface . The Delete key is the default keyboard shortcut for Delete .
Note 3: Members affected by this operation are automatically marked for Detail Members . If User and Site Options > Modeling > " Automatically process after modeling operation " is ' Process and create solids ',: all members connecting to the deleted member will automatically undergo Process and Create Solids , and you can, if you so choose, display those members in a solid form at this time. If that option is set to ' Process ' or ' Do nothing ', you will have to Process > Process and Create Solids before you will be able to display the affected members in a solid form.
Note 4: When you Delete a member, all materials, holes and bolts associated with that member are deleted. When you Delete a material, all holes and bolts associated with that material are deleted. On the other hand, you can Delete bolts without deleting their associated holes, and you can Delete holes without deleting the bolts that are associated with them.
Note 5: To delete grid lines , you must set the selection filter to ' Grid Lines ' or ' All ' so that you can select straight grid lines and/or curved grid lines . When you press the Delete key (or choose Edit > Delete ), you will be prompted with a yes-no confirmation dialog for each grid line that you selected.
VIDEO When the selection filter is ' Grid Lines ' or ' All ', you can delete grid lines by selecting them and hitting the Delete key. This is a direct alternative to Delete View . Tip: Instead of deleting system connection materials, you may be able to get rid of these materials by applying connection design locks . For example, you can erase a beam web doubler by entering a plate depth or plate width or plate thickness of zero (0). Changing connection design locks can also be used to delete holes and bolts.

