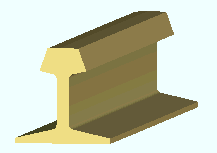
Rail material

|
Rail sections that are defined in the local shape file can be added to the model as a submaterial or miscellaneous member.
|
Also see :
page 1 | contents | material types | shapes properties
Submaterial piece marking :
page 1 | contents | material types | shapes properties | top
Entering rail section sizes :
- Naming convention: CR+lbs/ft .
- Example: CR85 .
- Note: When you add an rail to a shape file, you do not necessarily have to follow this naming convention.
- In Modeling and the Drawing Editor : A rail section must exist in the local shape file before you can enter it as a " Section size " to a member or material window, or before its weight will be automatically calculated when you add it to the " Description " field in the bill editor.
page 1 | contents | material types | shapes properties | top
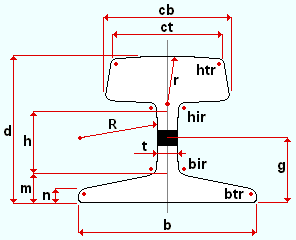
Shape file specifications for rail :
b = base width
n = base thickness
m = base thickness
h = web length
d = depth
R = web radius
cb = head width bottom
ct = head width top
|

|
htr = head top radius
hir = head inside radius
bir = base inside radius
btr = base top radius
|
- To change shape file specifications: Edit the material in Shapes Properties .
- To add a rail to a shape file: Use Copy Shapes in Utility Functions to copy the material from another shape file. Or you can manually add the material in Shapes Properties .
page 1 | contents | material types | shapes properties | top
Adding rail sections to the model :
- To add a rail to a member as a submaterial (pre-selection method): Select the one (1) member that you want to add the material to (so that it is displayed in the " Primary selection color ") > press F3 > filter for "
 Hot / Cold Rolled " > double-click " Rolled Section " > locate two material work points > enter a rail " Section size " on the Rolled Section Material window > optionally rotate the material into place > locate a material dimension reference point > right-click ( Return ) if done adding material to the member > Change All Options can be applied if the material is being added to a member that is batched together with other members that have the same member piecemark.
- To add a rail as a miscellaneous member: Press F2 > filter for "
 Miscellaneous steel " > double-click " Rolled Section " > locate two member work points > enter a rail " Section size " on the Rolled Section Edit window > right-click ( Return ) if you are done adding duplicates or variations of the miscellaneous member.
- To add a rail as a legacy miscellaneous member, click here for instructions.
- Locating work points for a rail that is added as material or a legacy miscellaneous member should be done in a view whose work plane is orthogonal to (at right angles to) the material being added. A rolled section miscellaneous member , on the other hand, can be added and properly rotated into place even in an isometric view.
- Settings for rails added as legacy miscellaneous members or submaterial may be entered on the Rolled Section Material window. Settings for rail members may be entered on the Rolled Section Edit window. Additional settings can be found in the local shape file (see above ).
- Rail sections can also be added to the model as the main material of a member by entering the appropriate " Section size " to the member edit window. Be aware, however, that connection design cannot design automatic connections on members that use rail as their main material.
page 1 | contents | material types | shapes properties | top


