 Shop Bolt Summary (data from 3D model)
Tool summary :
- Reports, on each line, the quantity of shop bolts of a particular length, diameter, etc. that are needed to fabricate all members that require those shop bolts.
- The Shop Bolt Summary provides a listing of all shop bolts of all types and sizes in the 3D model for your current Job .
- Shown below is a page from a Shop Bolt Summary .
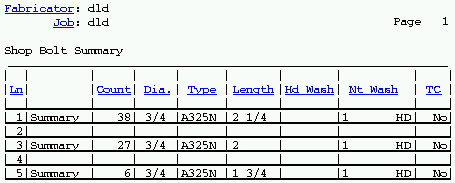
This single page lists all shop bolts used in the entire Job. Shop bolts with different specifications appear on different lines. - See, on this page, columns on the report and the step-by-step instructions .
Also see :
- Shop bolts ( Bolt Edit window > " Bolt class " )
- Shop Bolt Report (related report)
- Bolt designation shown in reports ( Home > Project Settings > Fabricator > Detailing > Bolt Detailing Settings > )
- Reports ( User and Site Options > Output > " Reports " > set report output)
- Report viewer (a good way to output a report)
home > reports > system reports > shop bolts > | reports > shop bolts >
Columns on the report (also see the example ) :
| Report writer links are based on the data source fields for the default Shop Bolt Summary used in the Report Writer , which you can Open in the reports/SDS2 folder. |
Line: The number of the line in this report that is assigned to the group of shop bolts described in the line. All bolts with unique specifications (as defined by their type, diameter, length, washer location) are grouped together on the same line.
Column 2: The word " summary " appear on each line in this column as a reminder that the line is a summary of all shop bolts with the particular specifications described in the line.
Count: The total number of shop bolts that have the specifications described on this line. This is all such bolts that are found in your current Job.
Diameter: The diameter of each bolt in the group of shop bolts reported on this line.
| diameter |
|
Report Writer: MemberMaterial.Bolt.DiameterDimension
Type: The material grade of the bolts reported on this line. This column also includes the bolt type if ' Bolt material & type ' is selected for the setup option " Bolt designation shown in reports ."
Report Writer: MemberMaterial.Bolt.BoltTypeDescription
Length: The distance from the inside of the bolt head to the end of the shaft. The program does not include the head thickness in its calculation of bolt length because head thickness may vary among bolt manufacturers.
| length |
|
Report Writer: MemberMaterial.Bolt.LengthDimension
Head Washer: The number of washers under the head of the shop bolt and their type ( HD or PL or RPL or FL or BVL or DTI or HLS ). If this cell is left blank, then there is no washer under the head of the shop bolt.
| washer under head |
|
| hardened
(HD) |
square
plate (PL) |
round
plate (RPL) |
flat
(FL) |
bevel
(BVL) |
load
(LD) |
hillside
(HLS) |
|
|
|
|
|
|
|
|
Report Writer: MemberMaterial.Bolt.PrimaryHeadWasher.TypeDescription
Report Writer: MemberMaterial.Bolt.SecondaryHeadWasher.TypeDescription
Nut Washer: The number of washers under the nut of the shop bolt and their type ( HD or PL or RPL or FL or BVL or DTI or HLS ). If this cell is left blank, then there is no washer under the nut of the shop bolt.
| washer under nut |
|
| hardened
(HD) |
square
plate (PL) |
round
plate (RPL) |
flat
(FL) |
bevel
(BVL) |
load
(LD) |
hillside
(HLS) |
|
|
|
|
|
|
|
|
Report Writer: MemberMaterial.Nut.PrimaryNutWasher.TypeDescription
Report Writer: MemberMaterial.Nut.SecondaryNutWasher.TypeDescription
TC: Yes or No . If the bolts on this line are TC (Tension Control) bolts, this cell reads 'Yes'. If the bolts are not TC bolts, the cell reads 'No'.
Report Writer: MemberMaterial.Bolt.IsTensionControl
home > reports > system reports > shop bolts > | reports > shop bolts > | top
How to output a Shop Bolt Summary :
Shop bolts are bolts that fasten connection materials to member main materials in the shop. A Shop Bolt Summary is an excellent report to use for ordering the specific bolts needed to fabricate members in the shop.
1 . Before output of this report:
1a : This report is compiled from the 3D model. When you Process & Create Solids , you effectively update the model for your current Job , and therefore ensure that this report is up to date.
1b (optional) : If you want only the steel grade to be listed in this report for the column " Type ," then set the setup option " Bolt designation shown in reports " to ' Bolt material only '.
2 . Use any one (1) of the following methods to begin printing this report:
▸ Home > Reports > System Reports > Shop Bolts > Shop Bolt Summary .
Method 2 : Click the Shop Bolt Summary icon, which is pictured above. The icon can be taken from the group named ' Reports ' and placed on the ribbon. Ribbon configuration is done using Customize Interface .
3 . The Output Configuration window opens, allowing you to change where you " Send output to " (for example, to " File " or " Screen " or " Printer ").
Alternative 1 : Press the " OK " button to output the report. Go to step 4.
Alternative 2 : Press " Cancel " to end this operation without generating the report. Do not continue.
4 . The Shop Bolt Summary is output to the device/ location that you designated.
Note: If you output the report to the report viewer, you can now review the report on screen, then optionally print it or output it to disk (see report viewer ).
home > reports > system reports > shop bolts > | reports > shop bolts > | top

