 Symbol Add ( Drawing Editor )
Tool summary :
Also see :
|
- Drawing Editor (where Symbol Add is a tool)
- Symbol (topic)
- ${Value} (special label for symbols)
- Save As Symbol (creates a symbol file)
- Explode (embeds a copy of the placed symbol, breaks link to symbol file)
- Deleting global symbols ( Delete Project Items utility)
- Deleting job symbols ( Delete Project Items utility)
page 1 | contents | objects > symbols > | objects -- symbols | xxx add | symbols
 Step-by-step instructions :
The following instructions assume that you are using a 3-button mouse.

|
|
a drawing saved as a symbol |
2 . Invoke Symbol Add using any one (1) of the following methods:
Method 1 : Click the Symbol Add icon. The icon can be taken from the group named ' Objects -- Symbols ' and placed on a toolbar (classic) or the ribbon (lightning).
Method 2 : If " Drawing Editor layout style " is ' Classic ', you can use the menu system to choose Objects > Symbols > Add .
Method 3, 4 or 5 : Symbol Add can also be invoked using a keyboard shortcut , the context menu , or a mode . For the ' Lightning ' layout style, configuration of the interface is done using Customize Interface .
3 . The Symbol Type Selection dialog opens. On it is a list of all of the symbols that have been saved into your current Job using Save As Symbol .
3a : Double-click the name of the symbol that you want to add.
4 . The X Edit window opens ( X = " Symbol name ").
 |
This window is named Evu Bolt Quantity Edit , after the " Symbol name ." The original drawing that the bolt quantity symbol was created from included a ${Quantity} label. |
Alternative 1 : Make appropriate entries to the " Rotation " and " Layer " and " Special label settings ," then press " OK ." Go to step 5.
Alternative 2 : Press the " Cancel " button to end the Symbol Add operation. Do not continue.
5 . A preview image of the symbol you selected in step 3 appears on screen along with the Symbol Add window.
 |
The Symbol Add window lets you adjust the preview image of the symbol on the fly, prior to locating it on screen. |
Alternative 1 : Go to step 6 if you find the preview image acceptable; to adjust the preview image, do alternative 2.
Alternative 2 : On the Symbol Add window, enter the settings that you want applied to the preview image that is shown on screen. Go to step 6 when you are done.
Alternative 3 : Press the " Cancel " button on the Symbol Add window to end this operation. Do not continue.
Tip: Use Tab to move forward or Shift + Tab to move backward from one widget to the next (or previous). As you Tab out of " Scale " or " Rotation ," any change you made is automatically applied to the preview image. Also, there is an " Edit Symbol " button that can re-open the same X Edit window that opened in the previous step -- this lets you, for example, change " Special label settings ."
6 . Locate- Pan -Return mouse bindings become active along with various Locate options. The image shown on screen is a preview (except for color) of how the image will look when located.
|
|
|
bindings |
6a (optional) : Select the Locate option that you want (if it's not selected already).
6b : Place your mouse pointer (
) so that the point location target (
) snaps to the on-screen location where you want the symbol to be placed, then left-click ( Locate ).
7 . A linked copy to the original symbol file is placed where you located it, and a new preview image appears on screen. Locate - Pan - Return mouse bindings continue to be active along with the Symbol Add window.
|
|
|
bindings |
7a (optional) : Repeat step 6 (and optionally step 5) to place another symbol that is linked to the original symbol file. You may do this as may times as you like.
7b : Right-click ( Return ) when you are done. Alternative: " Cancel " also ends the operation.
Tip: Symbols located using this procedure can be instantly removed (one at a time, in reverse-order of their addition) by using Undo .
page 1 | contents | objects > symbols > | objects -- symbols | xxx add | symbols | top
 X Edit window for the symbol ( X = " Symbol name ") :
 |
To open the X Edit window for a symbol, you can Symbol Add to place a symbol, or you can Edit a symbol that has already been placed. |
| The name of this window ( Evu Bolt Quantity Edit ) comes from the " Symbol name " that was entered when Save As Symbol was used to create the symbol. " User-configured options " (" Quantity " in this example) appear on this window if special labels for symbols were a part of the original drawing that the symbol was created from. |
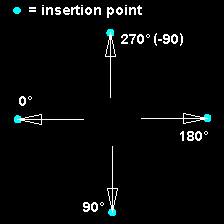
Rotation: Any positive or negative (-) number of degrees.
|
' 0 ' (zero) adds the linked copy of the symbol in the same orientation as the original symbol file it is linked to. A ' positive number ' rotates the symbol counterclockwise that number of degrees around its insertion point. A ' negative (-) number ' rotates the symbol clockwise that number of degrees. |
The insertion point: Before using Save as Symbol to save a drawing as a symbol, confirm that the drawing's reference point is where you want it. To do this on a standard detail, use Verify Reference Point . This reference point is the symbol's insertion point.
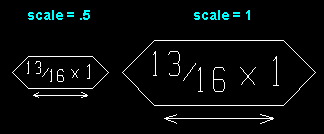
Scale: The scale of the symbol you are adding or editing. When you first Add a symbol, its default " Scale " is the " Drawing scale " of the drawing that the symbol was created from.
|
If you Symbol Edit to change a symbol's " Scale ," the symbol's label is automatically scaled in proportion with other components of the symbol. |
(Native: xxx) tells you the " Drawing scale " of the parent drawing (e.g., job standard detail) that this symbol was created from (using Save As Symbol ).
Layer: The drawing layer that the symbol you are adding or editing will be drawn on after you press " OK " to close this window. If that layer happens to be hidden (not marked " Show "), the symbol will disappear after the first Redraw .
![]()
Defaults: For an Symbol Add operation, the default selection (
) made here is the layer that was selected on the Layer Panel before you began this operation. For an Edit Symbol operation, the selection is the layer that the symbol is currently on.
User-configured options (special label settings) : " Quantity " and " face " are the " User-configured options " in the examples below.
| special label | original drawing | value entered | symbol as placed |
| ${face} |

|
|

|
| ${Quantity} |

|
|

|
"OK" closes this window and draws the symbol per this window's " Rotation " and " Layer " and " User-configured options ."
"Cancel" (or the Esc key or the
button) closes this window and ends the Symbol Add or Symbol Edit operation without changing the symbol.
page 1 | contents | objects > symbols > | objects -- symbols | xxx add | symbols | top
The Symbol Add window :
 |
The Symbol Add window opens in step 5 of the procedure that is outlined above. |
Current drawing scale: read-only . This tells you the scale of the drawing you are adding the symbol to. In other words, this is the scale of your current drawing.
Scale (Base 1 or Base 2) : The scale you want applied to the symbol you are adding. The scale is instantaneously applied to the preview image (when you press Tab or " Apply "). To locate the preview image, left-click ( Locate ) as described in step 6 .
|
Changing the " Scale " automatically scales the symbol's label(s) in proportion with the other components of the symbol. |
(Base 12) means imperial dimensioning is being used. Enter the number of inches on your current drawing that you want to represent 1 foot in the shop or construction site.
(Base 10) means metric dimensioning is being used. Enter the number of millimeters on your current drawing that you want to represent 10 mm on the actual materials.
Rotation: Any positive or negative (-) number of degrees. The rotation is applied to the preview image instantaneously (when you press Tab or " Apply "). To locate the preview image, left-click ( Locate ) as described in step 6 .
|
' 0 ' (zero) adds the linked copy of the symbol in the same orientation as the original symbol file it is linked to. A ' positive number ' rotates the symbol counterclockwise that number of degrees around its insertion point. A ' negative (-) number ' rotates the symbol clockwise that number of degrees. |
![]()
![]()
![]()
![]()
![]()
"OK" (or the Enter key) closes this window, but does not end the operation. The preview image remains on screen, and Locate- Pan -Return mouse bindings are active. Step 6 explains how to left-click ( Locate ) the preview image. Step 7 explains how to right-click ( Return ) to end this operation.
Note 1: You do not have to close this window in order to proceed with the operation. You can left-click ( Locate ) the preview image with the window still open. You can also right-click ( Return ) with the window still open.
Note 2: With respect to " Remember these values ," " OK " works the same way as " Apply ." See the discussion about defaults under " Apply ."
Tip: You can Undo to remove images that you have located.
"Cancel" (or the Esc key or the ![]() button) closes this window and ends the Symbol Add operation.
button) closes this window and ends the Symbol Add operation.
Note: Instead of hitting " Cancel ," you can right-click ( Return ) to end the operation.
"Apply" updates the preview image with the current setting for the field that you are in (" Scale " or " Rotation "), without your having to Tab out of that field.
"Edit Symbol" re-opens the X Edit window (where X = " Symbol name "). You might want to do this to adjust the " User-configured options " (special label settings) on that window.
" Reset " reverts the " Scale " and " Rotation " settings on the Symbol Add window back to the " Scale " and " Rotation " that were most recently set on the X Edit window.
page 1 | contents | objects > symbols > | objects -- symbols | xxx add | symbols | top


