 All Lifts Report (lift data from crane placements)
Tool summary :
- Outputs a report that provides lift information on all lifts in the model that have been assigned to crane placements.
Also see :
| Licensing: Crane Reports require a license. Without that license, commands found in the ' Model -- Crane ' group are not available in SDS2. |
- Crane placement (where lift data is stored)
- Lift Information (used in this documentation for comparison with this report)
How to output an All Lifts Report :
You need to have assigned lifts to a crane placement before you can output this report. To assign lifts to a placement, you can Assign Member Lifts or use tools such as Check/Assign Load Lift or Check/Assign Multi Lift .
1 . Use any one (1) of the following methods to begin output of this report.
▸ Home > Reports > System Reports > Cranes > All Lifts Report .
▸ Click the All Lifts Report icon. The icon can be taken from the group named ' Reports ' and placed on the ribbon. Ribbon configuration is done using Customize Interface .
2 (if applicable) : If your current Job has members in it which have not been assigned as lifts to a crane placement , you will get a yes-no warning message like the following:
|
Alternative 1 : Press the " Yes " button to output a report based on those lifts which have been assigned to crane placements. Go step 2.
Alternative 2 : Press " No " to cancel this operation. Do not continue.
3 . The All Lifts Report window opens.
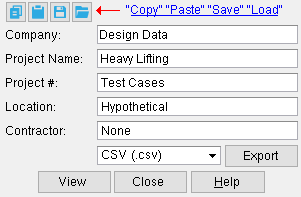
|
Entries made on this window to " Company " " Project Name " " Project # " " Location " and " Contractor " will be printed in the header of the All Lifts Report . Leaving " Company " and " Contractor " blank omits those fields from the report. |
Alternative 1 : Select the export format that you want, then press the " Export " button. You can select ' text (.txt) ' or ' CSV (.csv) ' or ' PDF (.pdf ) ' as the export format. A text file can be read by word processors and text editors. A CSV file can be read by spread sheet programs. CSV stands for "comma-separated values." A PDF file can be read by a web browser. PDF stands for "portable document format." Go to step 4.
Alternative 2 : Press the " View " button to output the report to the report viewer ( Output-Request Summary ). You can view the report on your computer screen, then optionally save it to a file. Go to step 4.
Alternative 3 : Press the " Close " button to close this window without outputting a report. Do not continue.
4 . After the All Lifts Report is output to the destination you selected in the previous step, a new All Lifts Report window opens. Follow the instructions for alternative 1 or 2 in step 3 to output another copy of this report to, for example, a different file type or different destination. Press the " Close " button when you are done outputting the report.
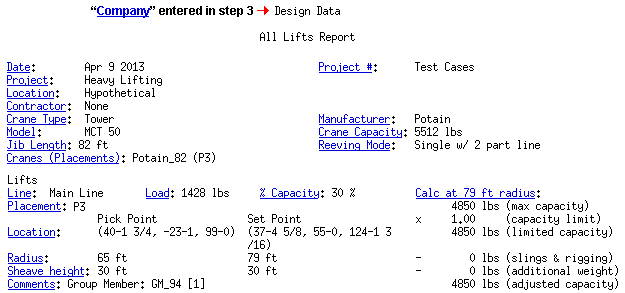
All Lifts Report
Date: The current date when this report was output. The date is filled in automatically.
Project: The " Project Name " that you entered in step 3 .
Project #: The " Project # " that you entered in step 3 .
Location: The " Location " that you entered in step 3 .
Contractor: The " Contractor " that you entered in step 3 .
Settings for a tower crane are on its Tower Crane window and on the Tower Crane Specification window for its particular manufacturer and model.
Settings for a crawler crane are on its Crawler Crane window and on the Crawler Crane Specification window for its particular manufacturer and model.
Manufacturer: This manufacturer of the crane whose specification you selected when you did the Add Tower Crane or Add Crawler Crane operation to add this crane.
Model: This manufacturer of the crane whose specification you selected when you did the Add Tower Crane or Add Crawler Crane operation to add this crane.
Crane capacity: The maximum capacity of the crane at the radius where the crane's capacity is the largest (e.g., at the minimum radius).
Jib length: The " Jib length " of a tower crane.
Boom: The " Boom " of a crawler crane.
Boom length: The " Boom length " of a crawler crane.
Reeving mode: The " Reeving mode " of a tower crane.
Cranes (Placements): The placements assigned to the crane described in the header of this section of the All Lifts Report .
Lifts
Line: The line used for the lift. See " Line " in Lift Information .
Load: The weight of the load. See " Load weight " in Lift Information .
% Capacity: The percentage of the crane's capacity that is the weight of the load. See " % Capacity " in Lift Information .
Placement: The crane placement that this lift is associated with.
Location: The X, Y, Z global coordinate of the pick point and set point are reported. See " Location " in Lift Information .
Radius: The horizontal distance from the center of rotation of the crane to the load hook while the crane is loaded and the load hook is in vertical alignment with the pick point or set point. This is reported for both the pick point and the set point of the lift. See " Radius " in Lift Information .
Sheave height: The sheave height is reported for both the pick point and the set point of the lift. See " Sheave height " in Lift Information .
For a member lift of one member, the first comment is the identity of the member (its member piecemark and member number ). See " Description " in Lift Information .
If the " Calc at radius " is for the pick point, the report will generate a comment that says, " Governed by pick point ."
Calc at radius: The adjusted capacity calculation at the set point or the pick point. See " Adjusted capacity calculation " in Lift Information .
If the calculation reported here is for the pick point, then the report will say " Governed by pick point ."

