 Base Grid Line (BSGL) ( Modeling )
Tool summary :
- BSGL stands for "Base Grid LIne." It can base a new grid line off of an existing straight grid line that you snap to.
- You can select BSGL when you do an Add Grid Line operation. After snapping to the new straight grid line (erection view) that you want, left-click ( Locate ) then enter the new view's name and specify a positive or negative distance that the new grid line will be from the existing grid line.
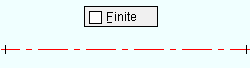
- If the grid line that is based off of is "
 Finite ", the new grid line will be finite also.
- See the example , the step-by-step instructions and the Add Erection View window .
Also see :
- Modeling (where BSGL can be found)
- Add Grid Line (tool for which BSGL is an option)
- Straight grid lines (created using BSGL )
- X-Y-Z display (displays angle of highlighted grid line)
- Constructing the 3D Model (topic)
- Rename Project Items (to change an erection view's name)
- Open (to open a view created using BSGL )
- Detail Erection Views (to create drawings of erection views)
Example of a grid of erection views :

|
The horizontal grid lines in this example were created by using BSGL to base off of grid line A. The vertical grid lines were created by basing off of grid line 1. |
Step-by-step instructions :
The following instructions assume that you are using a 3-button mouse.

|
1 . Invoke Add Grid Line , then select BSGL as the Locate option. |

|
2 . Place the mouse pointer ( |
|
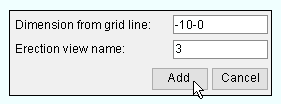
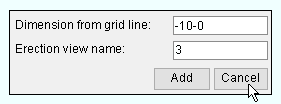
3 . On the Add Erection View window, enter the dimension from the erection view you are basing off of, name the view, select the type (not shown), then press " Add ." |

|
4 . The new view appears as a straight grid line in your current view. To view the model from this view, Open ( Ctrl + o ) the view by selecting its name. |
|
5 . Base a new erection view off of the last one that was added. Or press " Cancel " to close the Add Erection View window. |
The Add Erection View window (also see the step-by-step instructions ) :
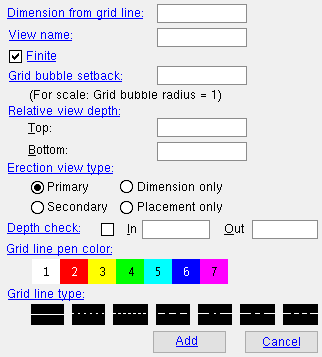 |
The Add Erection View window opens when BSGL is selected as the Locate option during an Add Grid Line operation. |
Dimension from grid line: The positive or negative (-) distance (in the primary dimension " Units " or other units ) that you want the grid line you are adding to be from the grid line you are basing off of. For vertical grid lines, a positive distance places the new grid line to the right of the line being based off of; a negative number places it to the left. For horizontal grid lines, a positive distance places the new grid line above the grid line being based off of; a negative distance places it below the grid line being based off of.
View name: The name (up to 61 characters) that you want to give the grid line.
Finite:
. A straight grid line added using Add Grid Line can be finite ("
VIDEO 
Double-clicking a grid line when the selection filter is ' Grid Lines ' or ' All ' opens the Edit Erection View window. The " Finite " option on that window is then turned on and off.
In a plan view: 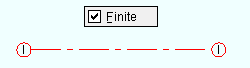
Vertical view height: The distance between the " Relative view depth " ' Top ' and ' Bottom ' elevations is the height that you will see when you Open ( Ctrl + o ) a finite grid line's elevation view. The elevation view accommodates the bottom elevations and the top elevations of all pieces of steel within its depth checking limits. In other words, the infinite grid line view's height is effectively infinite. Lateral view width: The distance between the two points located when the grid line being based off of was added is the view's width. In other words, the view's width is the length of the grid line minus the " Grid bubble setback ." The width of the grid line's view remains the same when its state is changed from " Depth check: The " In " and " Out " distances set for " Depth check ." In summary , the term "infinite" can be somewhat misleading. Regardless of whether a grid line is "finite" or "infinite," when you Open that grid line's view, you will find that the view's width is limited to the points located when the view being based off of was added. A plan view created using View > Plan View , on the other hand, is truly infinite -- that is, its extents expand to accommodate the steel that can be seen at that plan view's elevation. If this box is checked (
If the box is not checked (
Grid bubble setback: A positive number that is the factor by which the grid line will be extended in proportion to the diameter of its grid bubble. This applies when the grid line is "
VIDEO Add Grid Line is used to place three different finite grid lines, each with a different " Grid bubble setback ." Add Grid Line was named New View in pre-2015 versions of SDS2.
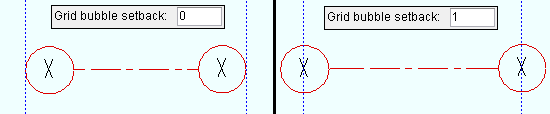
Entering ' 1 ' extends the grid line one grid bubble diameter -- half a grid bubble diameter at each end. Relative view depth: The range of elevations within which a plan view 's reference elevation must be in order for this finite grid line to be visible in that plan view. The " Top " elevation is the plan view elevation above which this grid line will no longer be visible. The " Bottom " elevation is the plan view elevation below which the grid line will no longer be visible.
VIDEO " Relative view depth " affects which grid lines and which members are shown in an erection view. To get grid lines to show in erection view drawings, the view must be detailed using " Annotate erection views ."
axes :

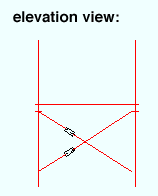
If you Open ( Ctrl + o ) a finite grid line in plan view, you will find yourself looking at an elevation view . Only members that are within the " Top " and " Bottom " elevations that are the specified " Relative view depth " will be shown in that elevation view. The " Depth check " settings for an elevation view also influence what members can be seen in a view.
Note: Finite grid line visibility within a plan view is independent of the plan view's " Depth check " settings. It depends only on whether the plan view's reference elevation is within the finite grid line's specified " Top " and " Bottom " elevations.
Also see: View > Reference Elevation can be used to discover the elevation of your current plan view. The " Elevation " decoration, which you can place on your toolbar, displays a plan view's elevation. Tools for changing a plan view's reference elevation are View > Plan View and View > Reference Elevation .
Depth check: The work plane of an elevation view is a vertical plane through the grid line. " In " is the distance that can be seen into the view from the work plane of the view. " Out " is in the distance that can be seen out from the work plane of the view.

depth check controls
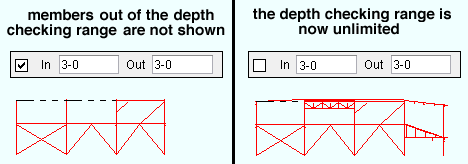
When this box is checked (
When the box is not checked (
Erection view type: Primary or Secondary or Dimension only or Placement only . Select the type of erection view according to how you want its straight grid line dimensioned when you Detail Erection Views and choose to " Annotate erection views ." Note: Locate options in Modeling such as INCL or INCM snap to points on erection views of any of these types.
Tip: You can, in Display Options , turn on or off the display of grid lines ( curved or straight ) based on their type (' Primary ' or ' Secondary ', etc.).
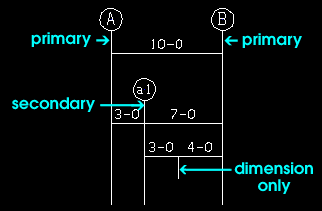
' Primary ' dimensions appear above ' Secondary ' dimensions. ' Dimension only ' erection views are auto dimensioned, but not with grid markers. ' Placement only ' erection views cannot be auto dimensioned (" Annotate erection views "). Grid line pen color: White or red or Yellow or Green or Cyan or Blue or Magenta . Press the button for the display color that you want to apply to the grid line that you are adding using BSGL. Since that grid line will always be a straight grid line , this sets the color of the grid line in Modeling only. Straight grid lines are not generated when you Detail Erection Views . They can be automatically dimensioned on erection view drawings, but are not themselves drawn.

Grid line type: The dash pattern of the straight grid line that you are adding using BSGL . Since the grid line will be a straight grid line , this sets the line type of that grid line in Modeling only.

The button that is pressed sets the line type (dash pattern) of the grid line that you are adding.

"Add" generates an erection view of the specified name, type and distance from grid line. Add Grid Line continues to be active, allowing you to add more erection views. Right-click ( Return ) when you are done adding erection views.
"Cancel" closes the Add Erection View window, but does not add an erection view or end the operation. The Add Grid Line tool continues to be active. Right-click ( Return ) if you are done adding erection views.

